“Without a good ear at the helm, you could find yourself musically adrift at sea”: Steve Vai shares his course on ear training for guitar players – the ultimate guide to improving your musicality

The following lessons appeared in Steve Vai's classic column, The Ultra Zone, which was first published in the December 2001 issue of Guitar World.
Introduction to ear training
I could never overstate the importance of a musician’s need to develop his or her ear. Actually, I believe that developing a good “inner ear” – the art of being able to decipher musical components solely through listening – is the most important element in becoming a good musician. Possessing a healthy imagination is a necessary ingredient for creativity.
But without the ability to bring those imagined sounds into the real world, one’s creative aspirations will remain debilitated. Training one’s ears to understand and recognize musical sounds and concepts is one of the most vital ways to fortify the connection between the musical ideas in one’s mind and the musical sounds created on one’s instrument.
All musicians practice ear training constantly, whether or not they are cognizant of it. If, when listening to a piece of music, a musician is envisioning how to play it or is trying to play along, that musician is using his or her “ear” – the understanding and recognition of musical elements – for guidance.
This is also true when trying to emulate a piece of music, or transcribe it, or even just finding inspiration in it. No matter what one is playing, one’s ear is the navigational device that steers the musical ship where it will go. Without a good ear at the helm, you could find yourself musically adrift at sea.
I've always been fascinated with looking at music written on paper. When I was in college, I took a class called solfege, which entailed learning how to sight-sing. Sight-singing is the art of looking at a piece of written music and singing it. First, you identify the key center, and then you sing the written pitches, using the “doe-ray-me” phonetic structure, just like that song in the movie The Sound of Music.
“Do-Re-Mi-Fa-Sol-La-Ti-Do” (pronounced “Doe-ray-me-fa-so-la-tee-doe”) represents a major scale; there are other monosyllabic sounds that represent the other pitches that reside within a 12-tone octave. These solfege classes in college were difficult courses, but they were well worth the time invested. A thorough study and analysis of solfege within the confines of this column would be impractical, so I can only encourage you to investigate it on your own.
All the latest guitar news, interviews, lessons, reviews, deals and more, direct to your inbox!
I’ve always considered transcribing to be an invaluable tool in the development of one’s musical ear and, over the years, I have spent countless glorious hours transcribing different kinds of music, either guitar-oriented or not.
The most well-known example of my guitar-based transcribing labors is The Frank Zappa Guitar Book (Hal Leonard), for which I transcribed, among other things, the entire Shut Up and Play Yer Guitar series of recordings. Many musicians, however, do not have the ability to pull the sounds – guitar solos, rhythm parts, melody lines, etc. – off the records that they love. Transcribing is an art that takes a lot of practice and a study that I encourage everyone to experiment with.
But fear not: you do not need to have the ability to sight-read or transcribe in order to practice ear training exercises. If you are just sitting there with a guitar, there are still a great many ways to develop your ears, in the quest to strengthen the connection between your head and your fingers. Below, I have outlined some of the ways a guitarist can work on ear training exercises using just the guitar.
As guitarists, there are certain things that most of us do that are simply part of the program: we learn some scales, develop some exercises intended to improve our physical abilities, work on chord forms on different parts of the neck, etc. I believe it is extremely important to put aside some time dedicated solely to focusing on ear training.
One of the easiest ways to begin working on ear training is to sing what you play. For example, you can play a C major scale (C D E F G A B) in any position – preferably one that is physically comfortable for you – and sing each note of the scale as you play it, being very careful to sing on pitch as accurately as possible.
Start with one note: play the note, sing it, and then play and sing the note simultaneously. Then go to two notes. Once you feel comfortable, take a little piece of that scale, say, the notes C, D, E and F, and create a very simple melody with these notes for you to sing simultaneously, à la jazz guitarist George Benson.
This is an easy way to get your ear in sync with the sounds your fingers are creating. Whether you’re soloing over a rhythmic vamp or are playing alone in free time, you have to really stick with it, and don’t allow yourself to slip up or drift into something else. The idea is to endlessly improvise and sing what you are playing, using any key.
This is an exercise in discipline: do not play anything that you cannot follow perfectly with your voice
Another good thing to do is to record a simple one-chord vamp to play over. First, only play/sing notes that fall within the key, staying within a basic note structure of a five-, six- or seven-tone scale. Don’t start wandering off into your favorite guitar licks to play; save that for another time, when you’ve developed your ear to the point where you can sing just about anything you can play.
This is an exercise in discipline: do not play anything that you cannot follow perfectly with your voice. Whether you stay within one octave of the guitar, or you sing the notes an octave lower than the sounding pitches, or you use falsetto to hit the high notes, you must be able to recreate all of the notes played on the guitar with your voice.
If you work on this every day, you’ll find yourself getting better and better at it, and it will become easier to do. The cool thing that happens is that you’ll begin to hear music more clearly in your head, allowing you to formulate musical ideas – write music – within your head, without the aid of a guitar. When you finally do pick up the instrument, you will discover that you will instinctively be able to play these ideas that have taken form in your mind.
To take this a step further, try this exercise: without a guitar at your disposal, picture the guitar’s fretboard in your mind, and then envision playing something so that you will “hear” and “see” the notes as they are played. It may be helpful to sing the notes as you imagine them being played.

This is an excellent exercise that will fortify your mind-fretboard relationship and actually improve your ear by strengthening the acknowledgment of “pitch relativity” (how one pitch relates to another, in terms of sound and placement) on the guitar’s fretboard. You may discover some cloudy areas in your mind’s eye/ear, but if you work through it, the picture will soon become clearer and clearer.
These techniques do not address the act of playing one thing on the guitar and singing something completely different. Someone like Jimi Hendrix had the uncanny ability to play very complex rhythm parts and single-note riffs while singing complementary parts. This technique requires a whole different set of brain muscles and is very difficult for many players.
Playing one thing while singing another must be worked on as an independent field of study. If I could play the guitar and sing at the same time, hey, I might have a career!
Singing the notes you play on the guitar
A valuable method of training your ear is to practice singing the notes that you play on the guitar. I’d like to elaborate on this fun approach and offer you some specific advice on how to go about doing this on your own.
A good way to start this training method is to stay within one scale and key and make sure that you can follow with your voice any melodies or licks that you play. Obviously, you can only sing one note at a time, so you’ll probably want to stick with playing single notes, at least for now, so you can zero in on specific pitches.
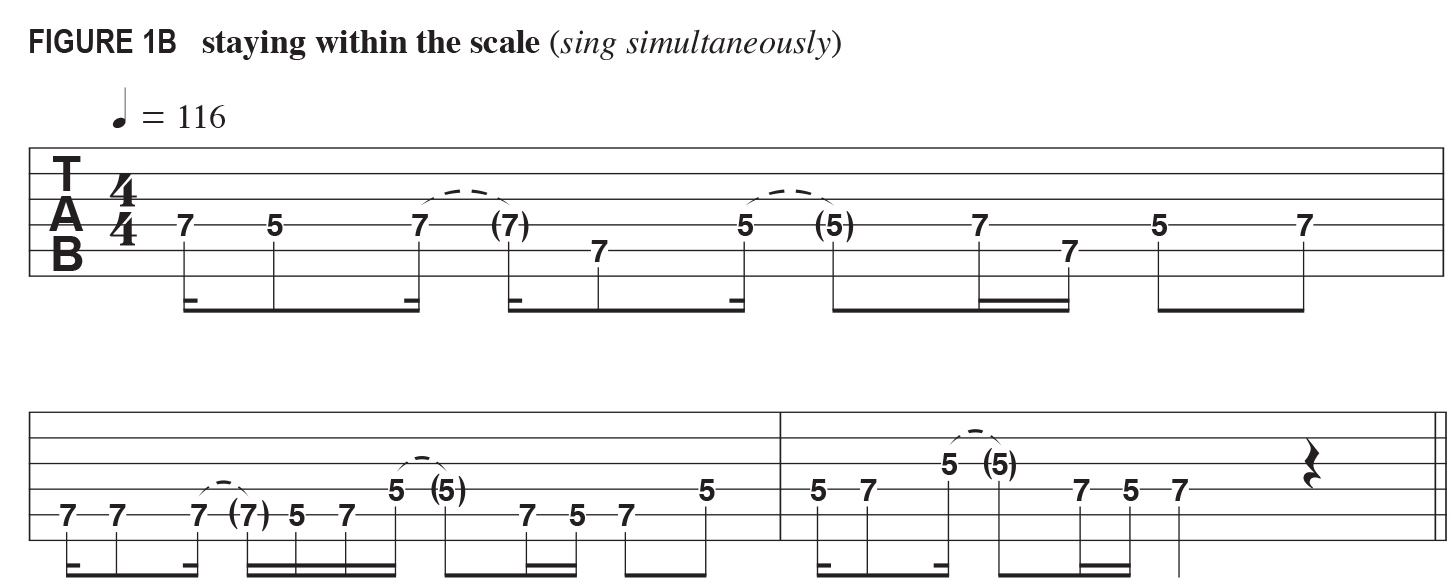
Let’s say you’re using the A-minor pentatonic scale, illustrated in FIGURE 1A, as your starting point. FIGURE 1B is an example of a line to play and sing simultaneously. This drill can be challenging, but it’s ultimately rewarding.
The next level of this exercise is to venture outside the fixed structure of one scale and add chromatic “passing” tones – the notes that fall between the scale degrees – to the lines you’re trying to sing and play.
FIGURE 1C is an example of how you might go about doing this within the A-minor-pentatonic pattern we just looked at. Venturing away from the fixed structure of the diatonic key presents a great challenge to your ears and will strengthen your “pitch-recognition muscles” immensely. If you practice this drill every day, you’ll be pleasantly surprised at how quickly your ears will “grow”.
An essential element in ear training is the thorough understanding of intervals. An interval is the distance or gap between two notes: if you start on an A note and go up two frets to B, the intervallic distance between the two notes is a major second. If you were to go up four frets from A to C#, the interval between these two notes would be a major third.
FIGURE 2A depicts the A-major scale and indicates the intervallic relationships between the tonic (root note) and all the other notes in the scale. FIGURE 2B shows the chromatic scale, starting on A and covering an octave and a half, with the intervals indicated.
I highly recommend memorizing all of these intervallic relationships; a good way to do this is to recite each interval name while playing the notes of the scale.
There are many different exercises one can do to strengthen interval recognition. Here’s one that I like: get a tape recorder and record yourself playing pairs of notes, using root notes combined with either major or minor thirds, as illustrated in FIGURE 3A.
Play random pairs of major or minor thirds all over the guitar neck and, after each pair is played, wait a moment and then say either “major” or “minor” to identify the interval.
After filling up a 60-minute tape with this random stuff, listen back and try to identify the intervallic relationship by saying “major” or “minor” before your voice on the tape provides the answer. The purpose of this exercise is to train yourself to quickly identify major and minor intervals in all keys, anywhere on the guitar.
The next step is to proceed to other intervals, such as fourths and augmented fourths, which are one half step (one fret) higher than fourths. FIGURE 3B shows random pairs of fourths and augmented fourths; again, fill a 60-minute tape with pairs of notes, then go back and try to identify the intervallic relationships.
Another idea is to make a tape of fourths combined with major and minor thirds, or fourths and augmented fourths combined with major and minor thirds. Then, continue this approach using all of the intervals in different combinations.
Another good exercise is to play every type of interval against a fixed root note. For example, if you choose the key of B, begin by playing a low B, and then play a variety of higher notes against this low B. After the higher note is played, identify on the tape what the interval is, and then move on to another interval. This type of exercise is illustrated in FIGURE 4.
By the time you’ve gotten this drill down cold – to the point where you consistently attain a near-perfect score – you will have established a firm grasp of intervals. You may have to make three or four 60-minute tapes, each in a different key, but, in time, you’ll end up knowing this stuff inside out. The study of intervals is something that many musicians work on their entire lives.
Ear training techniques using chords
My first two ear training columns outlined a variety of techniques intended to strengthen your note-recognition abilities, using the guitar as an ear training tool. Now, I’d like to turn you onto some ear training techniques that use chords.
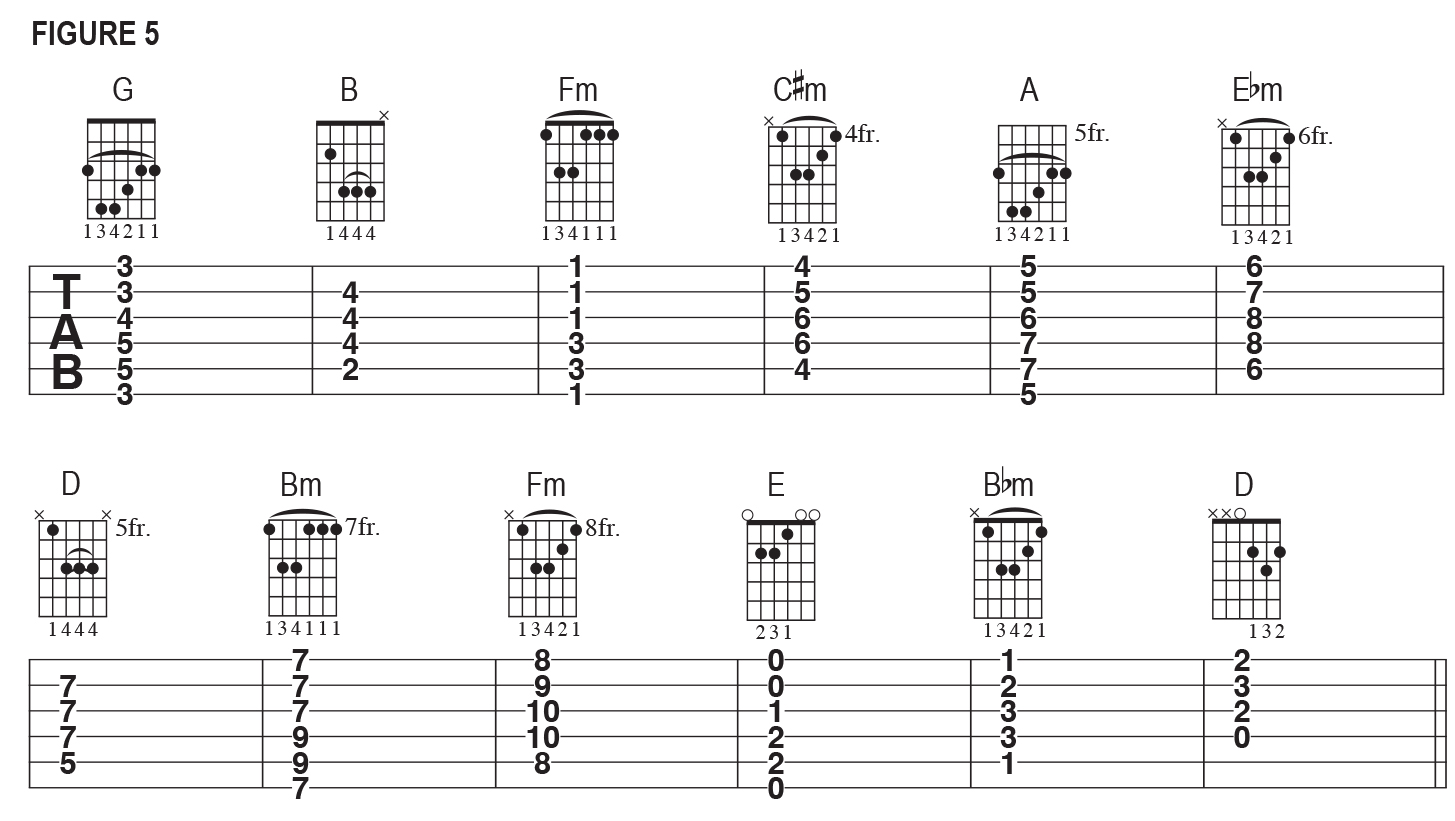
Let’s begin by playing a series of random major and minor chords all over the neck, which we’ll record with a tape machine. First, play either a major or a minor chord in any key, anywhere on the neck, wait a moment and then identify on the tape either the chord type, i.e., major or minor, or, if you’re more ambitious, the chord name, i.e., G major, B minor, etc.
FIGURE 5 illustrates a short series of randomly chosen major and minor chords. Fill a 60-minute tape with random minor and major chords, and then listen to it, doing your best to identify each chord type or chord name before your voice on the tape is heard. No cheating by using the guitar to find these chords! Rely on your ears, make your best guess, and only then use the guitar to see if you are correct.
If you’re only identifying “minor” or “major”, this exercise is still valuable in that you’re focusing on harmony and chord quality. If you take it a step further and identify the actual chord names, you’ll fortify your ability to identify root notes as well as harmony. This will get you started on the road to identifying the chord progressions you hear on records, when jamming, at a concert, etc.
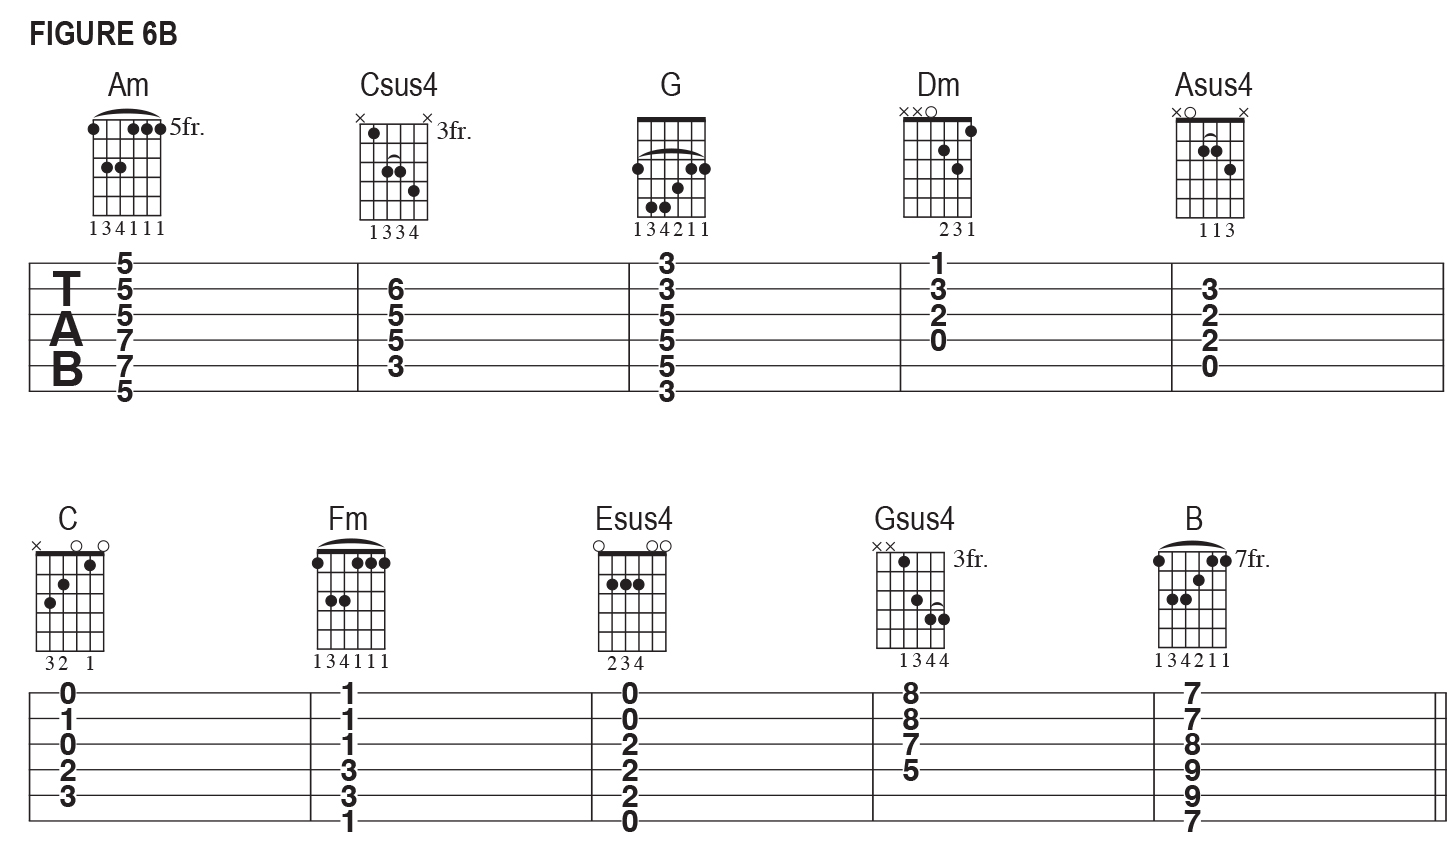
You can expand this exercise by adding suspended chords to the mix. FIGURE 6a indicates a few different ways to play suspended chords: in the first three chords, the root notes are located on the sixth and fourth strings; in the second three chords, the roots are located on the fifth and third strings; in the last three chords, the roots are located on the fourth and second strings. Memorize all of these different suspended-chord voicings.
FIGURE 6b illustrates a sequence of randomly chosen major, minor and suspended chords. You can start by recording this example or, better yet, make up your own!
An important thing to remember is to not make these exercises too difficult for yourself. If you make them inordinately tricky or complex, you may only succeed in becoming discouraged. Start out with simple stuff, and gradually progress to chord changes that are more unusual or difficult.
Once you feel you’ve become accustomed to identifying major, minor and suspended chords, expand on the idea by including more complex chord qualities. A good place to start is by adding “tension” tones, such as major sevenths or dominant sevenths to major and minor chords. FIGURE 7 depicts an arbitrary sequence of major, minor, major seventh and minor seventh chords.
When you can correctly identify all of these chord names and chord types just from hearing them, you’ll be pleasantly surprised at how much the proverbial bar has been raised on your overall musicianship. Having this harmonic ear-training skill will positively affect your approach to composition, soloing and comping (rhythm guitar) and will give you a whole new appreciation of the structure of music.
To further enhance your ear training study, bring interval recognition into the equation: pick a chord and arpeggiate it (pick each note of the chord individually and in succession). Wait a moment, and then identify each interval in the chord. FIGURE 8 illustrates this type of exercise. The possibilities are endless; you can incorporate millions of chords, depending on how great a challenge you wish to give yourself.
All of the ear training exercises I’ve outlined in the last three columns are ones that I have spent hours and hours doing back when I was a teenager. There is no doubt that this is time-consuming hard work; you may find yourself becoming overloaded or frustrated. If this becomes the case, take a break and go do something else for a while. But the benefits to be reaped from this type of independent study are tremendous and will stay with you forever.


