The Basics and Beyond: An In-Depth Guitar Lesson by Steve Vai
Grab your guitar and sit down for a comprehensive, GW-exclusive guitar masterclass taught by Steve Vai.
All the latest guitar news, interviews, lessons, reviews, deals and more, direct to your inbox!
You are now subscribed
Your newsletter sign-up was successful

People are turned onto the guitar in different ways. A lot of it might have to do with who you are hanging out with, or if you have a brother or sister that plays the instrument, or you might have seen someone playing it. There are so many different styles of music to play and to be interested in.
First and foremost, I think one’s attraction to the instrument needs to be very organic. Perhaps your goal is to be a world-class virtuoso, or maybe you just want to play some songs. The guitar has so many dimensions to it. There are two “levels” that you may want to consider looking at, which, to me, need to be in balance—this is true in the life of any musician. One is the technical side, which includes your tone, the way you touch the instrument, your facility, your intonation and your “language,” meaning the way you communicate your connection with the instrument. That takes a certain amount of practice, study and focus. The deeper dimension of playing an instrument involves connecting with the musical voice inside of you and developing a way to let it seamlessly and effortlessly flow out of you.
Where the balance sits between these two things is different for different people. Some players need a lot of technique to get their point across—like me, for instance. I was always attracted to the idea of being able to play relatively effortlessly; it was just a feeling that I had before I even started playing. But I was also very interested in the academics: technique, music theory and that level of musical study. Two levels: the music that is inside of you and your unique musical voice; and the mechanics of getting it out. Musicians have to find the balance that works best for them.
What I often see in young people is some sense of confusion and frustration, often because they are told how much they “need” to know in order to play their instrument. To me, much of this is unnecessary. You don’t really need to know much at all. It should be based on what you are interested in.
The most important thing in the career of any musician is the ability to listen. We will get into a few ways in which one can address the ability to listen, and to “hear” music in the most effective ways. I am sometimes reluctant to give direction, because each of us has the potential to have a very unique sound, touch and technique on the instrument. Sometimes, too much direction will go against the grain of one’s natural inclinations. That said, there are a handful of things that I can point out to players who have just picked up the instrument but do not yet know the function of it or how they are going to learn to be creative with it.
If you were to prioritize, the first thing is to decide what kind of music you’d like to play. Anything is fine. There are no rules in that regard: you may want to play like another guitarist, or you may want to find your own unique voice, or you may just want to play simple songs. Whatever your penchant is, it’s fine. The next step is to figure out how to play a song that’s in line with those criteria.
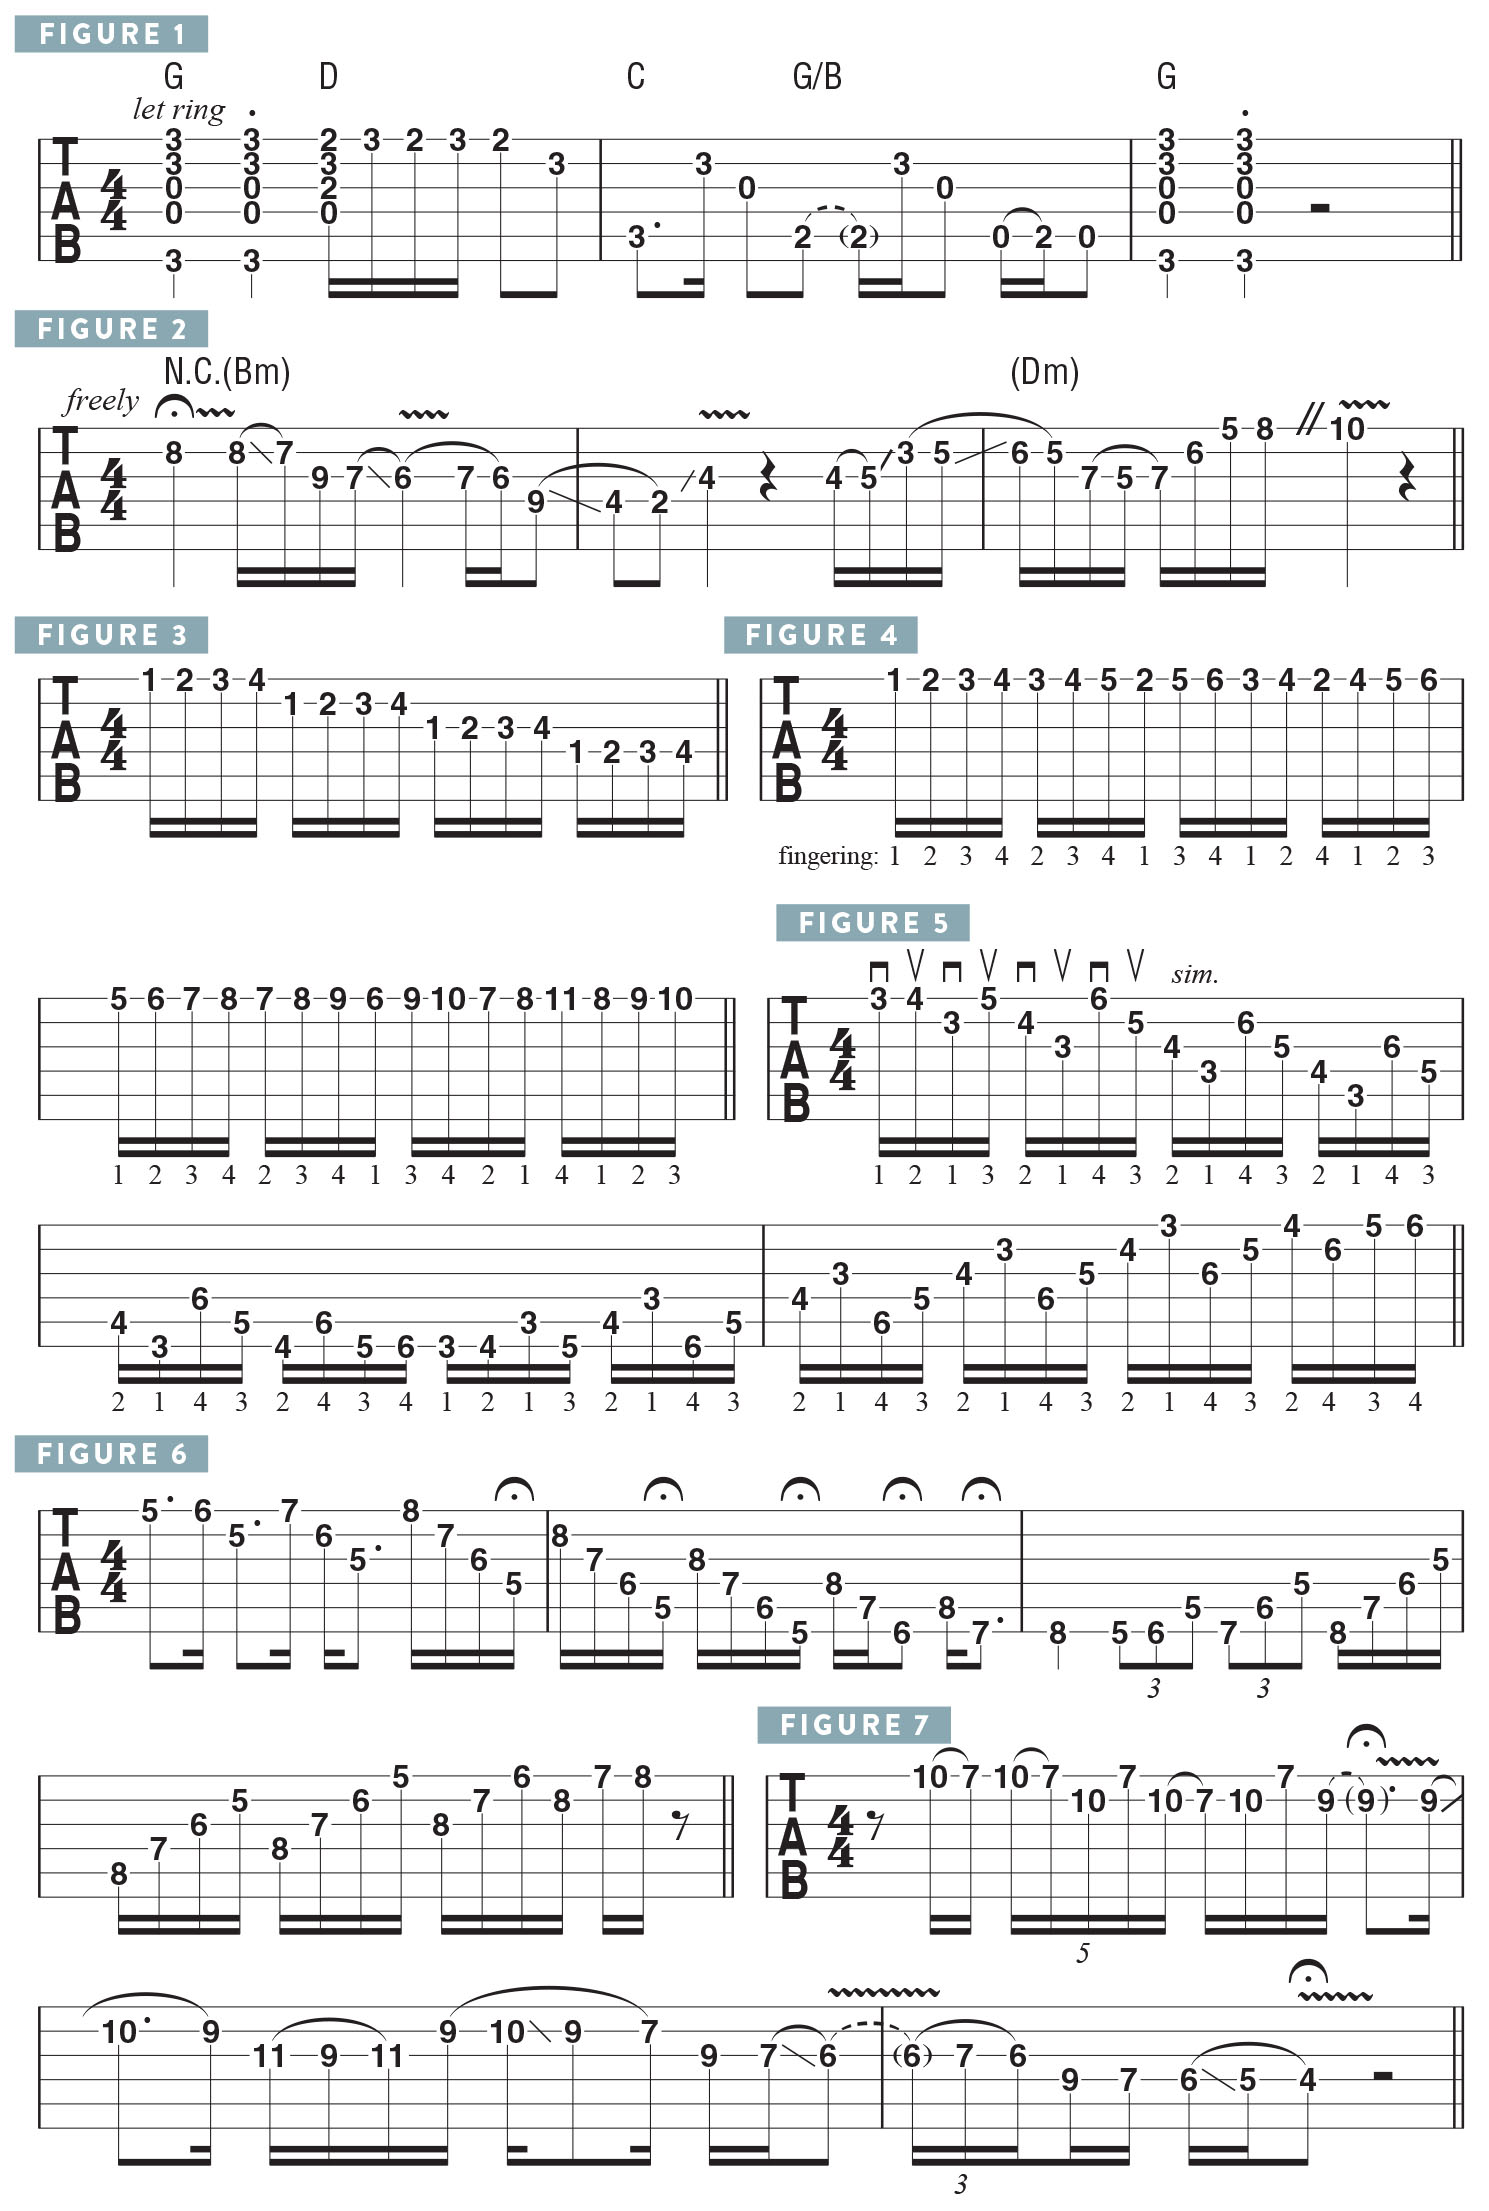
One of the first songs I ever learned to play was this (FIGURE 1), which is built around simple open chords. Once I got serious about the guitar, my approach, my method for learning, was really intense. That was the approach I needed to take, but that doesn’t mean it would be the best approach for everyone. I’d play guitar all day and make up lists of what to work on, such as three hours of scales.
All the latest guitar news, interviews, lessons, reviews, deals and more, direct to your inbox!
Picking up the guitar and simply playing a riff is a great way to immediately feel like you’re accomplishing something. For me, it was riffs like Deep Purple’s “Smoke on the Water” or Led Zeppelin’s “Heartbreaker.” Try to get a song going, because it feels good. I remember the first time I played the opening lick to Zeppelin’s “Since I’ve Been Loving You,” and I thought, I’m playing music! It’s exciting!
The amount of time you put into playing will be directly reflected in your command of the instrument. The last thing you want to do is to feel like you have to put in more time than you are comfortable with, because you’d be pushing yourself to do something uncomfortable. The truth is, if you want to be a virtuoso player, you won’t have to push yourself to practice; it will come more naturally to you. And you will see results quickly, which provides the inspiration you need to push further and further. Whatever you may be practicing—scales, chords or any element of musical learning—the most important thing is listening. When you listen, you are strengthening your connection to the instrument.
TECHNIQUE
An Essential Aspect of one’s technique is tone. Tone is something that you have to experiment with. My tone has developed and changed over the years, based on how I listened. It’s in your head; the way you want to “hear” the note will force your fingers to massage the note a particular way. There are a plethora of exercises one can do to get your fingers connected. Something I did often when I was younger was to watch my hands in the mirror as I practiced, because I knew how I wanted my playing to look, which has an impact on how natural it feels. I always wanted everything to look nice and elegant. I’d play something like this (FIGURE 2) to help develop my vibrato, among other things. The goal was to use economy of motion, with smooth execution and no wasted energy.
A great exercise for working on economy of motion is to simply move from the index finger to the pinkie on consecutive frets, moving across all of the strings, like this (see FIGURE 3). You need to listen and focus and be sure every note sounds good. Experiment with picking techniques too, because there are so many ways to “color” a note, depending on how you pick, whether it’s with a sharp attack down by the bridge, or a soft attack closer to the neck, and every variation in between. And if you feel frustrated at all, the thing to do is relax. It’s all too easy to build up tension, so just take a breath and a moment, and then start again. When you do this, you will never get bored with playing. So, try this consecutive fret exercise on every area of the fretboard, striving for consistency in sound.
Here’s a great permutation of the previous drill (FIGURE 4): I begin with the fretting fingers 1-2-3-4, and then change the sequence to 2-3-4-1, 3-4-1-2 and 4-1-2-3 as I ascend the board, one fret at a time. It should sound connected, even and legato—smooth—the entire time.
I used to try to devise every kind of fingering exercise imaginable. Here’s a similar one that is great for building up your picking accuracy (FIGURE 5). The consecutive movement between fretting fingers is now configured with one note played per string, using a pattern in bar 1 that ultimately results in 4-3-2-1 across descending adjacent strings, and then, in bar 2, 4-3-2-1 across ascending adjacent strings. You have to go slow; if you make a mistake, go back and start again, and make sure you don’t get ahead of yourself. You need to lay down a solid foundation. Here’s the exercise moved up to fifth position (FIGURE 6).
Put your attention in the sound of every note. Through listening, you can mold and shape the sound of each note with your intention. Another important aspect is the angle at which your fretting fingers come down onto the board. I like my fingers on a slight diagonal, as opposed to straight above/fingers parallel to the frets as classical players do. If I play a lick like this (FIGURE 7), the diagonal attack works better for me. Also, comparing standing up to sitting down when you play, because the way the instrument feels is very different with each of these two different postures. If you only sit when practicing and then do a gig where you have to stand—surprise!—things won’t feel and work the way you think they will. This is all fret-hand elegance. The goal is economy of motion and fluidity.
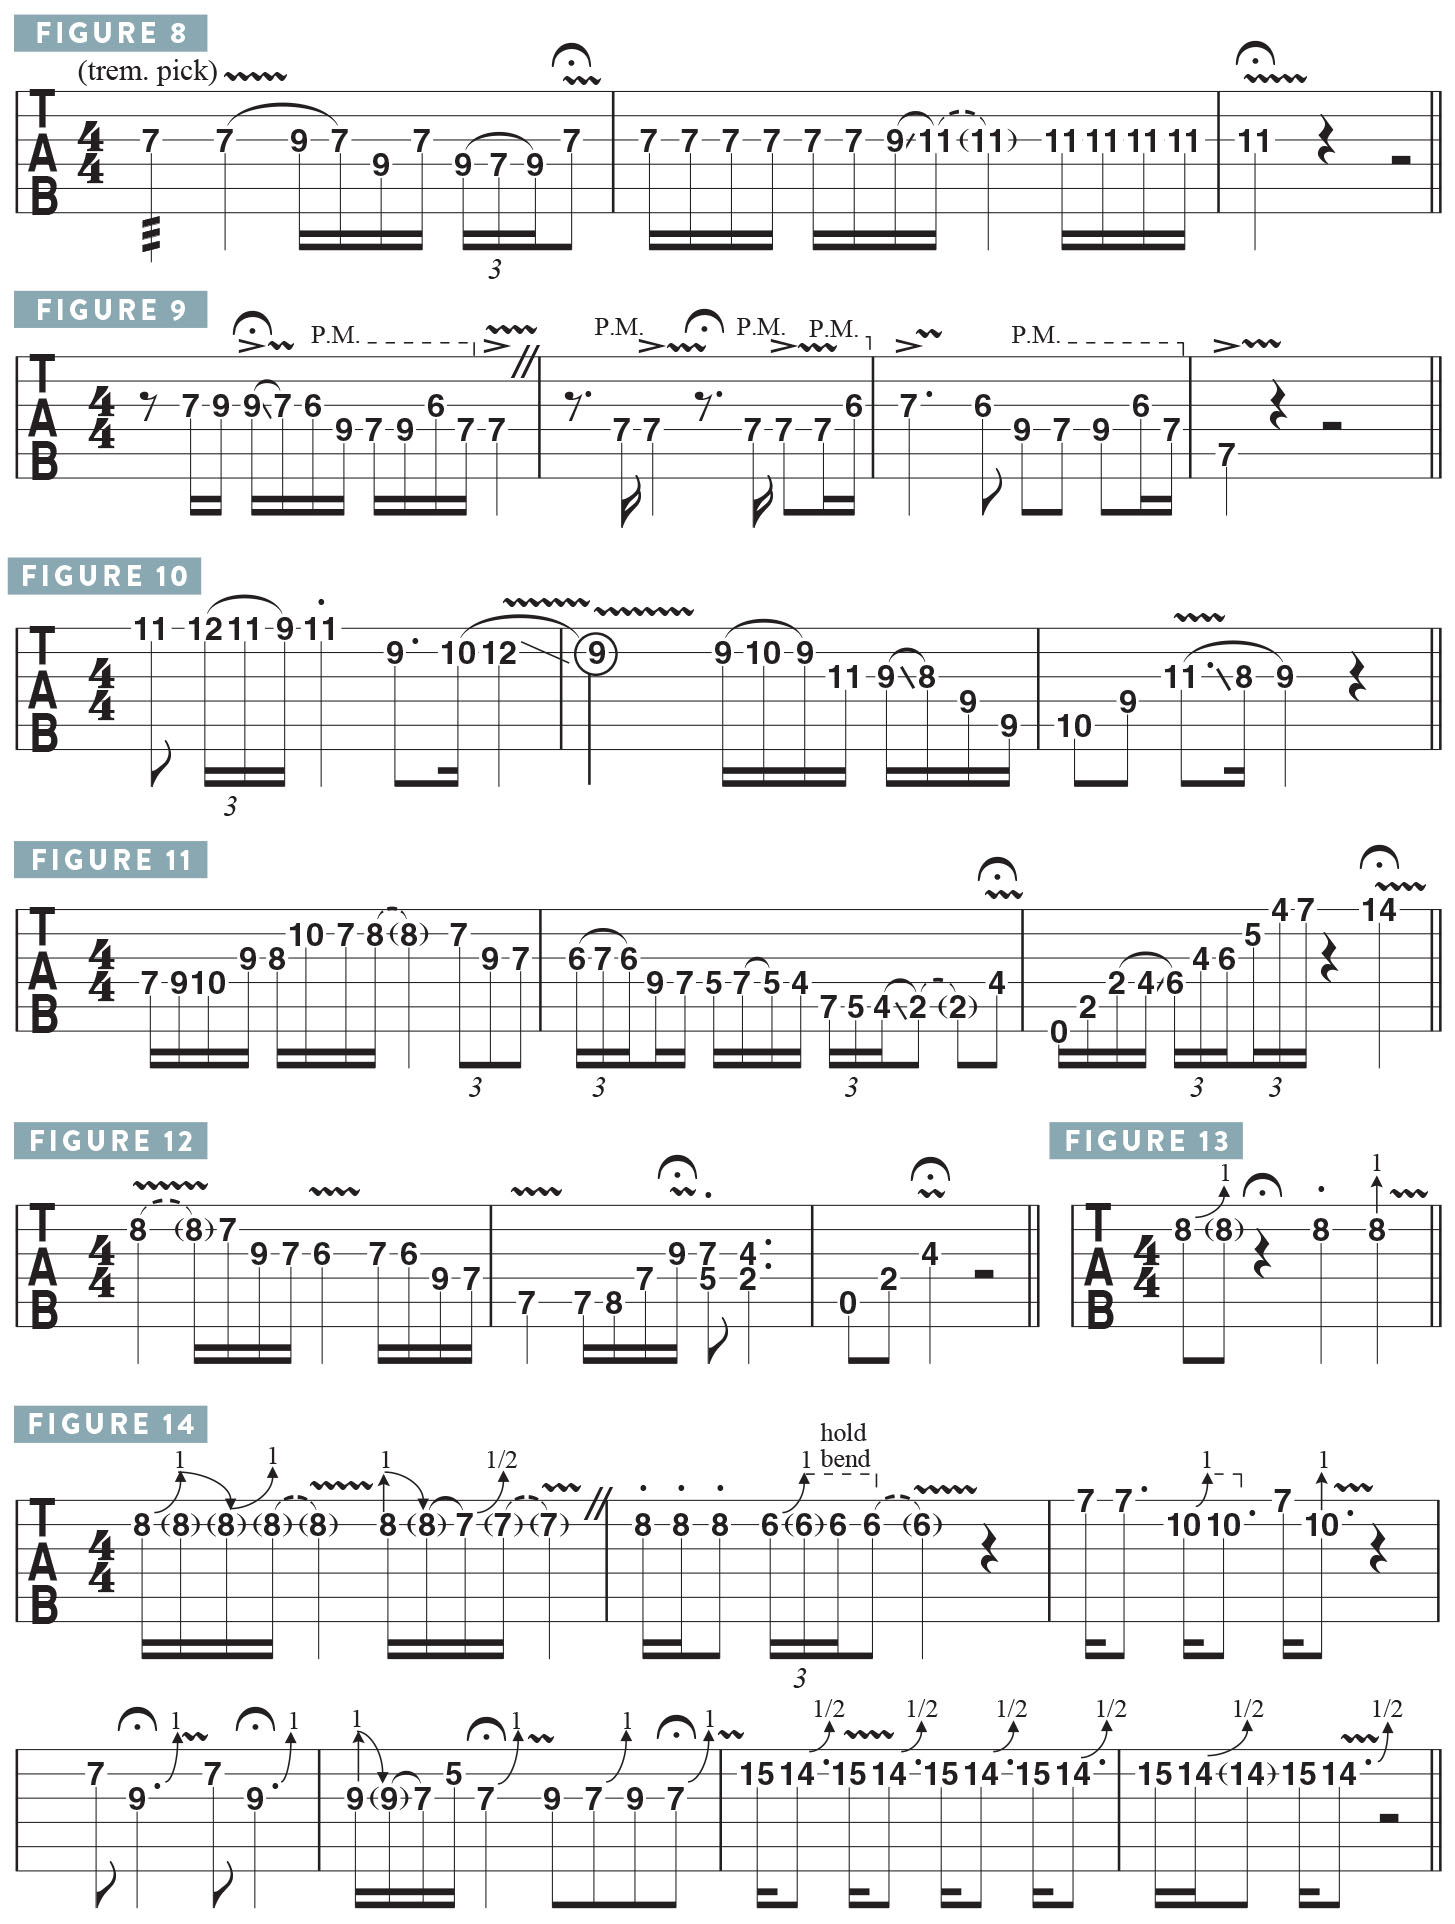
Picking needs to be experimented with, too. Every guitar player picks a little differently. There are different techniques, like moving the wrist back and forth, either “floating” or resting your forearm on the guitar’s body, moving the entire arm, or anchoring one or more pick-hand fingers to the pick-guard. For me, I move the joints of my fingers slightly while I pick. If I tremolo pick (FIGURE 8), I am sure to keep the hand relaxed, and I listen for the tone.
Dynamics—contrasts in volume and texture—are very important, in how you articulate a note and move from one type of articulation to another (FIGURE 9). Is it staccato—short and sharp—or sustained and vibrato-ed? Every note in this example has a different velocity in the pick attack, so you should practice the “feeling” of a note while practicing the other elements of playing. In this example (FIGURE 10), the melody of the line dictates the dynamics that best serve the musical feeling.
There is a developmental period of time, when you’re getting your technique together, in which you have to focus intently on each element: picking technique, sound, dynamics and what note, until it feels natural and you don’t have to think about it anymore. The tightness with which you grip the pick has a lot to do with the quality of the sound, too; the best thing is to hold the pick as lightly as you can, where it almost is falling out of your fingers (FIGURE 11). Then you can alter the tightness of your grasp on it to shape the sound in different ways.
Two things that may seem esoteric are 1) watching your hands in the mirror as you play; 2) recording yourself, and critiquing these things. You have to be careful when you critique, too. What do you want to see, and what do you want to hear? A visualization has been created, and there’s no way that it’s not going to come out on the instrument and be realized in your playing. These are the basic elements to developing your tone: first, listen with your “inner ear.” Second, focus on technique, making sure every note is its own entity, and then you experiment with the picking technique and the tones that are produced based on those two variables.
Intonation—playing in tune—is essential, too. When you hit a note, it must be true and in tune, whether it’s fretted normally or vibrato-ed. This is especially true with vibratos and bend vibratos—you have to be aware of the intonation of the pitch you’re producing and manipulating (FIGURE 12).
STRING BENDING
Control of bending, or stretching, strings is essential, too. What I used to do, and still do, when practicing is to take one technique and focus intensely on it, for an hour without disruption. It’s so important to put the time in to make sure you’re bending to the right notes.

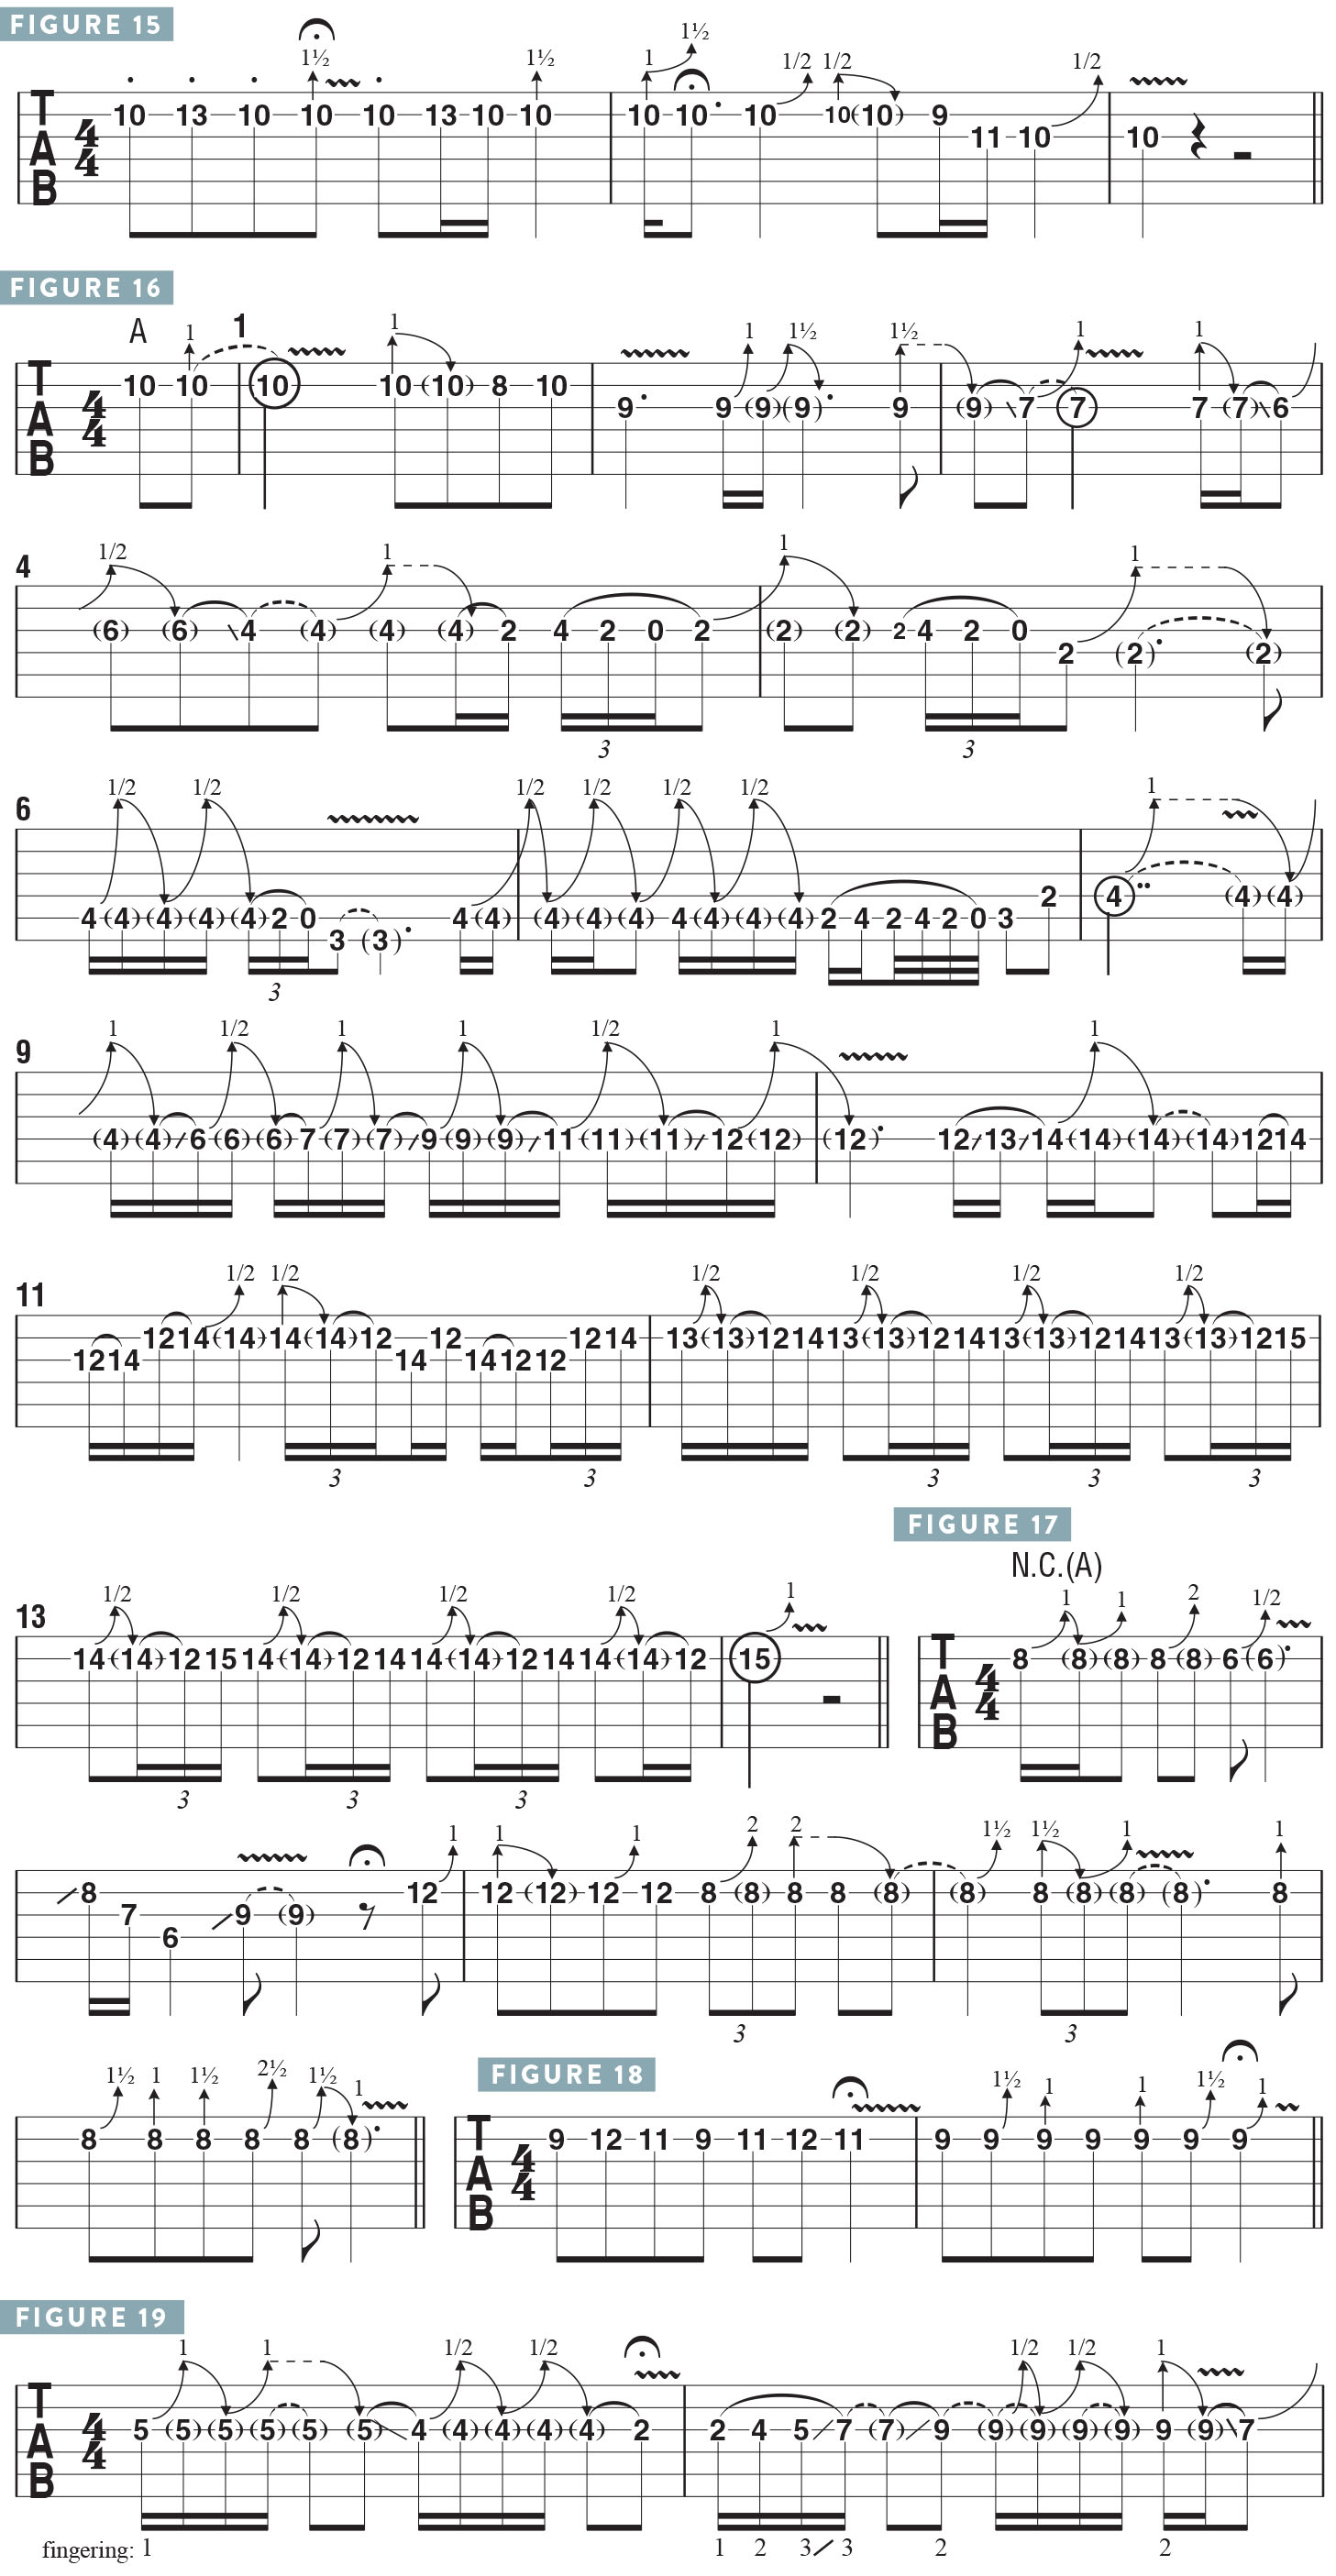
The best way to get power behind a bend is to line up two or three fretting fingers on the string and push with all of them. This will ensure stability in your string bends, with a side-to-side motion (FIGURE 13). When bending, without the assistance and support of the other fingers, the intonation usually is not there. The fingers, wrist and arm work together, which is especially useful when fretting the bends with only two fingers, or one. I used to sit for hours and hours, fretting a note and then bending up to that note from a lower fret, listening for precision in intonation (FIGURE 14). I’d then practice three-fret bends and one-fret bends (FIGURE 15), applying vibrato after the apex of the bend is reached.
Put limitations on your practice parameters; for one hour, focus exclusively on precision bending, and then practice making every element of the technique sound like music (FIGURE 16). You can’t sound like you’re struggling, either—you have to get to the point where it sounds natural and relaxed.
There’s a song on the album Modern Primitive called “Dark Matter,” in which I perform the melody with all of these weird stretches (FIGURE 17). It took me forever to get the microtonal bends in the last part just right! You can take a melodic phrase and play it normally and then articulate it with bends only (FIGURE 18). No other technique will give you that specific type of sound. Be sure to practice string bends with every fretting finger too (FIGURE 19).
VIBRATO
The soul of the note is the vibrato, and this essential technique must be practiced intently. The conventional “rock and roll” vibrato is an up-down-up-down movement, pulling the string up and down in even movements. You must focus on vibrating the correct note, with attention once again to proper intonation. You can move the string down a little and up a little (FIGURE 20), or side-to-side, as a classical violinist would do. I use a circular vibrato, which is a mixture of the two.
It’s very important to have control over your vibrato. So, practice all of the different varieties, and some of the parameters of vibrato are depth, width and speed. On really big vibratos, like Zakk Wylde’s, he’ll vibrate a G note and bend it up a whole step to A. Practice vibrato with every fretting finger on every string in every position. When I vibrato on my B or high E string, I can’t do my circular vibrato as well because there’s less fretboard under the string. Having control over the speed of the vibrato is a delicious thing, too, but it takes practice. It’s more of a state of mind than a control of the muscles; the muscles will react based on what you’re listening for.
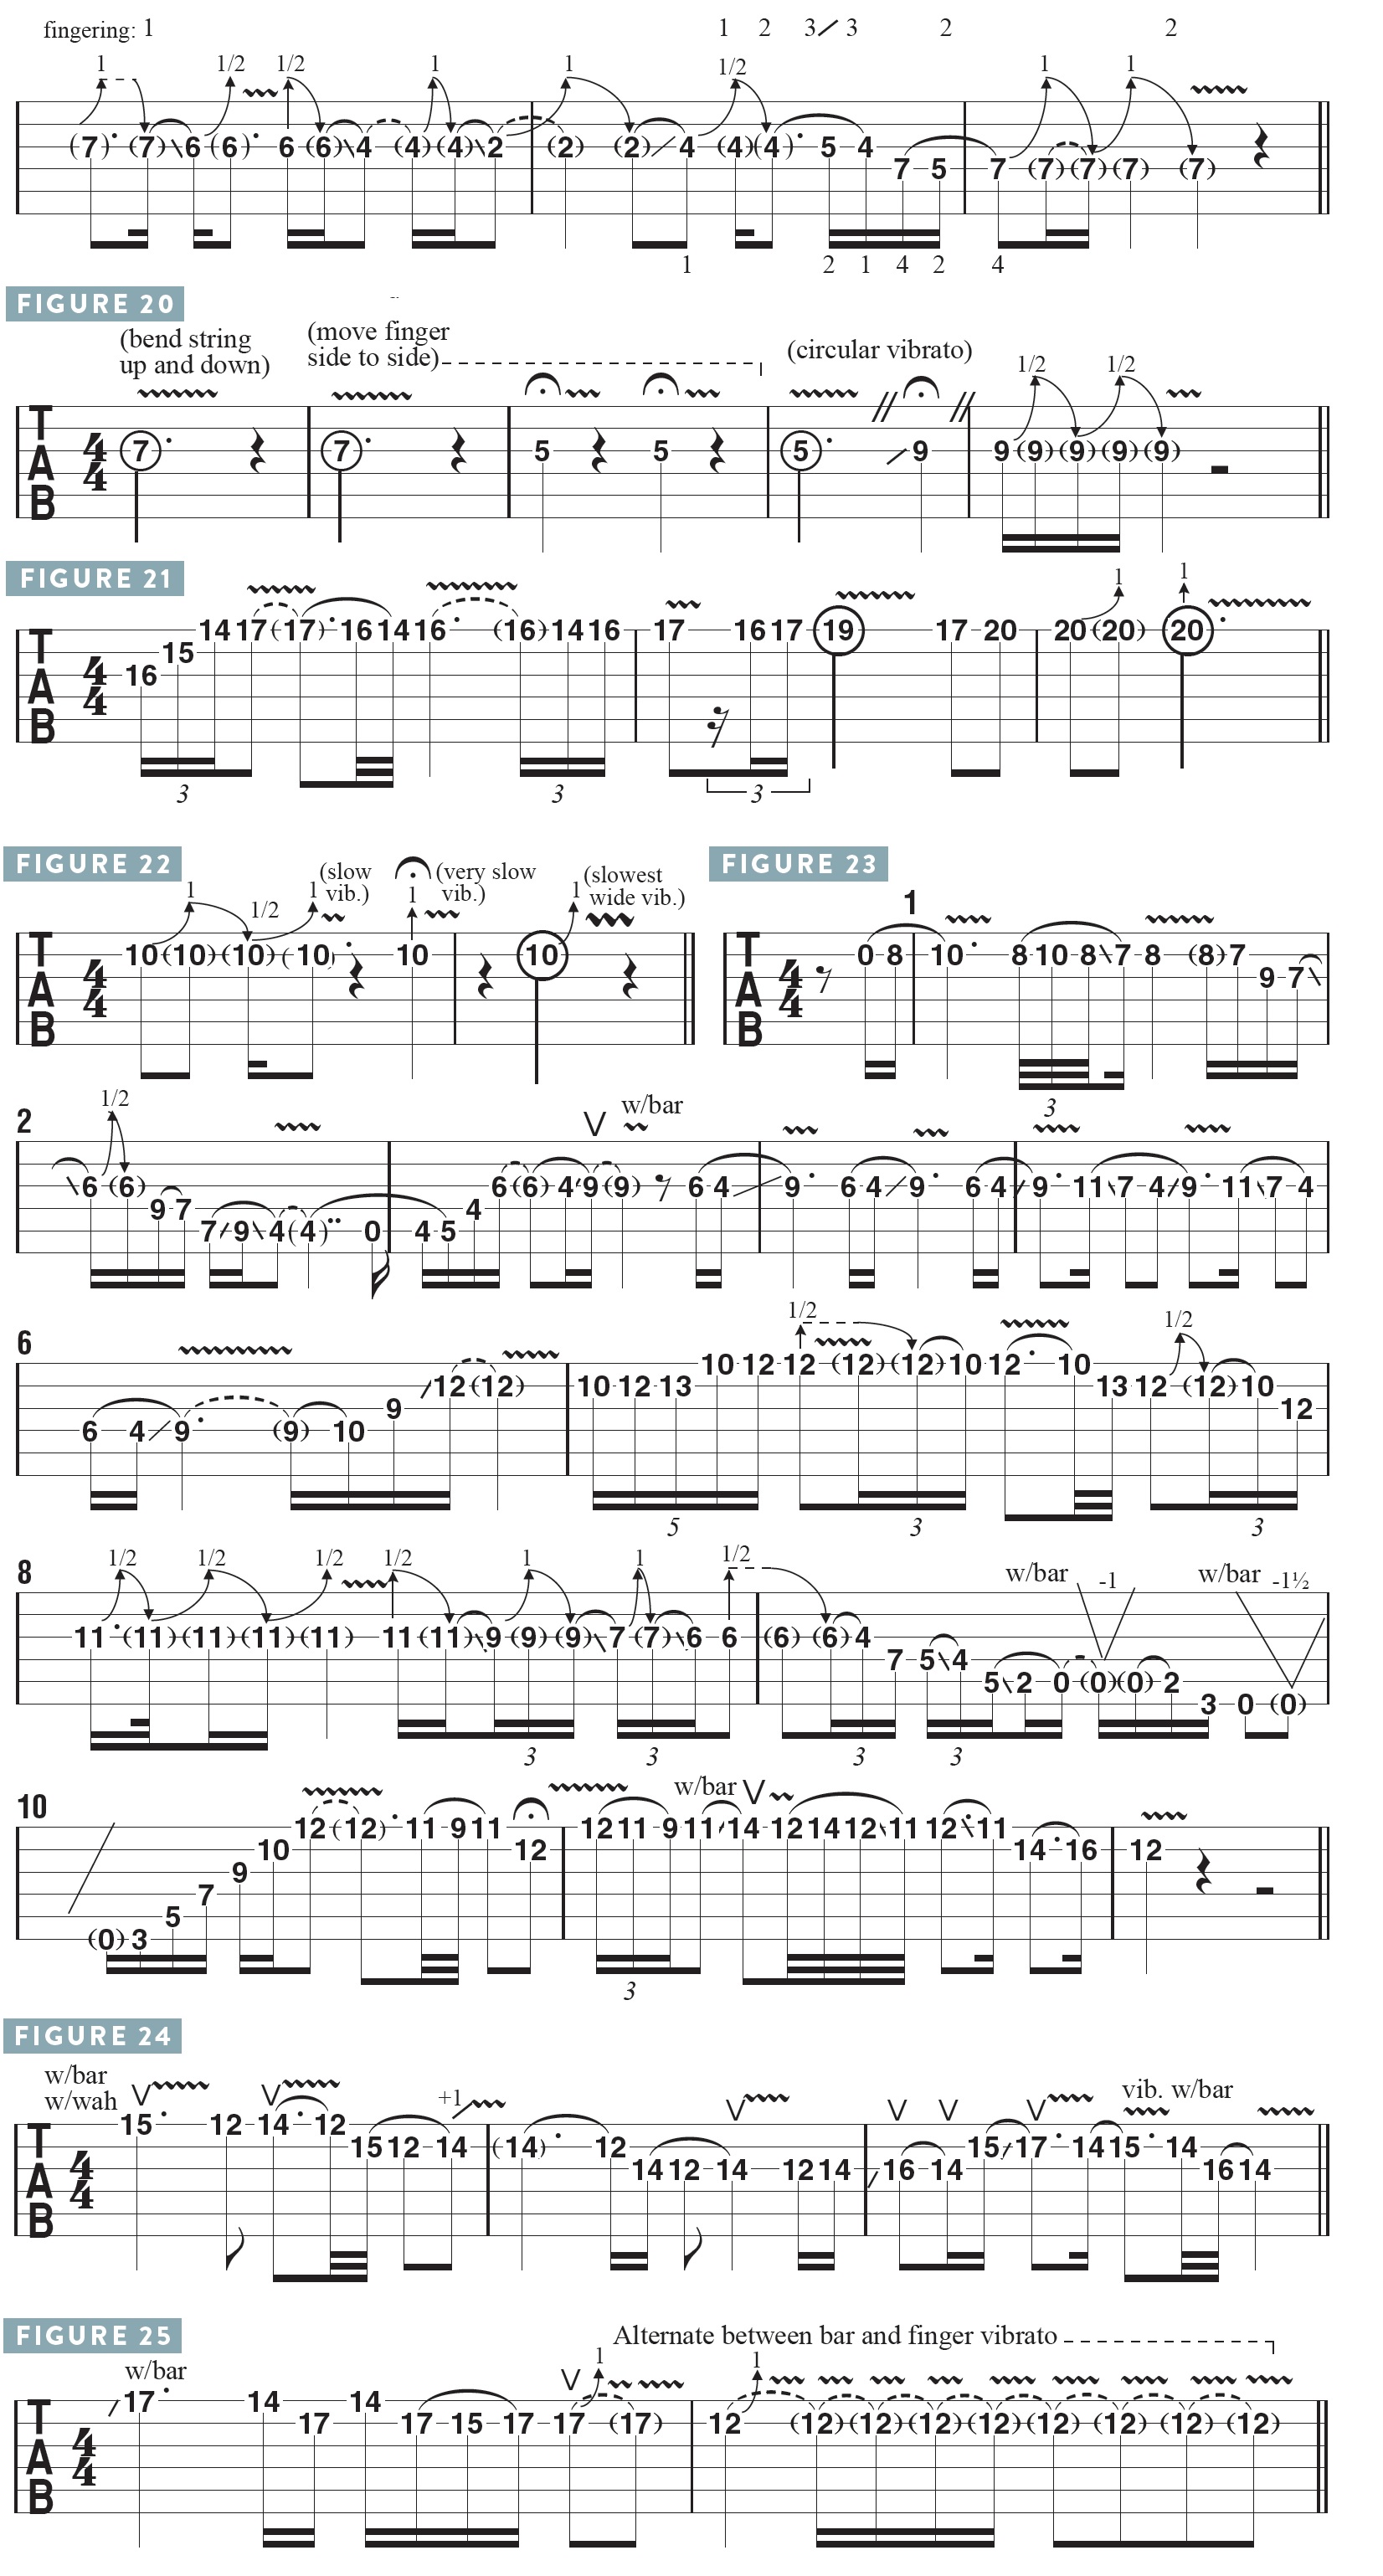
Vibrato is what makes the note sing, especially up high on the neck (FIGURE 21). Practice stretching notes and adding vibrato (FIGURE 22), focusing on different speeds and widths. Use your imagination! If you focus on these different approaches, they’ll soon come out naturally in your playing, based on the intent of the melody. In this example (FIGURE 23), I call on different vibratos in different spots in order to make a specific musical statement.
Of course, there is also the vibrato bar, which I brought in during the last example, and you can certainly experiment with bar vibrato. If I focus on using the bar, the vibratos will sound much different (FIGURE 24). Or I can use finger vibrato and bar vibrato together (FIGURE 25). The vibrato bar adds a whole different dimension to the instrument, and there’s so much you can do with it. I’ve investigated the vibrato bar quite extensively—that could be an entire class in and of itself.
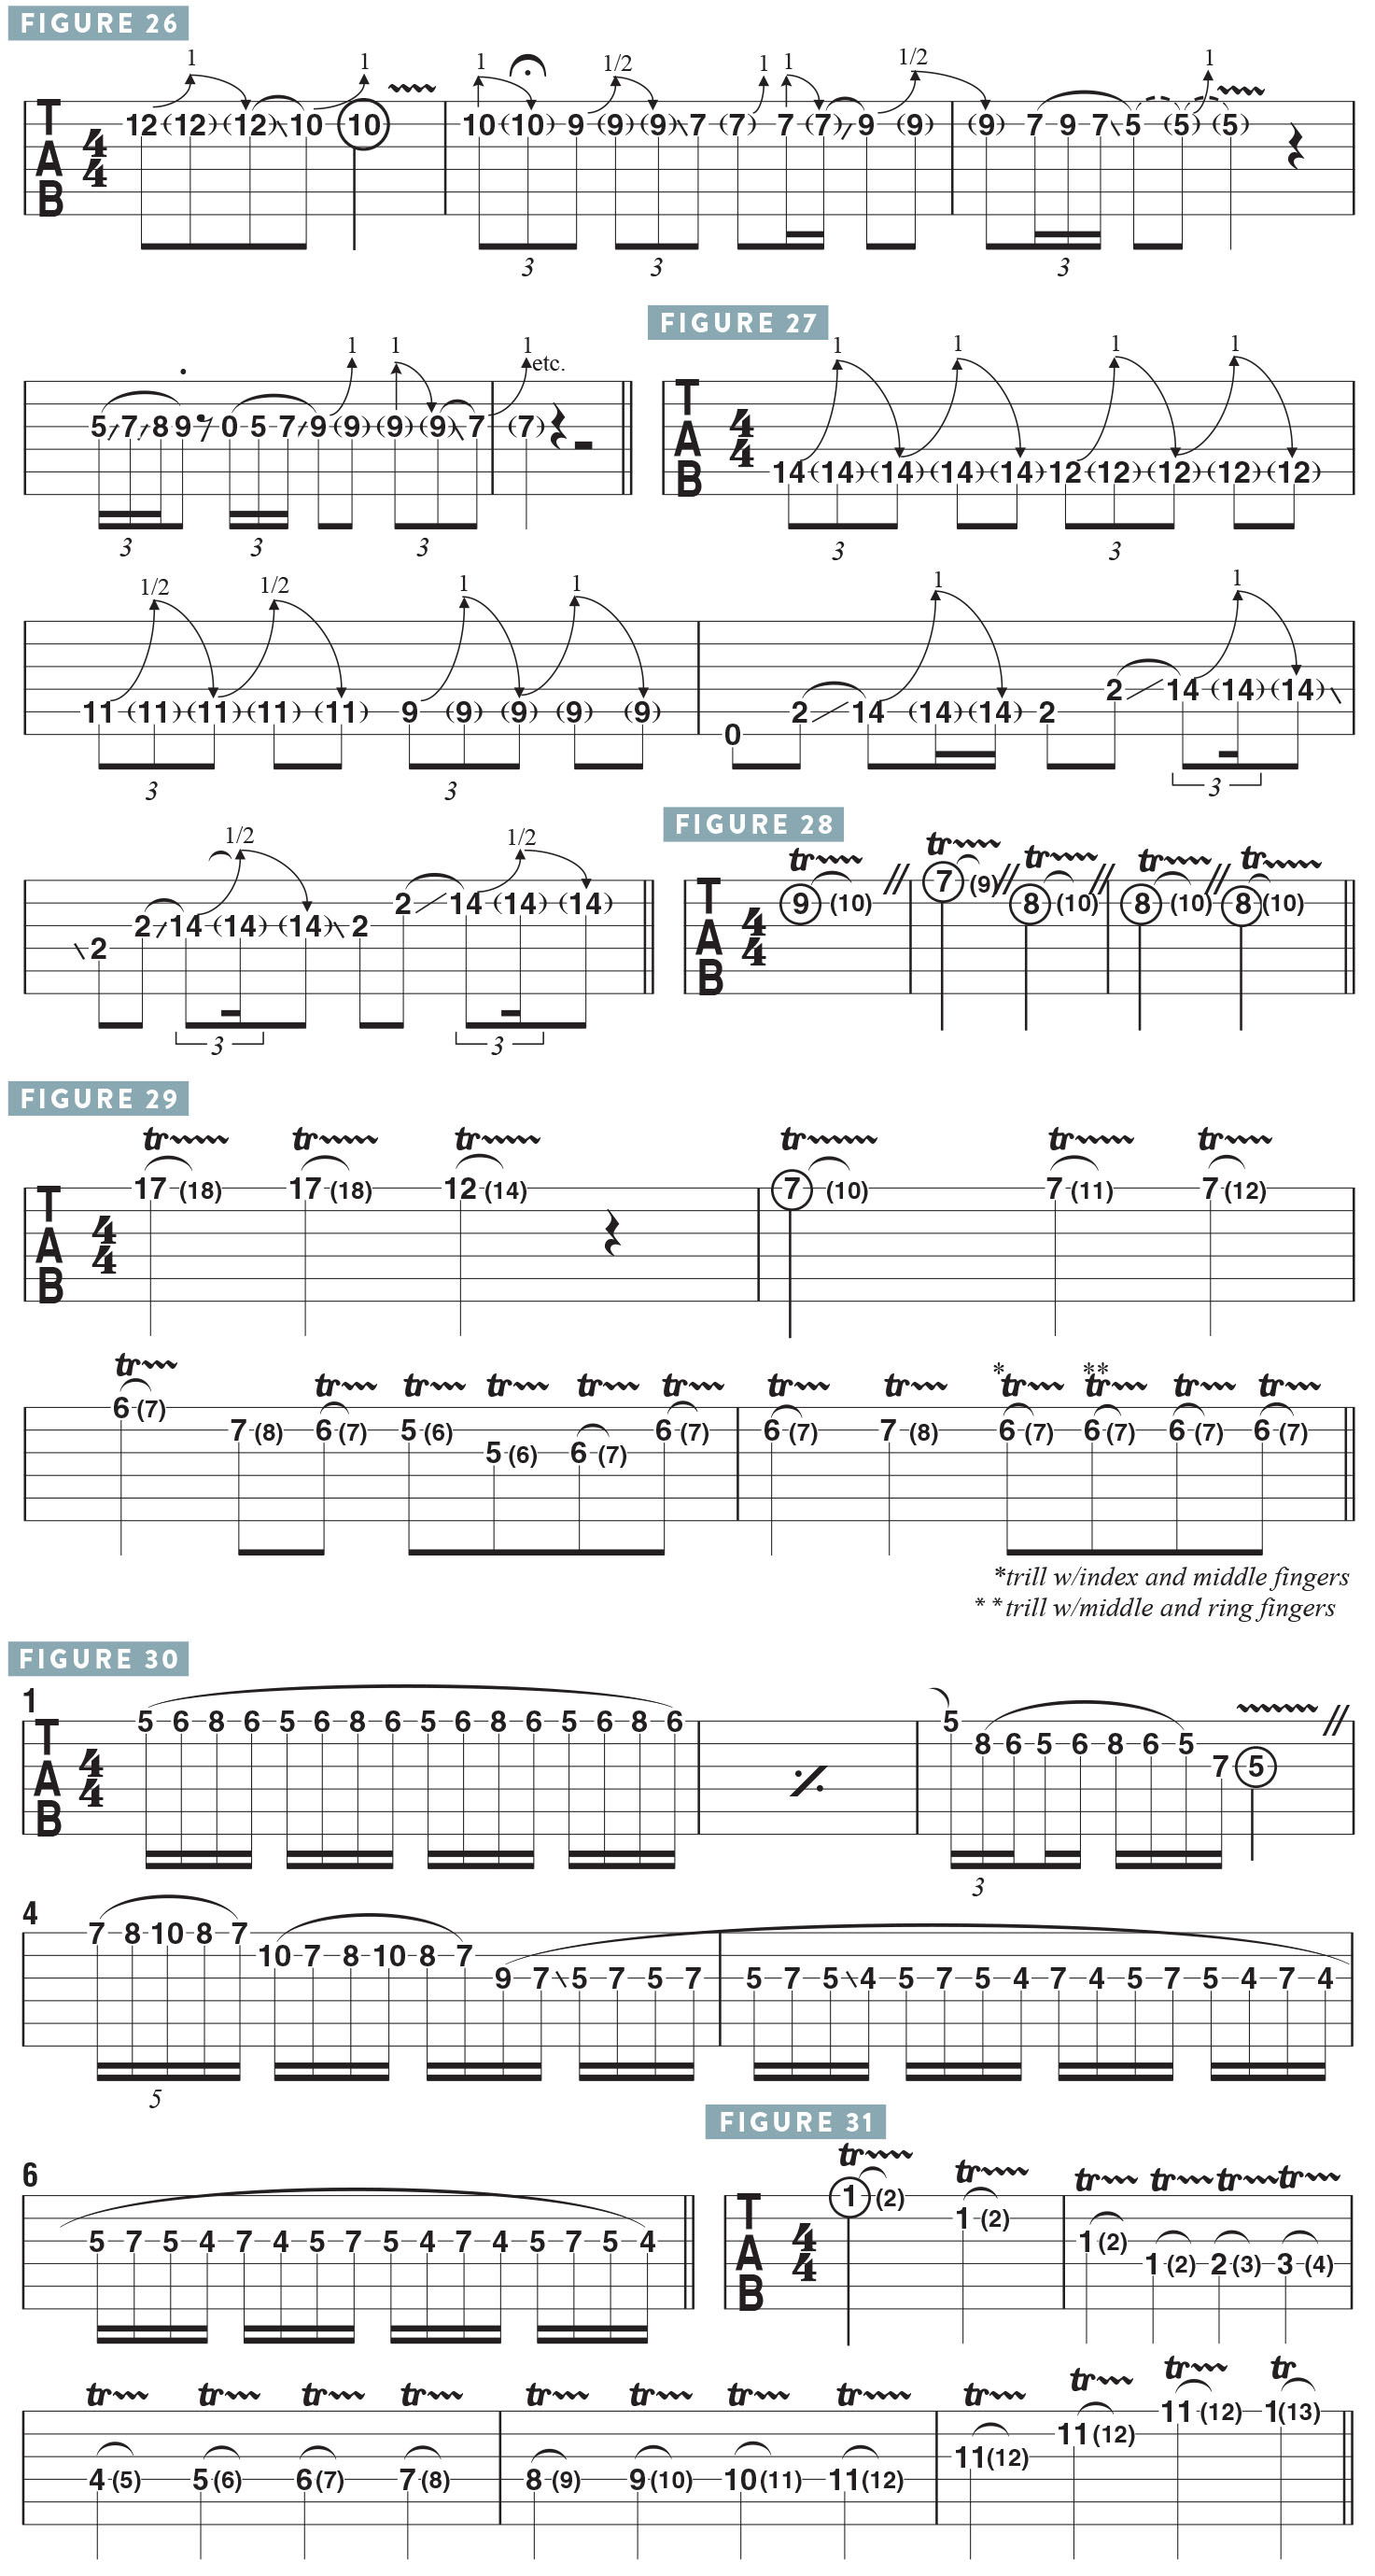
With any vibrato, you’re looking for ease of control, flowing without thinking, good intonation and nice tone. Those simple techniques are very helpful. Here is a great way to practice moving around with bends and vibratos on a given string (FIGURE 26). I like to sit and practice making up melodies utilizing these techniques. If you reach out past your abilities, you’ll discover new ideas to explore. And if you can’t get something just right, make an exercise out of it that’s based on that technique (FIGURE 27), and it will come easier next time.
LEGATO ARTICULATION
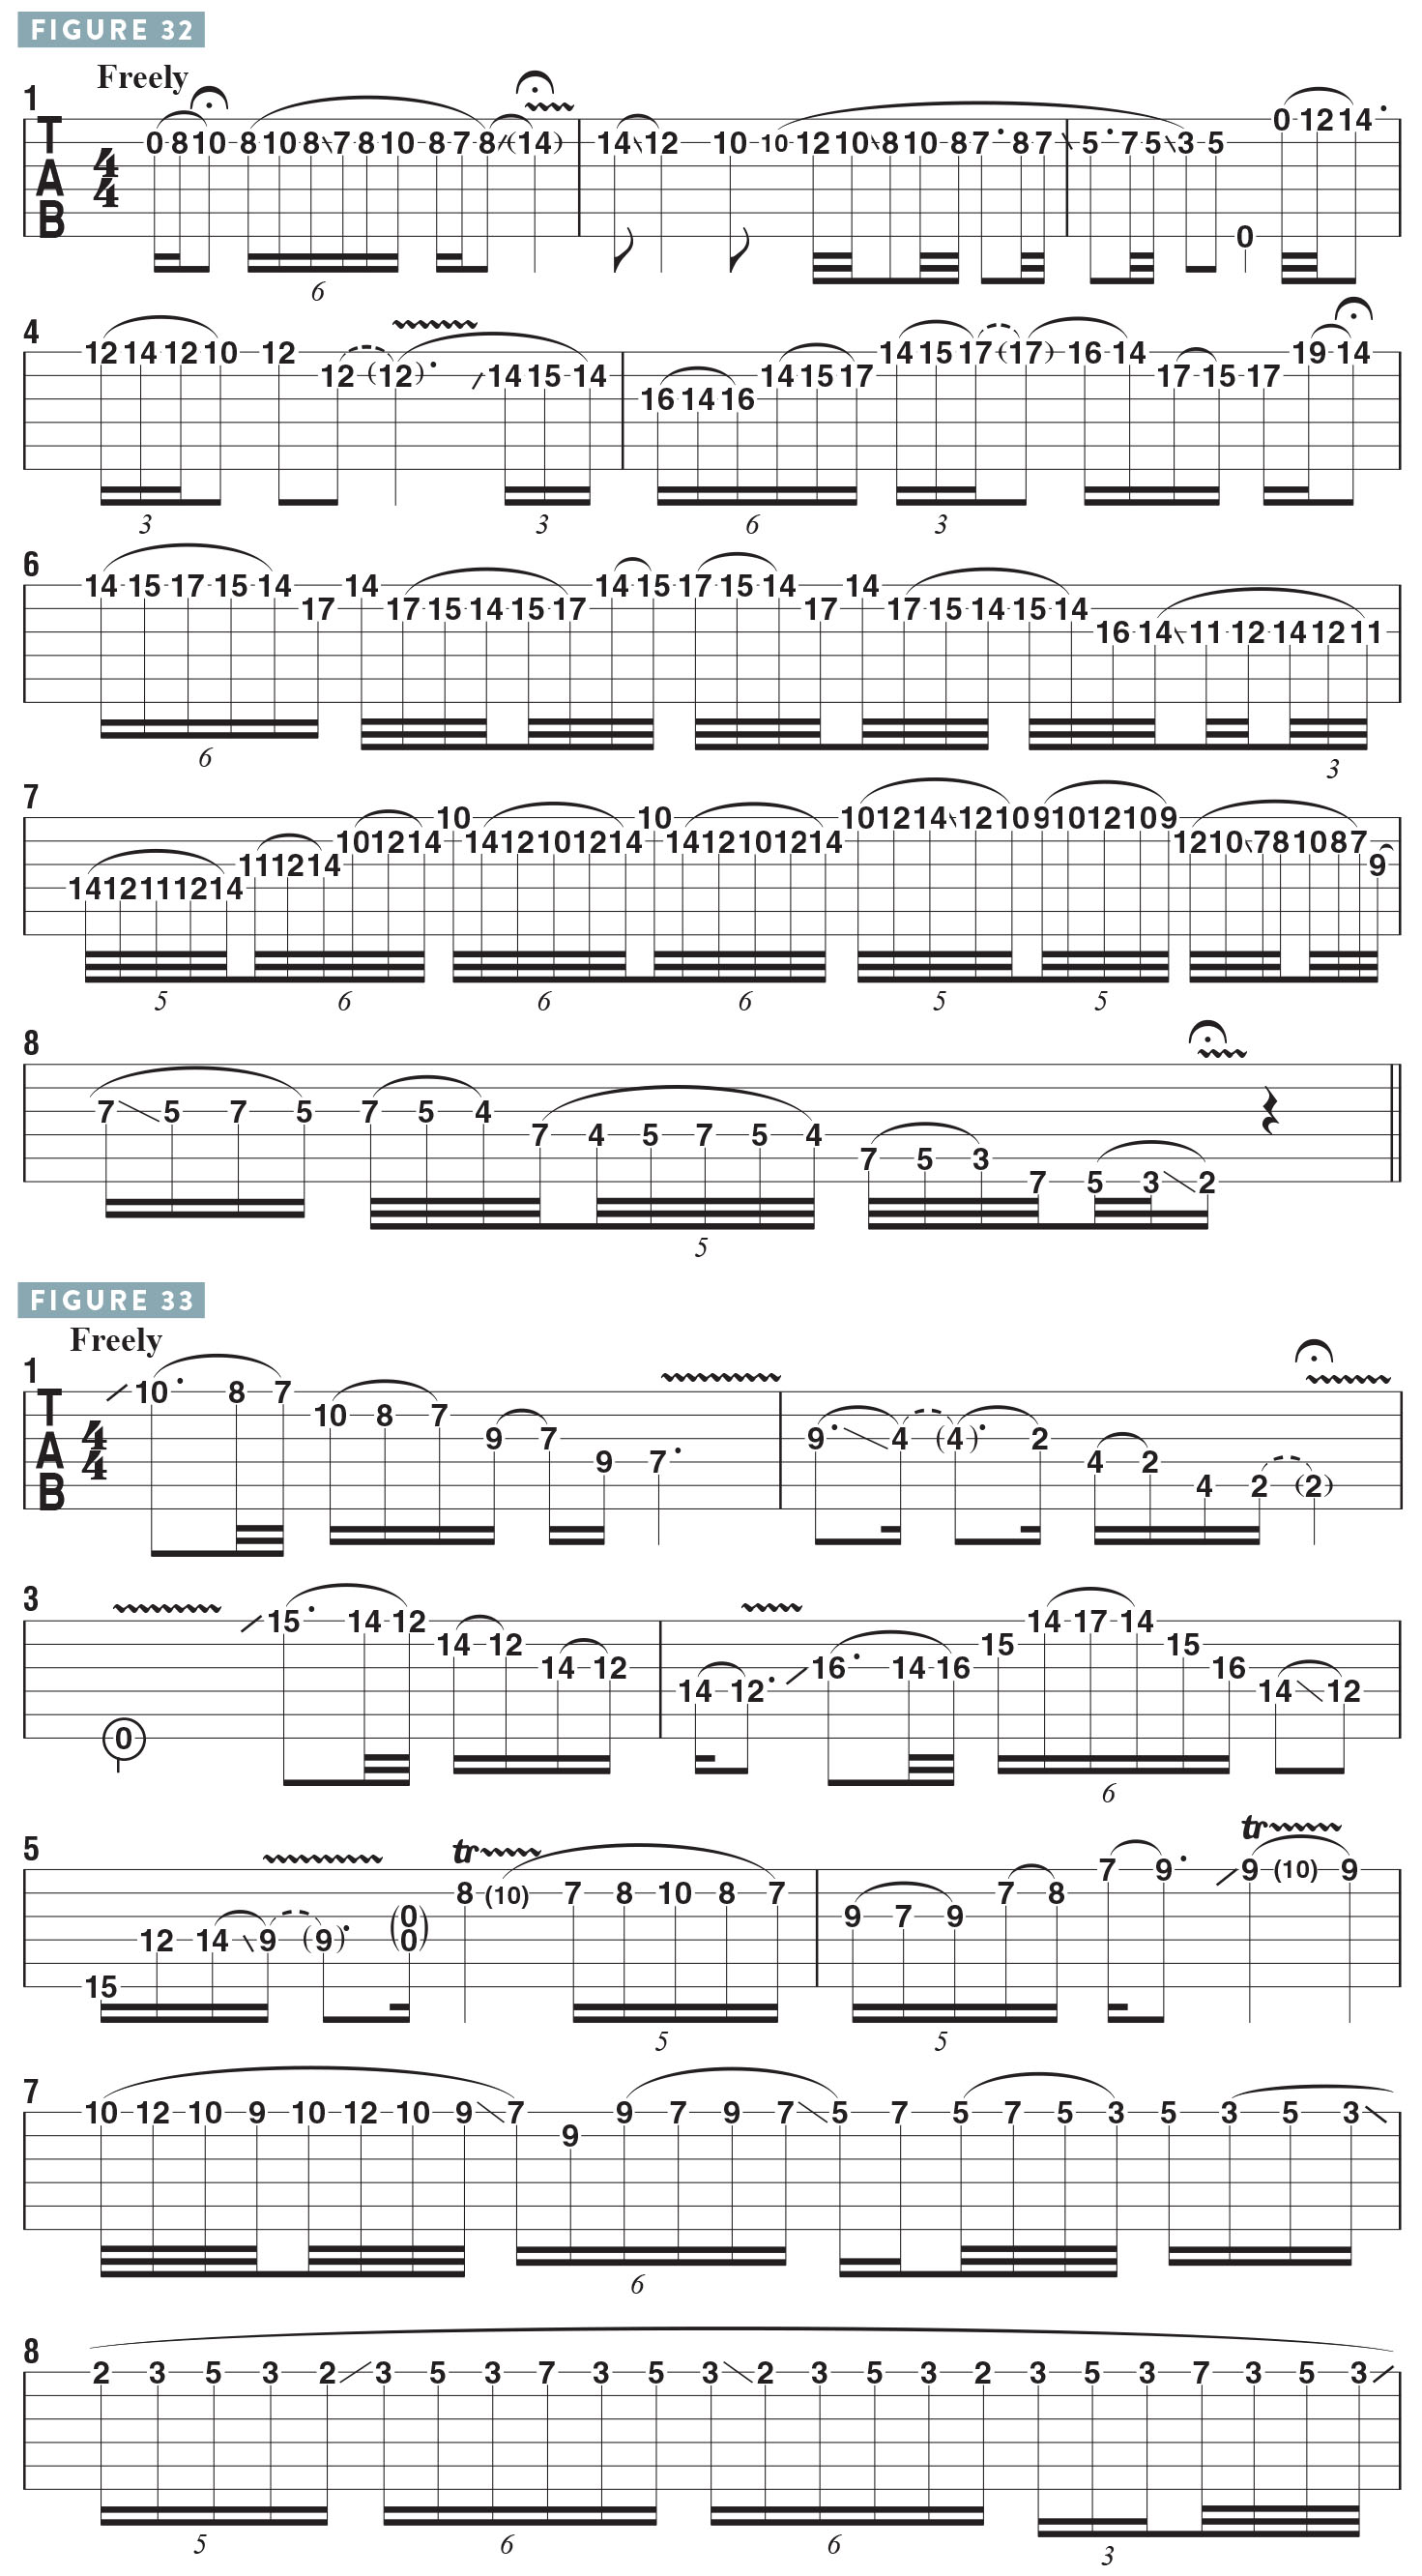
One of the things I focused on a lot in my development was legato playing—smooth and connected melodies. When I was much younger, I was more fascinated with picking, but nowadays I’m more interested in phrasing and in legato-style playing. Legato playing requires accuracy in hammer-ons, pull-offs and finger slides, so a great exercise is to play a series of trills on each string and in every position (FIGURES 28 and 29). Do that until you are blue in the face! You’d be surprised how hard it is to keep a solid trill going after a minute and a half!
Also, use every pair of fingers and all different speeds, and listen carefully so that you’ll develop control of the technique. Does a middle-and-ring-finger trill sound as good as an index-middle one? You have to practice every two-finger combination you can think of, and then proceed to every combination of three fingers (FIGURE 30). It may start off sounding uneven, so just relax, take a breath and continue. Try any distance between frets, any kind of stretch—the only criteria is that it has to sound good. If it doesn’t, find the patience to correct it. The way you find the patience is this: you know that if you work on it, eventually it’s going to come out amazing and sound great. That’s the incentive to keep working diligently.

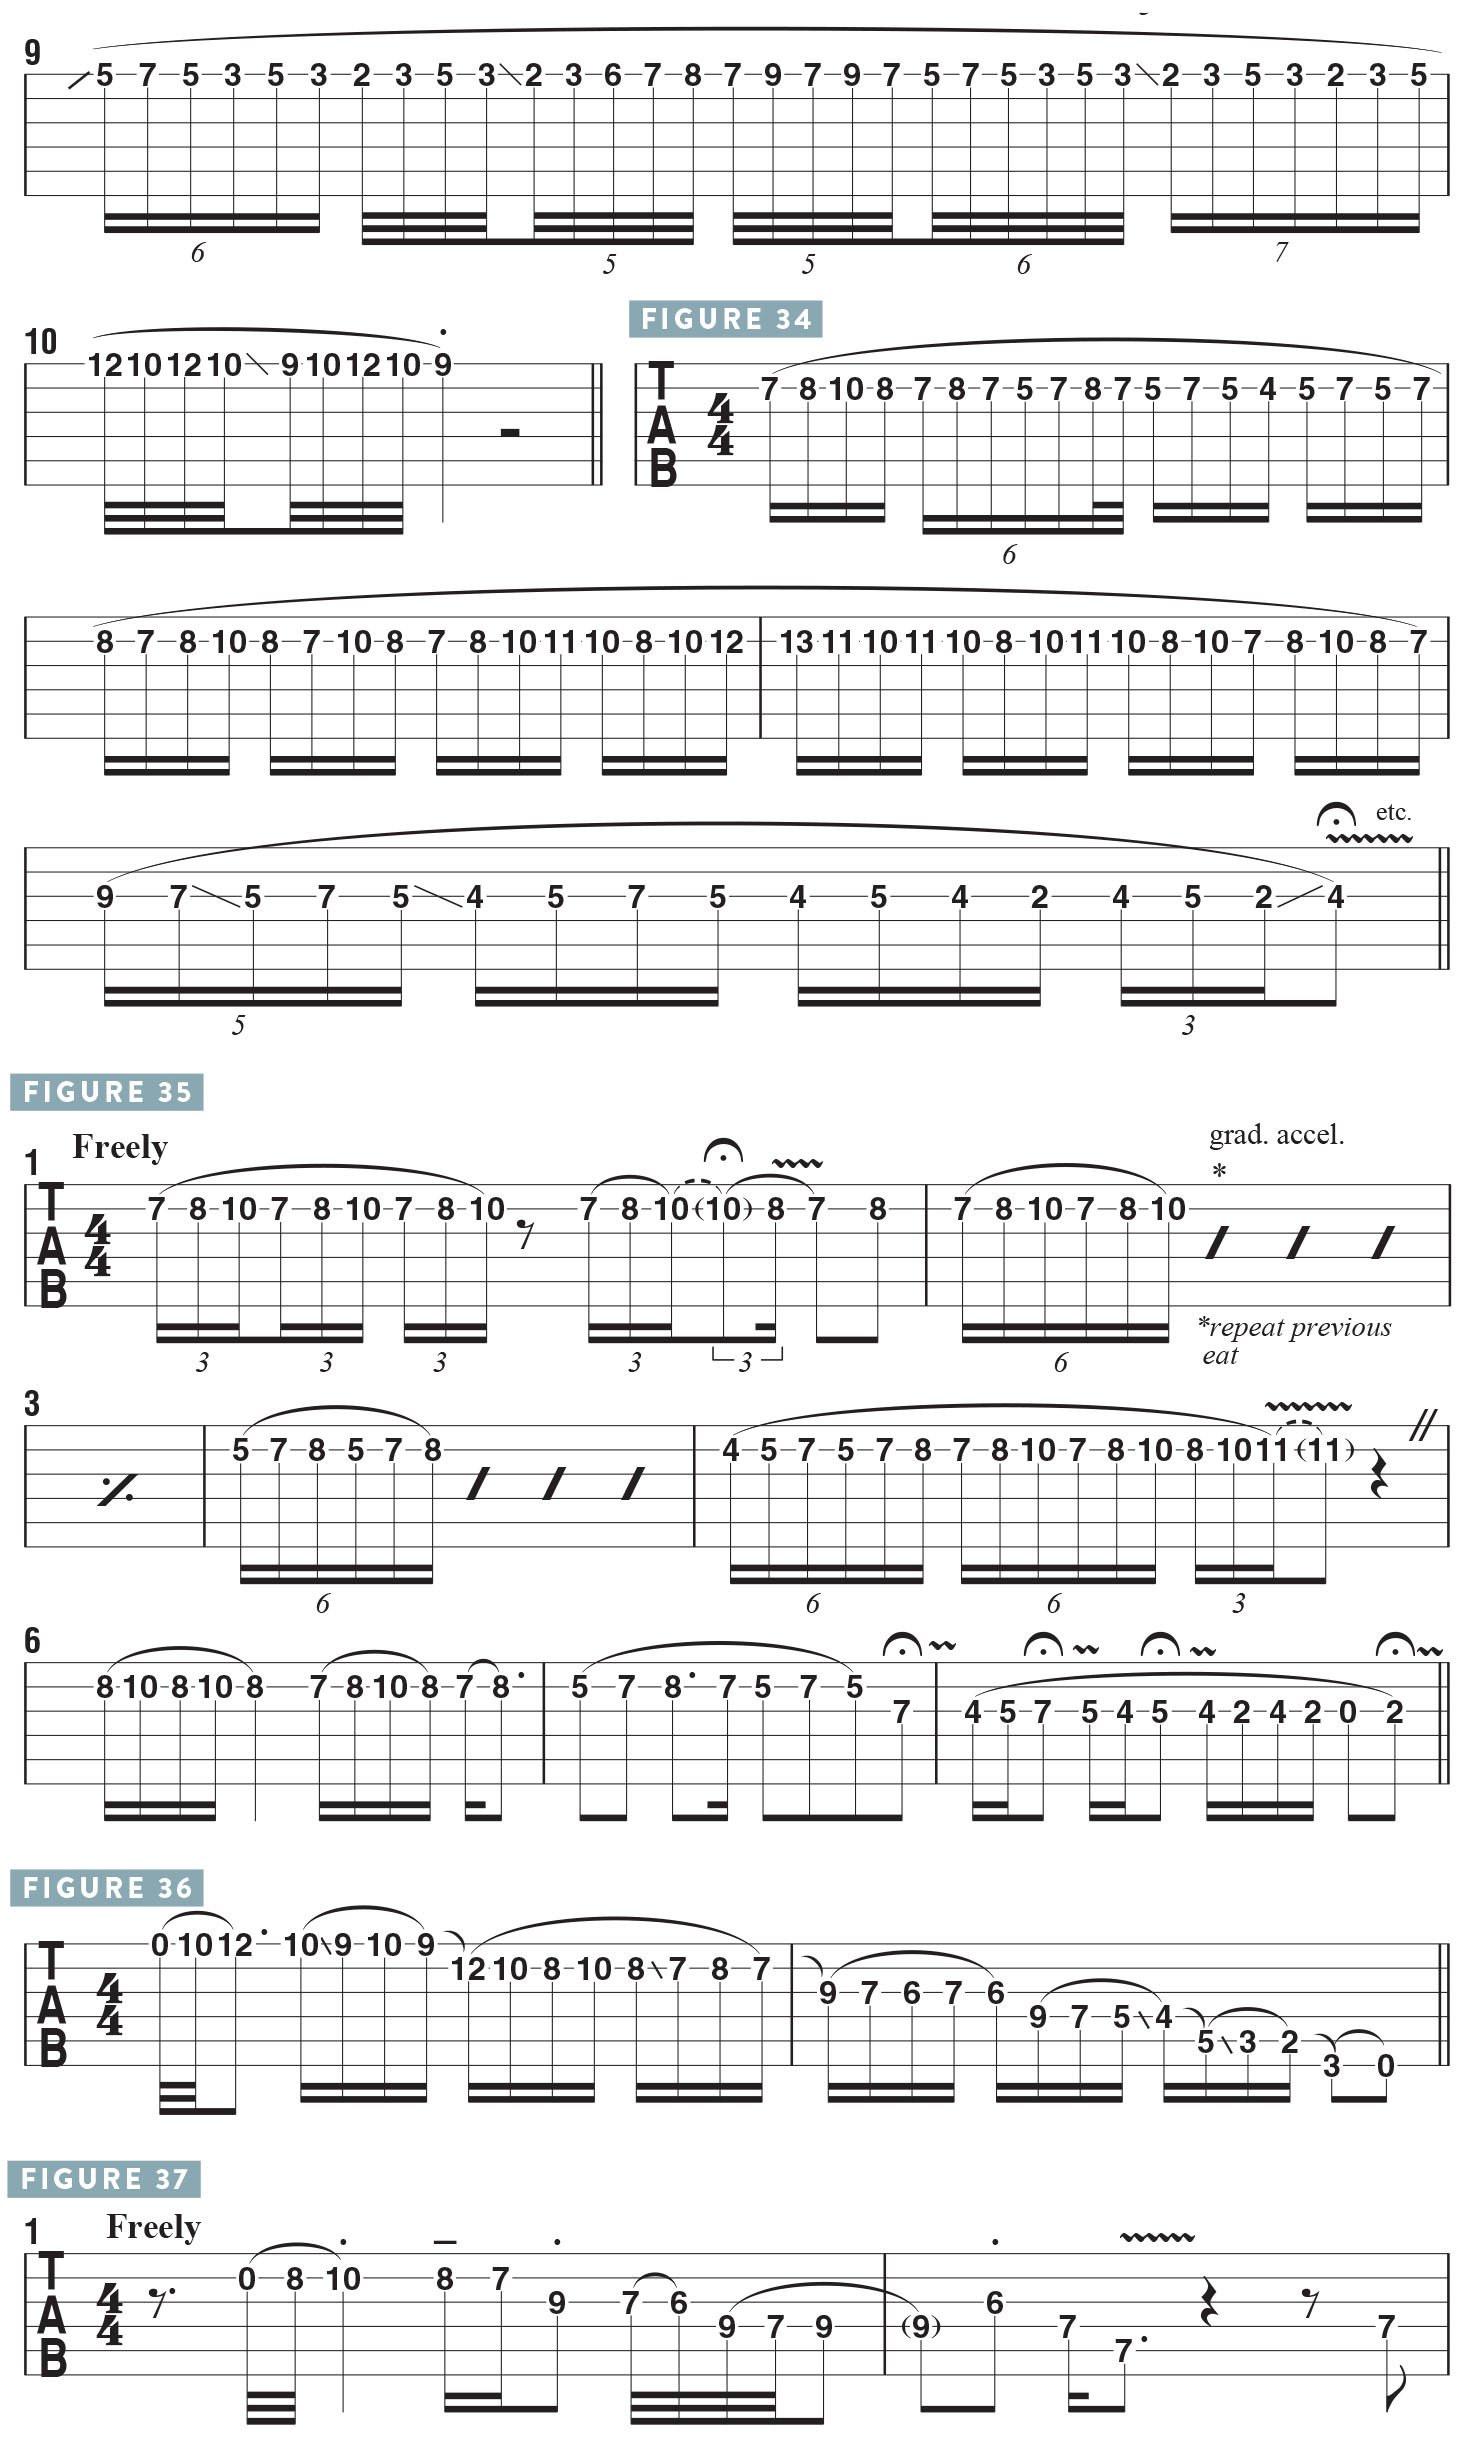
I recommend a methodical approach, moving through every type of trill, in regard to the distance between the notes, the speed of the trill, where you are on the fretboard and the fingers to use (FIGURE 31). Try trilling as long as you can between just two notes, and the trick is, the longer you want to go, the more relaxed you need to be. If you tighten up, the trill will stop. Just relax your fret hand, and your endurance will increase. Then try playing freely and making the technique sound musical (FIGURES 32 and 33). Another great approach is to limit the technique to ascending and descending one string (FIGURE 34), playing within a scale with just the fret hand and focusing on the legato trilling technique.
Break it down to just two notes, played slowly and carefully, and gradually build the technique from there, until you have three notes that all sound clear and defined (FIGURE 35). Legato means “flowing and connected,” so strive to make every note sustain and sound crystal clear (FIGURE 36).
DYNAMICS AND PHRASING
Two things that you can make part of your vocabulary that are powerful when it comes to playing melodies are dynamics and phrasing. Phrasing can be exhibited through the use of space (FIGURE 37), which will serve to emphasize dynamics as well. In terms of dynamics, you can play staccato—short and sharp—or let the notes sustain, or use palm-muting (P.M.), pinch harmonics (P.H.) and a plethora of different techniques to span a wide dynamic range.
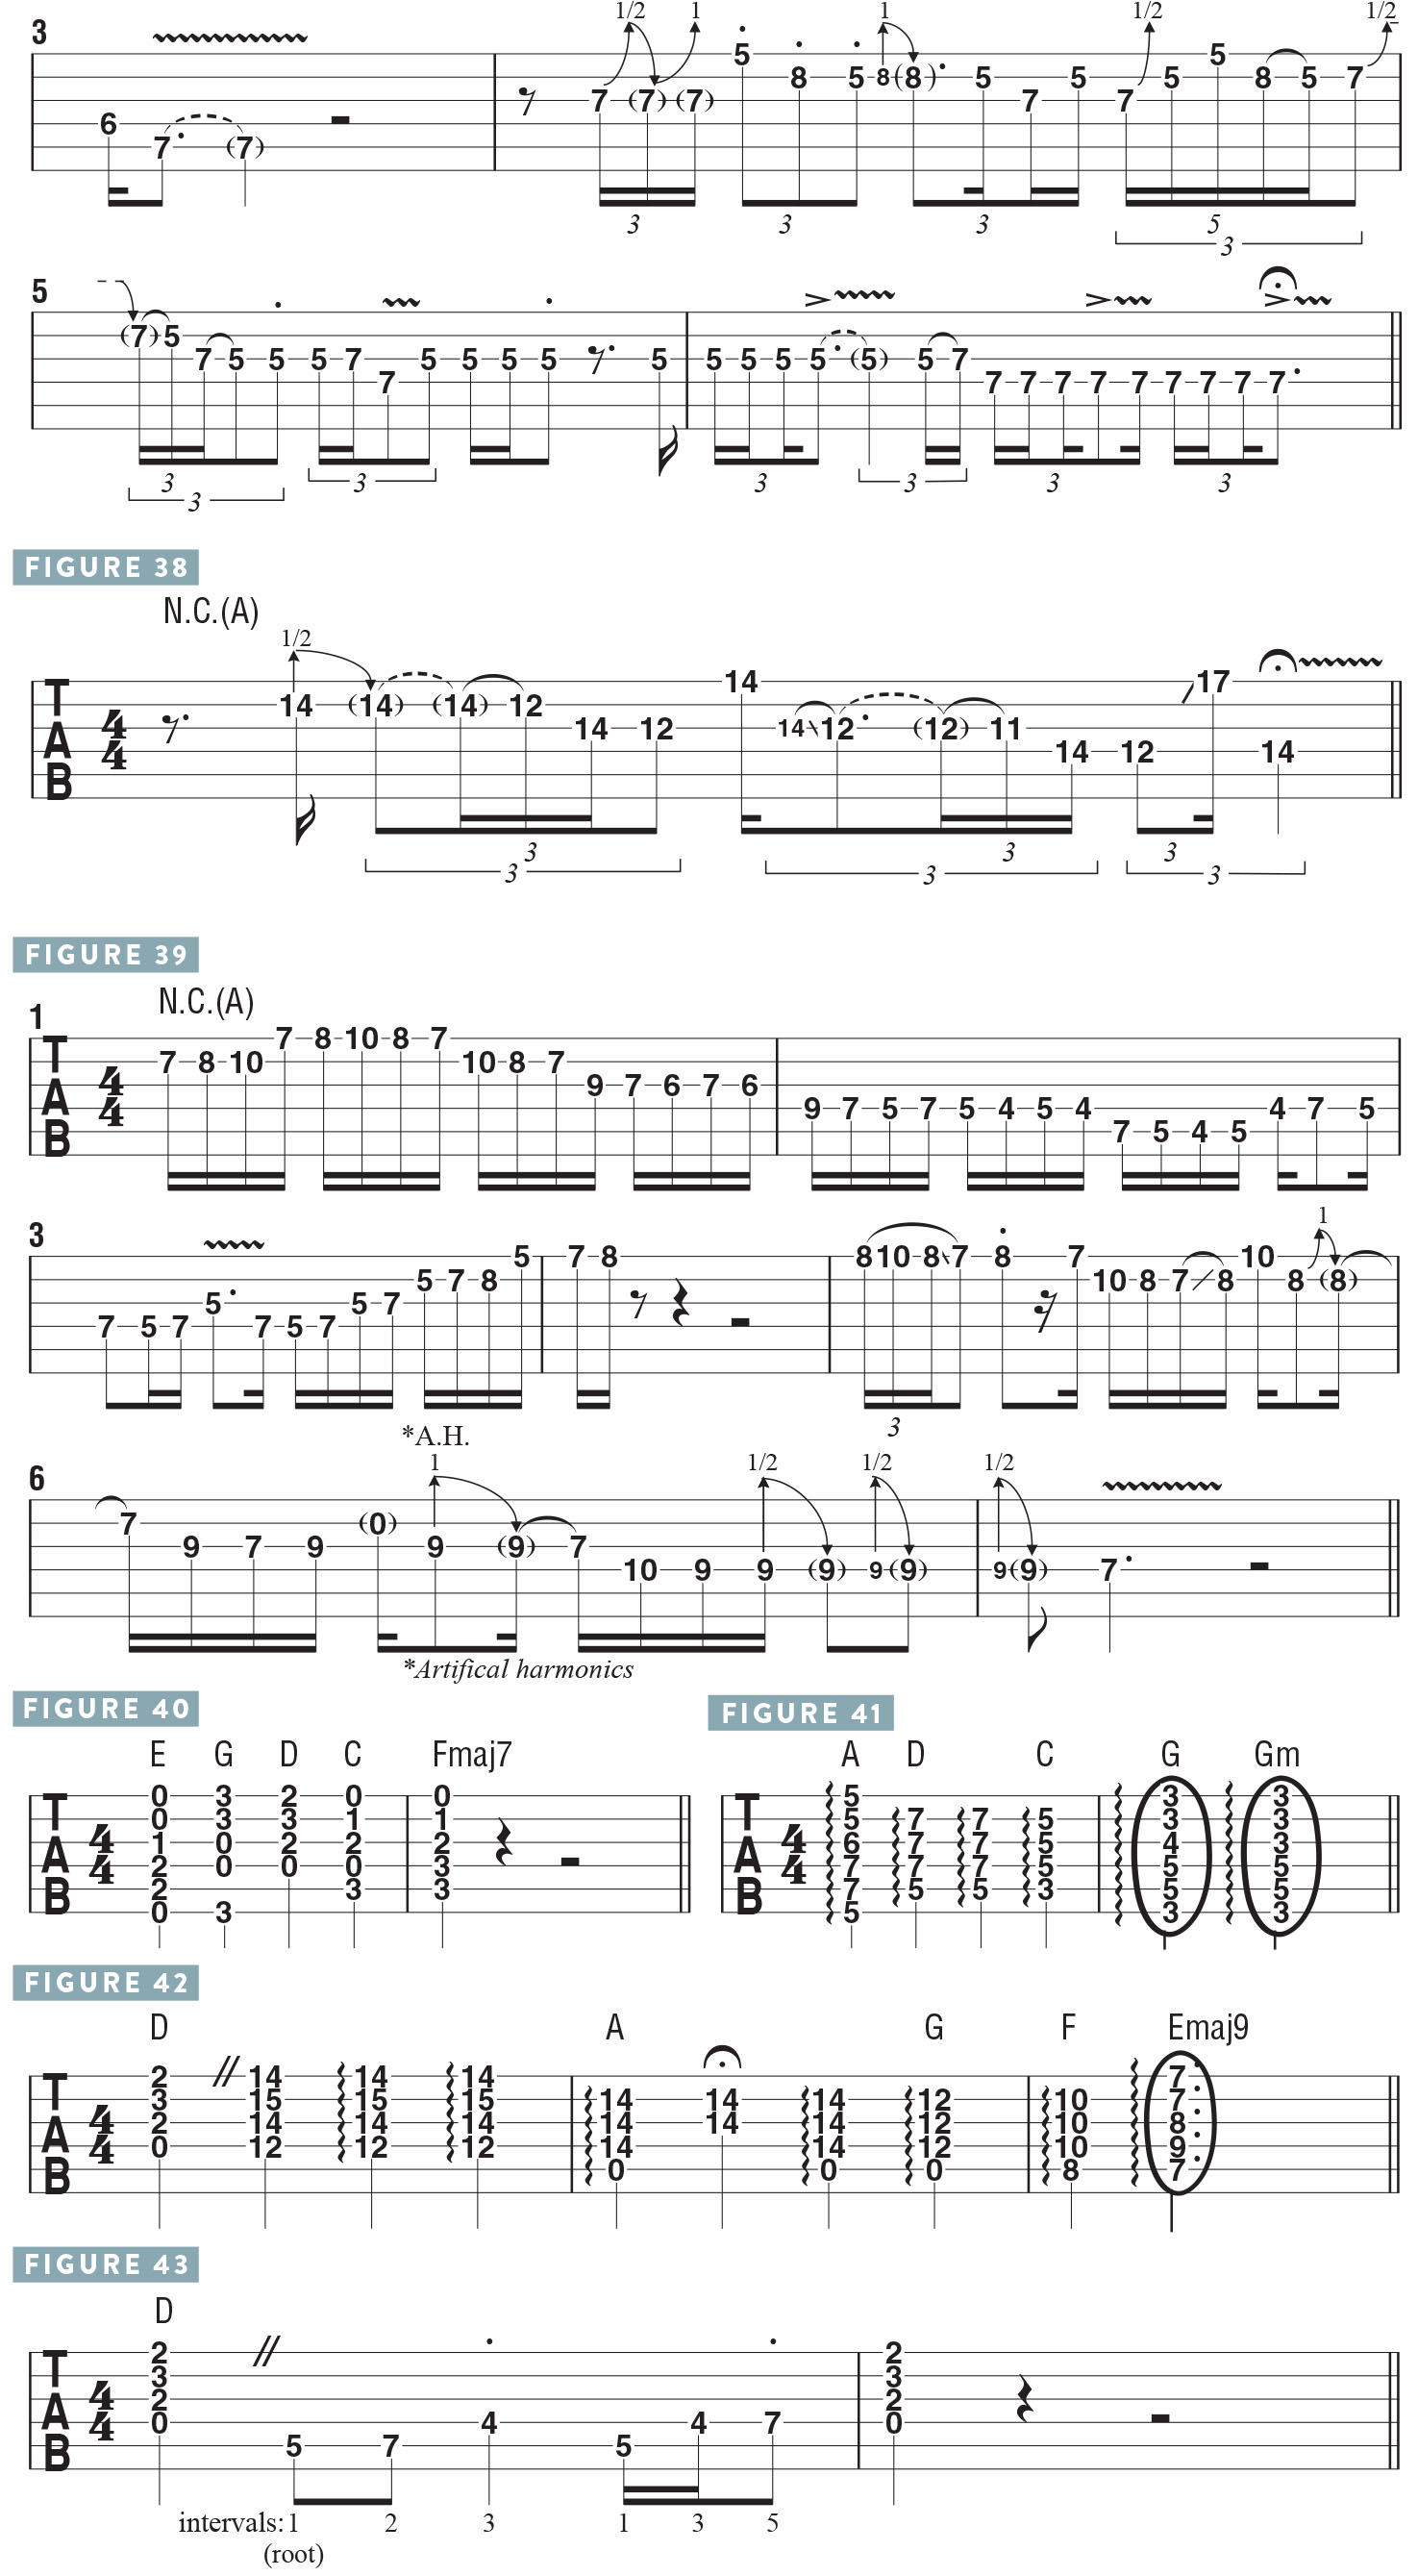
Phrasing is the heart of a melody, the way you turn certain notes, the way you end a line, the way you use vibrato. If I play this (FIGURE 38), there’s a lot of phrasing in play, in regard to the way in which the melody is performed. Every movement and technique serves to create shapes of dynamics, of articulation, and taken together, they will play important roles in the way a melody is phrased. The beginning of this next example (FIGURE 39) does not have much phrasing or articulation, so in the second half I bring more of these techniques into the picture, resulting in a more musical statement.
CHORDS
Aside from studying all of the previously discussed playing techniques, it’s also good to know the basics, like the names of all of the strings, all the notes on the fretboard and how to play all of the basic first-position “open” chords (FIGURE 40) and basic barre chords (FIGURE 41). When you play these chords, make sure you can hear every note, and you can switch between chords smoothly. If you play a D chord in one area of the board, move it around (FIGURE 42). Be sure that each of these voicings sounds in tune as you play.
Memorize every chord there is—there are many books and study guides on the internet where you can find this basic information. Acquaint yourself with every chord! The most effective way to learn a chord is by listening deeply to it. This is a D major chord in second position (FIGURE 43), and I can fill your mind with a lot of information about it: it comprises the first, third and fifth scale degrees of the D major scale; I could show you how to write it out in standard notation; I can show you every inversion of it. That’s all fine, but that’s not a “D chord.” It’s like, your name is just a sound—it’s not who you are. The same thing applies to chords. Listen intensely to the sound of the chord, and that sound, and that feeling, is what a D chord really is. You will create a relationship with the chord. Eventually, you do this with every chord, so that each chord and chord type has a deeper meaning to you. This is how you develop as a musician and not just a technician.
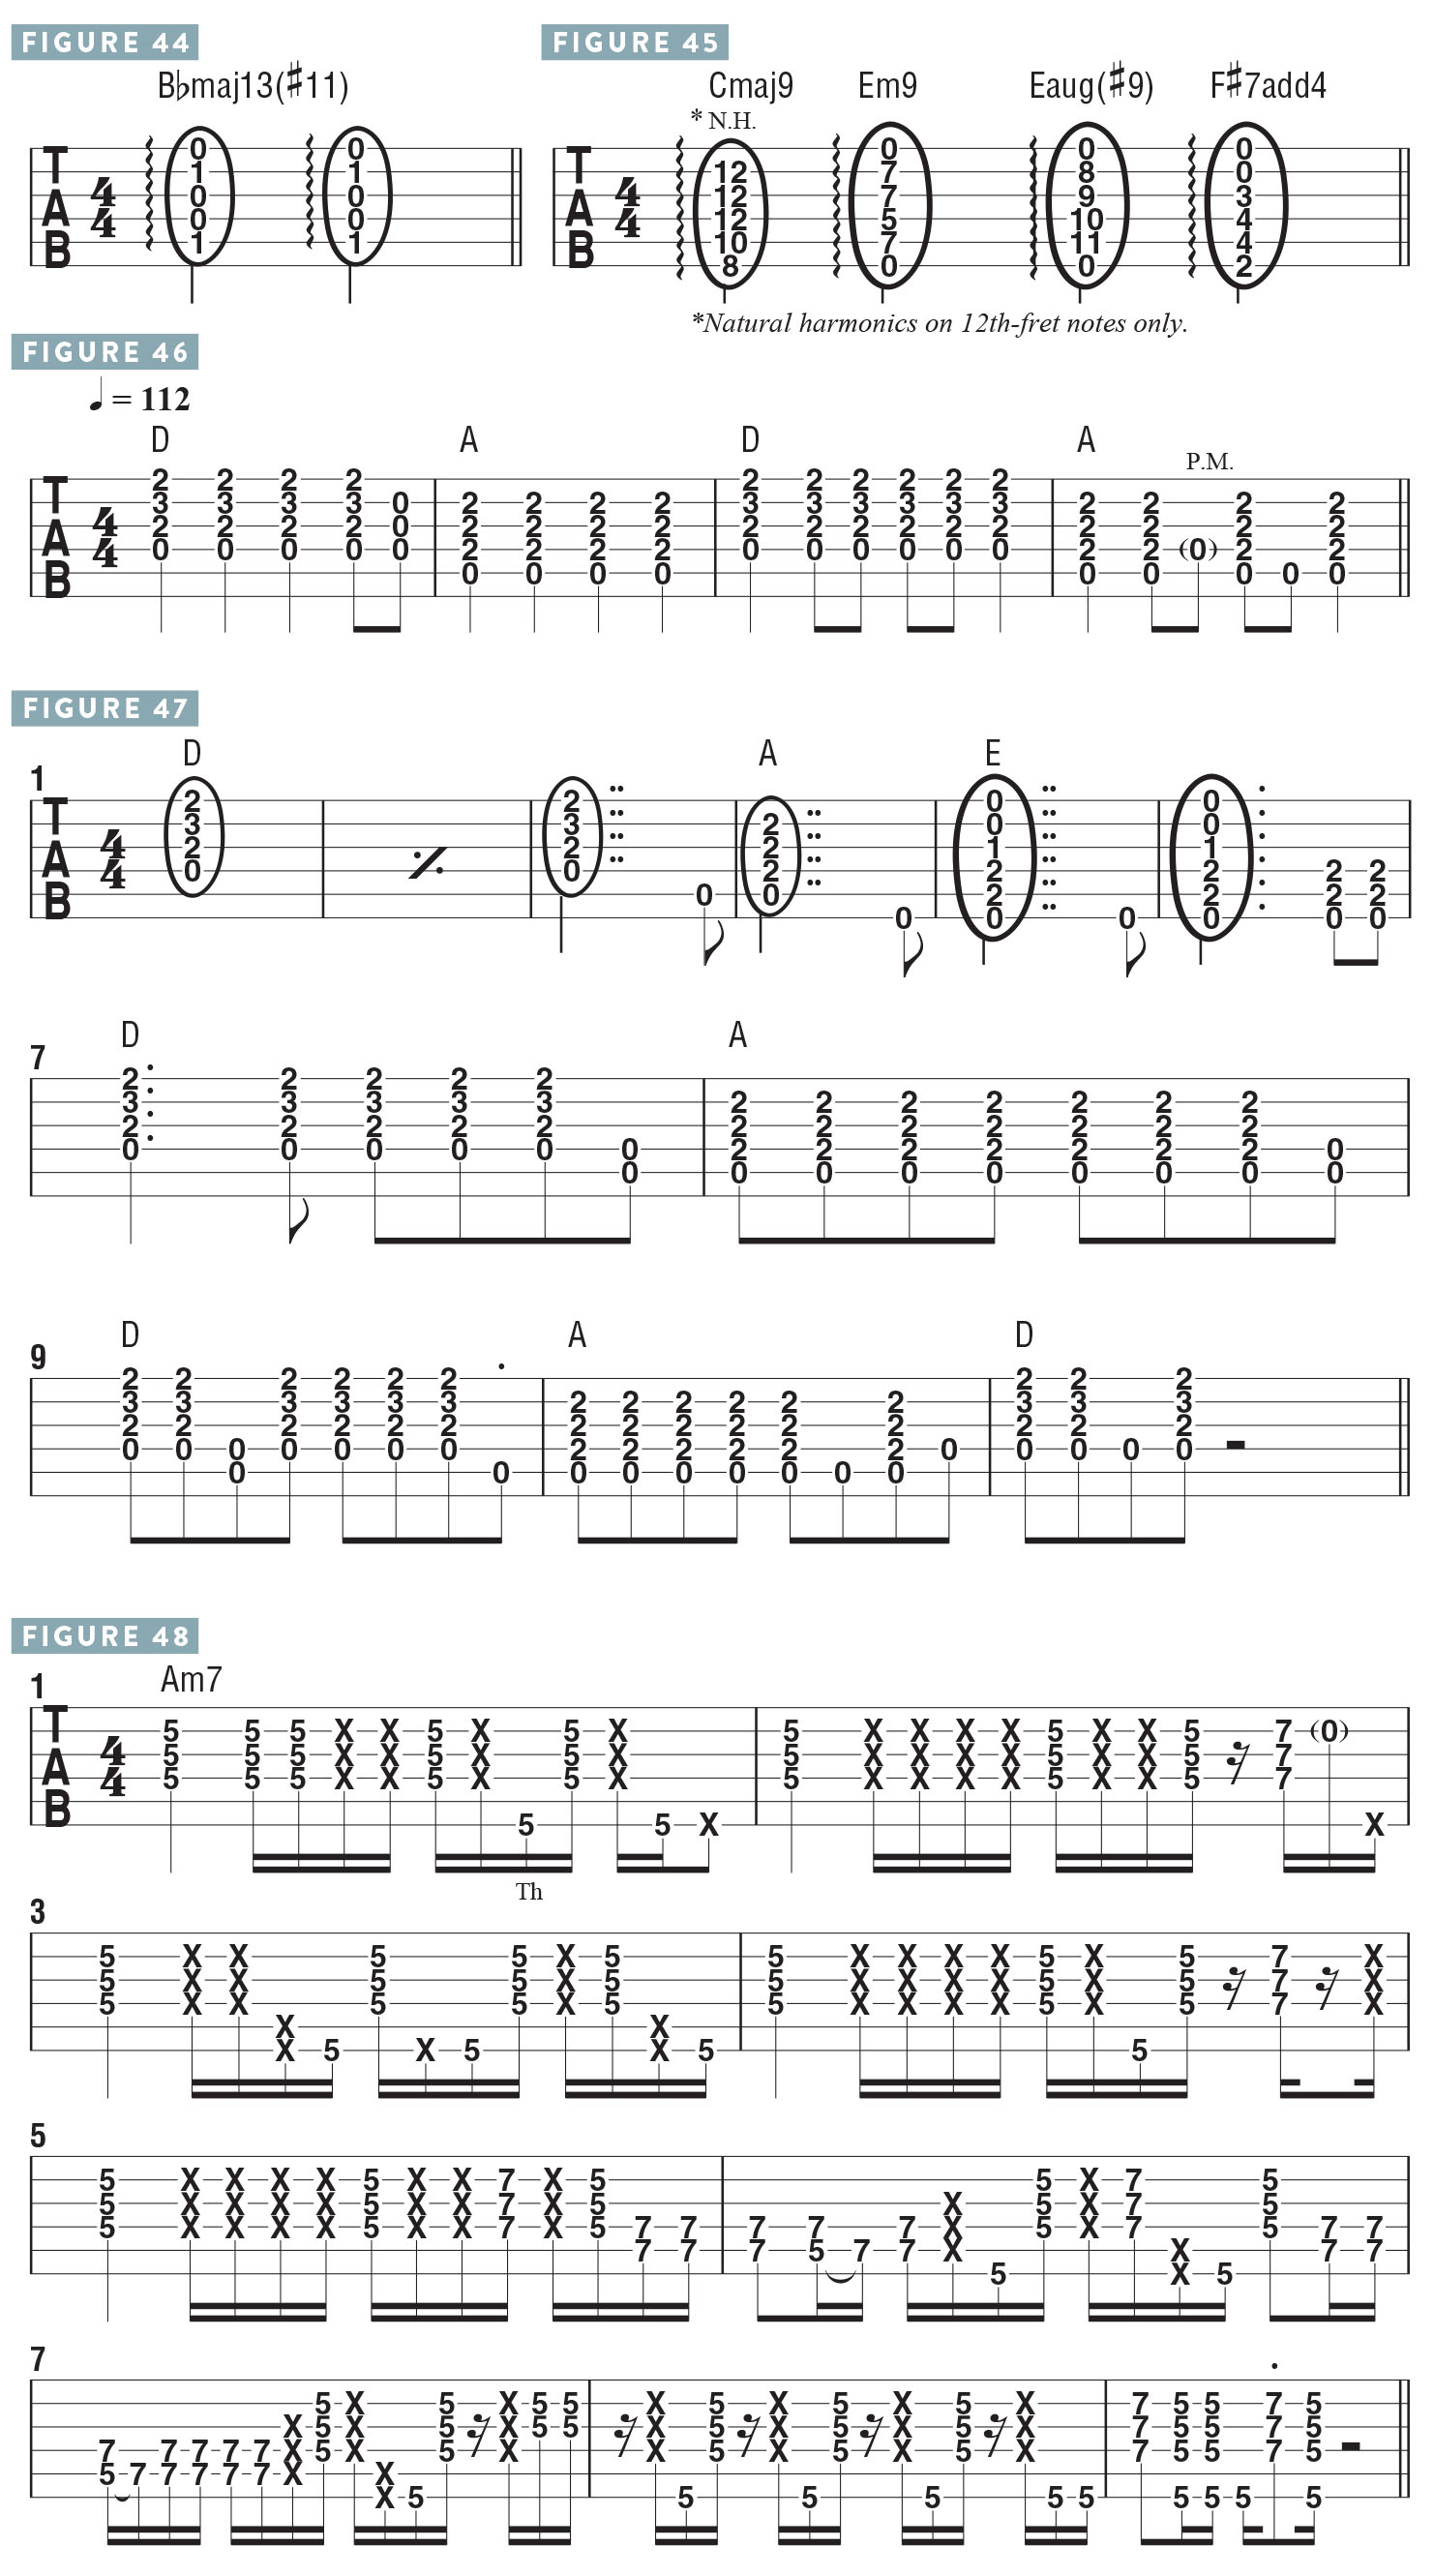
I could tell you that this is a specific chord (FIGURE 44), but the most important thing is the sound and the way that chord makes you feel. The chord has a personality, and you won’t get to know it unless you listen to it deeply. It has a story to tell; you own the chord, and you become the chord as the sound permeates your whole body. This is true for any chord (FIGURE 45).
RHYTHM
It took me a long time before I learned how to lock into a groove. Focusing on what it means to “lock in” with other musicians is vital, and it all has to do with rhythm. A great thing to do is to play to a drum machine or click track (FIGURE 46). Learning to play to a groove is about meditating on it, so listen very carefully and start with sustained chords before moving into strumming (FIGURE 47).
Once you begin to feel a solid connection to the beat, try more complex strumming patterns with eighth-and 16th-note rhythms (FIGURE 48); for the adventurous, try laying different rhythmic syncopations and odd meters on top of the straight beat. In time, you will sync up to the beat, and once you understand that feel, you can pull back against the beat, or push ahead, in an effort to create different musical impressions within the rhythmic pattern itself.
PRACTICE ROUTINES
Your practice routines need to be based on what your goals are. My usual practice routine when I was young was nine hours a day—I’d start at 3 P.M., when I got home from school, and I’d go until midnight. The reason it was nine hours is that it was divided into three three-hour segments, with specific things I wanted to accomplish in each hour. It’s not necessary to practice that much, unless you want to be like an Olympic athlete, and even then, you have to be careful. Some people are “naturals” and they really don’t need to practice that much. When I was first giving Dweezil Zappa some lessons, I thought, Uh oh…, because he had never played and he was having difficulty. But the rate at which he improved was astonishing. Within one week, he was playing guitar very well, and a few weeks later I was bringing him tapes of Yngwie Malmsteen and Eddie Van Halen. He was a natural.
People have to decide how much time to put in, relative to what is comfortable for them. I think it’s good to round it off; I liked to get to everything in one day. If you have two hours, allocate a certain amount of time to developing the vessel: exercises, scales, techniques, chords, rhythm, strumming, locking in with a drum machine and ear training. But a good portion of the time should be spent on being present and playing and creating in the moment. You have to exercise your imagination, and that is different than honing the vessel. It’s good to work on the academic, mechanical stuff, but it’s essential to spend some time not knowing what you are going to do and just playing whatever comes to you in the moment. In this way, you are exercising your spontaneous reaction to musical situations.
WOODSTOCK MUSIC LABS
It has always been a dream and intent of mine to one day start a comprehensive music school that offers a new kind of music educational experience. I have had the great fortune to have intimately experienced most aspects of the music business and feel I have a wealth of essential information to share, in regards to being an independent musician in the business and achieving goals in ways that elude conventional music school curriculums.
As fate would have it, about a year ago I partnered with some wonderful, talented folks who were already in the process of creating such a music school, Michael Lang: creator of the original Woodstock Festival and well-known music producer, Paul Green: founder of School of Rock, Bill Reichblum: successful internet entrepreneur, and David Jarrett, who has developed entertainment companies around the world.
The school is called Woodstock Music Lab. We purchased and are converting a 50,000-square-foot elementary school on 23 acres in Woodstock, New York, with plans to have multiple studios, rehearsal and classrooms, broadcasting/streaming facilities for live events, online education and perhaps the best-sounding recording studio in the country (picture a live room the size of a gymnasium), and an immersive experience that incorporates real-life music-project challenges that give students and young artists just starting in their careers an opportunity to work with the best producers, writers, musicians, engineers and business leaders on site and online for collaborative production in a rigorous immersion model. As we develop this, we will be posting updates and the admissions process to woodstockmusiclab.com.
