Tommy Emmanuel Master Class: Exclusive Tips on Fingerpicking, Flatpicking, Harp Harmonics and More

What I always recommend to anyone getting started with fingerstyle guitar is that you must start with the thumb first. The thumb takes care of most of the “backing”—the persistent rhythm that propels the song along—while the index, middle and ring fingers, and occasionally the pinkie too, add melody and harmony notes on the higher stings. But, first and foremost, you want to get your thumb working independently.
STEP ONE
Put those rebellious fingers down onto the face of the guitar, and do not let them up! In fact, sometimes when I’m teaching a student, I will take a piece of gaffers’ tape and tape their fingers to the face of the guitar so that they can’t move!
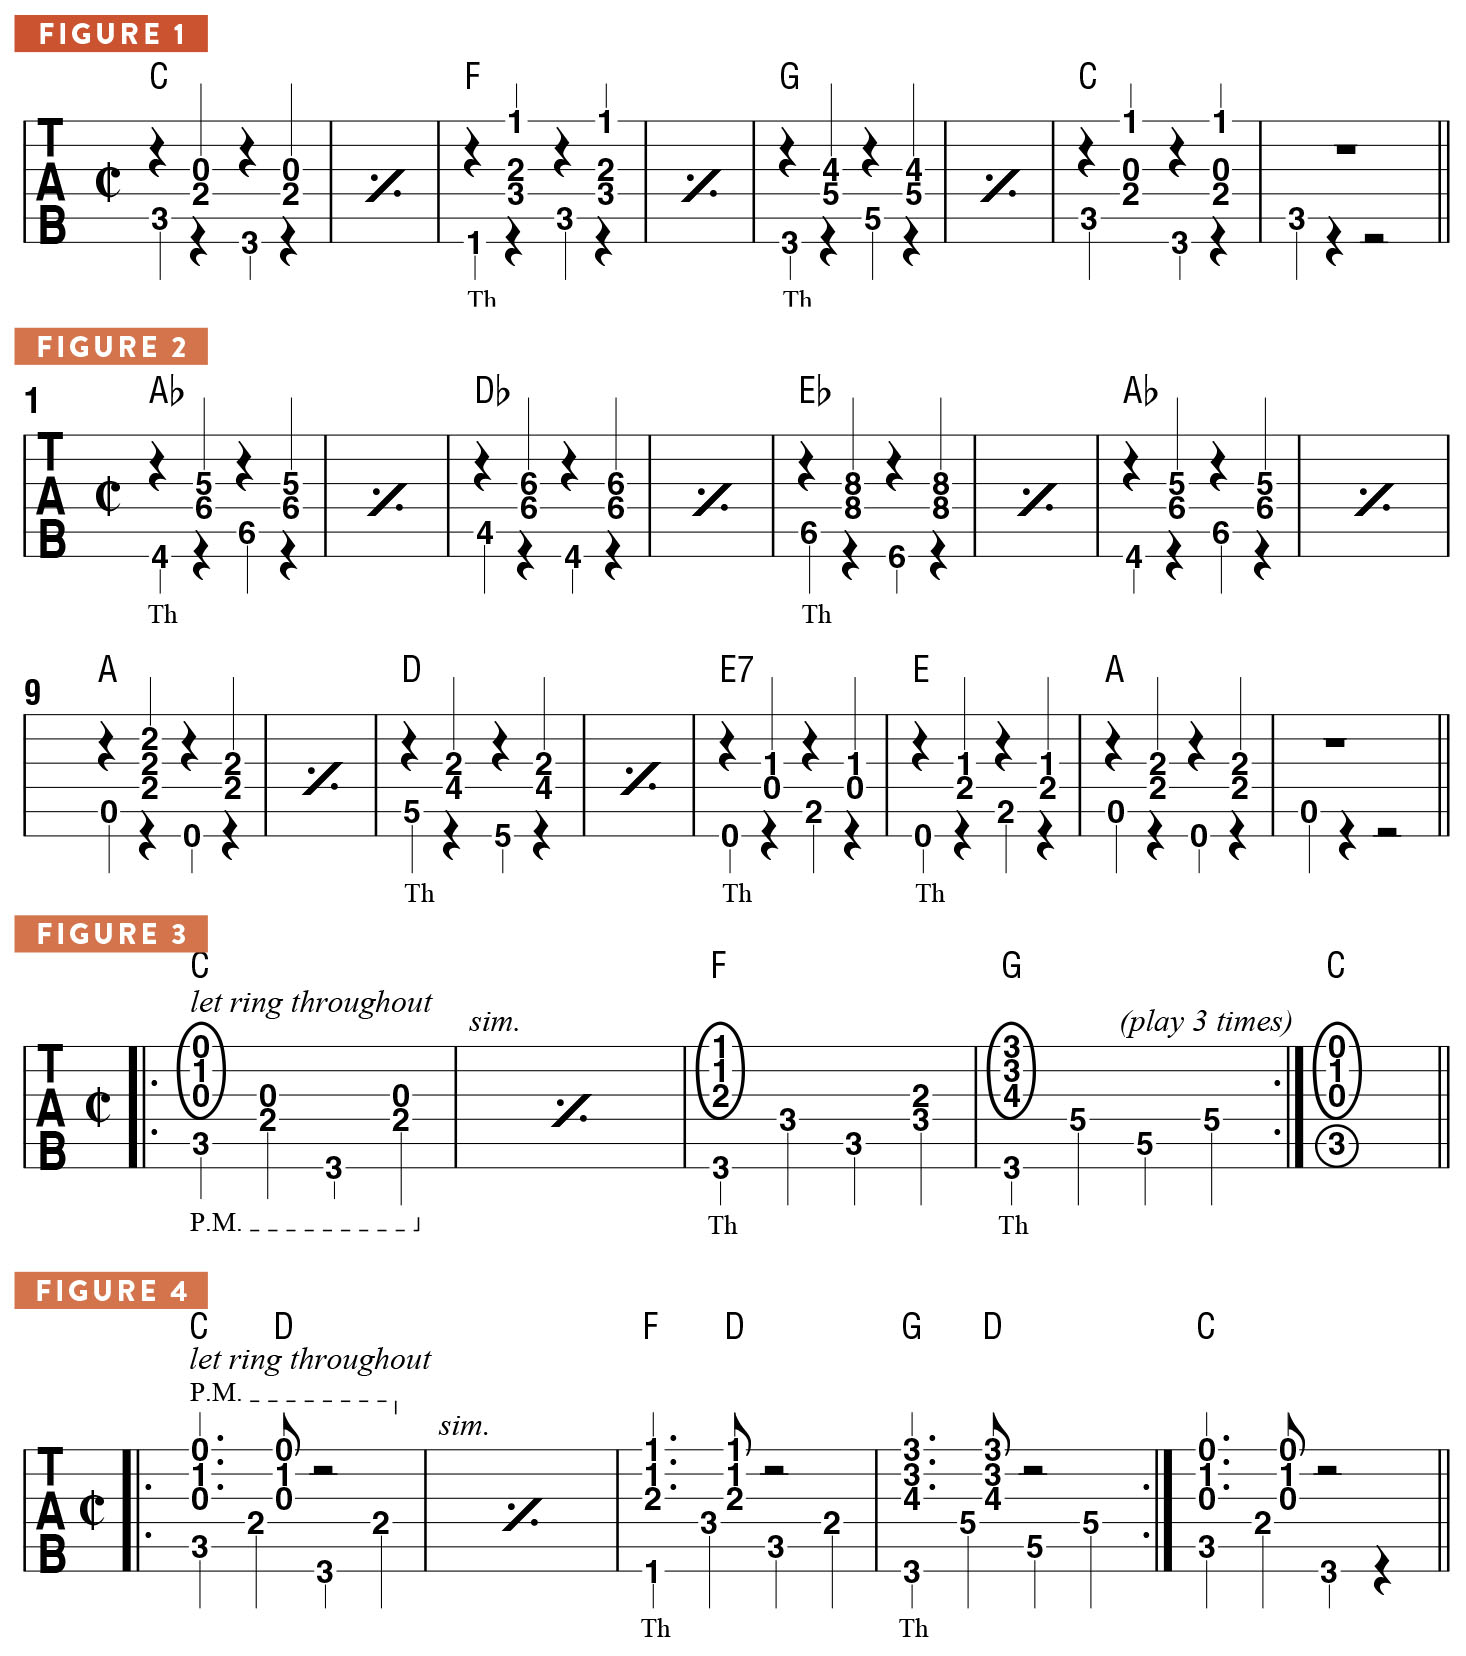
The objective is to spell out each chord with the notes sounded with the thumb, starting with the root note. When playing fingerstyle, I prefer to utilize a thumb pick. If we play a progression of C-F-G, the thumb will sound, in sequence, the root note, the third, the fifth and the third once more (FIGURE 1). The only pick-hand digit involved here is the thumb, and I am lightly muting all of the strings by resting the edge of my pick-hand palm across them next to the bridge pins. This type of pattern is called alternating bass, and the sound is often described as “BOOM-chick-BOOM-chick.”
You can, of course, use this approach in any key, so here it is in the keys of Ab and A (FIGURE 2). The voicings of the chords used here are different than those in the first example, thus demonstrating that one can easily apply this technique to different keys, string groups and areas of the fretboard.
Another factor is that my thumb is held straight out, parallel to the string, instead of coming at it from above or with any crook in the knuckle of the thumb. This is not as easy to do as it may seem; you need to practice picking with this thumb “posture” in order to play with a good sound and consistent groove.
STEP TWO
All the latest guitar news, interviews, lessons, reviews, deals and more, direct to your inbox!
Now let’s bring the other pick-hand fingers into play. We’ll leave our pinkie down against the body of the guitar to serve as an anchor. Some guitarists prefer to use a “floating” pick-hand (no anchor), but I recommend anchoring the pinkie because doing that works well for me. The pinkie will help keep your pick-hand steady at all times.
In the next exercise, we’ll repeat the thumb pattern used previously, but now we’ll bring the index, middle and ring fingers into play, to pluck notes on the top three strings, filling out each chord. These chords fall on beat one of each bar and ring throughout the bar (FIGURE 3). This exercise represents the very beginning of developing independence between the pick hand’s thumb and fingers.
STEP THREE
This step is a little more challenging, in that we’re playing a syncopated rhythm between the thumb and fingers, emphasizing the upbeat of beat two in each bar with a chordal accent. This is a great way to get started with learning to create independent rhythms between the steady beat laid down by the thumb and the accents occurring above on the higher strings (FIGURE 4). Like using two hands on a piano, the thumb and fingers have to work in tandem here to create the complete musical presentation.
STEP FOUR
Now let’s replace the chordal accents with arpeggios, wherein the notes of each chord are played individually and in succession. The fingerpicking sequence for each arpeggio is middle-index-thumb-middle, sounded on the B, G, D and high E strings, respectively. This is integrated with the alternating-bass thumb pattern we looked at earlier (FIGURE 5). Once you have a handle on this, try speeding it up and adding a few variations here and there.
FIRST SONGS
Once you can perform these primer examples comfortably, you’re ready to play your first songs in this style. One that I always teach first is the old tune “Freight Train” by Elizabeth Cotton. The first version I ever heard of this song was by Chet Atkins, who performed it in the key of E. Most people, however, learn the song in C, which is Elizabeth Cotton’s original key.
The reason I like teaching “Freight Train” first is you don’t have to run all over the fretboard to find the melody; it’s right there within each of the chords. My first step in crafting a fingerstyle approach to any tune is to find the melody notes in relation to the corresponding chords. Once I’ve located the best place to play the melody, I can combine the melodic line with the steady chordal rhythm (FIGURE 6). On the E7 chord, notice that I use a partial barre with the index finger to sound the F note on the high E string. Play through this example slowly and carefully before gradually increasing the tempo, striving to keep a steady rhythm with the thumb throughout. I suggest you work on this etude in small bites. For example, start with the melody over the C chord, then work on the melody over the G chord, and then piece those two parts together.
After you’ve practiced this piece diligently, you’ll hopefully reach the point where you’ll stop thinking about the motor skills involved and instead just focus on hearing the music coming out of your guitar. And that is a wonderful moment!
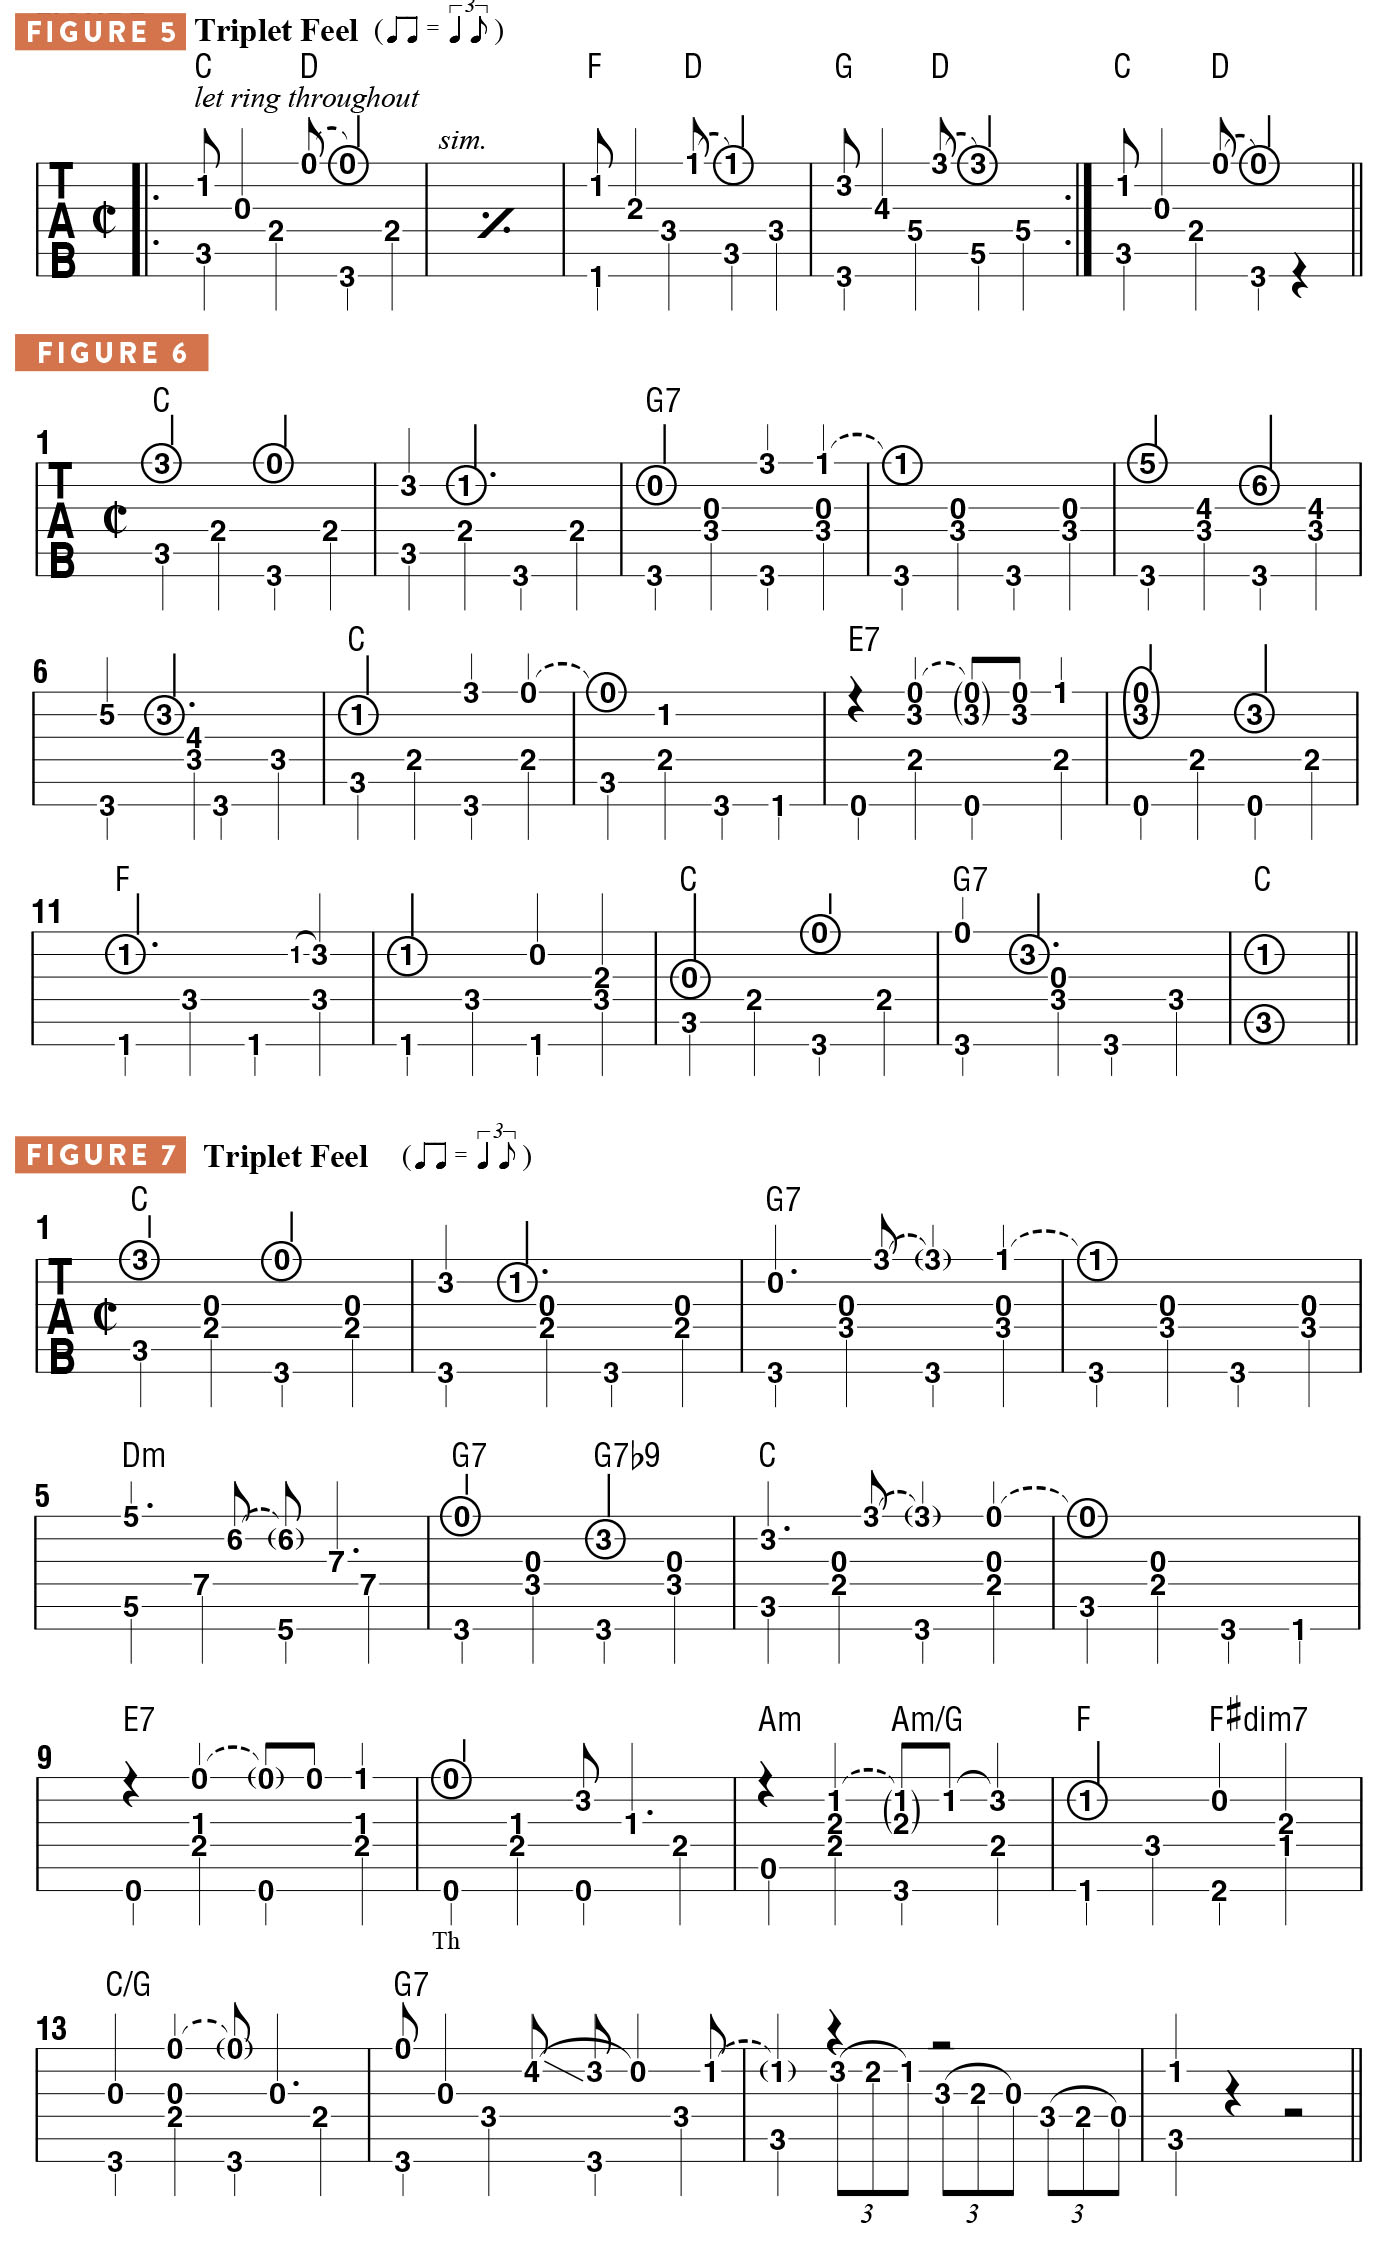
There are different ways to make “Freight Train” more interesting, and one is to bring in a few different chords (FIGURE 7). In bars 5 and 6, instead of staying on G7, you can play Dm in bar 5 before switching to G7 in bar 6 and end that bar with G7b9 for added harmonic interest.
Another twist would be to insert Am and Am/G in bar 11 before moving to F in bar 12, along with ending bar 12 with F#dim7, used as an approach chord to C/G. And I can’t resist throwing in the flashy “Chet Atkins” double pull-offs triplet run at the end (bar 15).
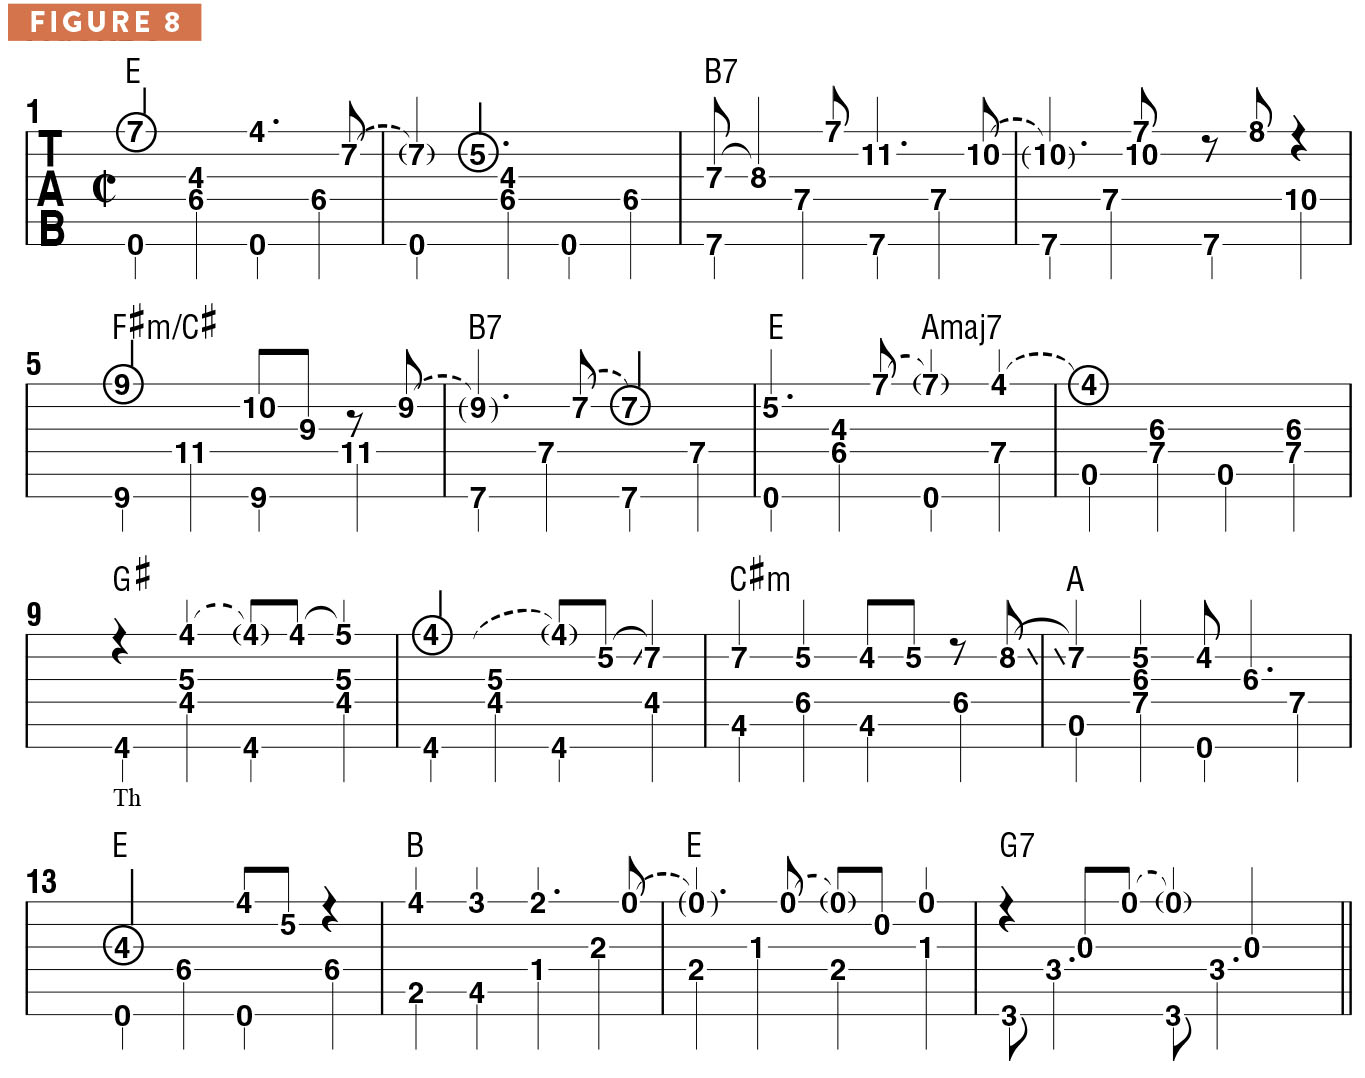
When I play “Freight Train,” I like to start in C but then modulate to E (FIGURE 8) and play it more in Chet’s style. Notice that here, I play in a more swinging rhythmic style with an implied eighth-note triplet feel. It’s fun to then modulate back to C and interpret the song in a “Mother Maybelle Carter” style with a “frailing” strumming approach, also known as “clawhammer” (FIGURE 9). For good measure, you can close it out with a little bit of “Wildwood Flower”!
This is a style that I like to apply to the old standard “Waltzing Matilda” as well, as that tune lends itself perfectly to this fingerstyle approach. I like to begin that tune with a less structured rhythm (FIGURE 10) before switching to the frailing technique, as well as other fingerpicking approaches.

CHORD SUBSTITUTIONS
Another great way to be creative with a well-known tune is to employ chord substitutions, for which the possibilities are endless. Years ago, I studied jazz great Ted Greene’s book, Chord Chemistry, which has so much great information in it, demonstrating many interesting ways of getting from one place to another, harmonically. A great example of this is Ted’s arrangement of “Watch What Happens,” wherein the melody ascends the high E string but the chords underneath are all re-harmonized (FIGURE 11).
Knowing a little bit of music theory can be very useful in finding substitute chords, and it really helps to know your intervals. Intervals are based on simple math, counting up or down through a scale to find the major or minor third, the fourth, sharp fourth, etc. If you want a raised fifth (#5), play through the major scale up to the fifth and then play the note one fret higher, which is also known as an augmented fifth. You learn these things along the way. Also, a m7b5 (minor seven flat-five) chord is sometimes referred to as half diminished, and is often written, as a chord symbol, with a circle with a diagonal slash through it, followed by a 7.
“RACHEL’S LULLABY”
One of the world’s most well known fingerstyle songs is the Beatles’ “Blackbird,” written and performed solo by Paul McCartney. There are elements of “Blackbird” that are characteristic of the music of J.S. Bach. By learning “Blackbird,” you learn so much about fingertsyle guitar, and about music, too, such as melody against chord, song structure and more. It’s a mini masterpiece!
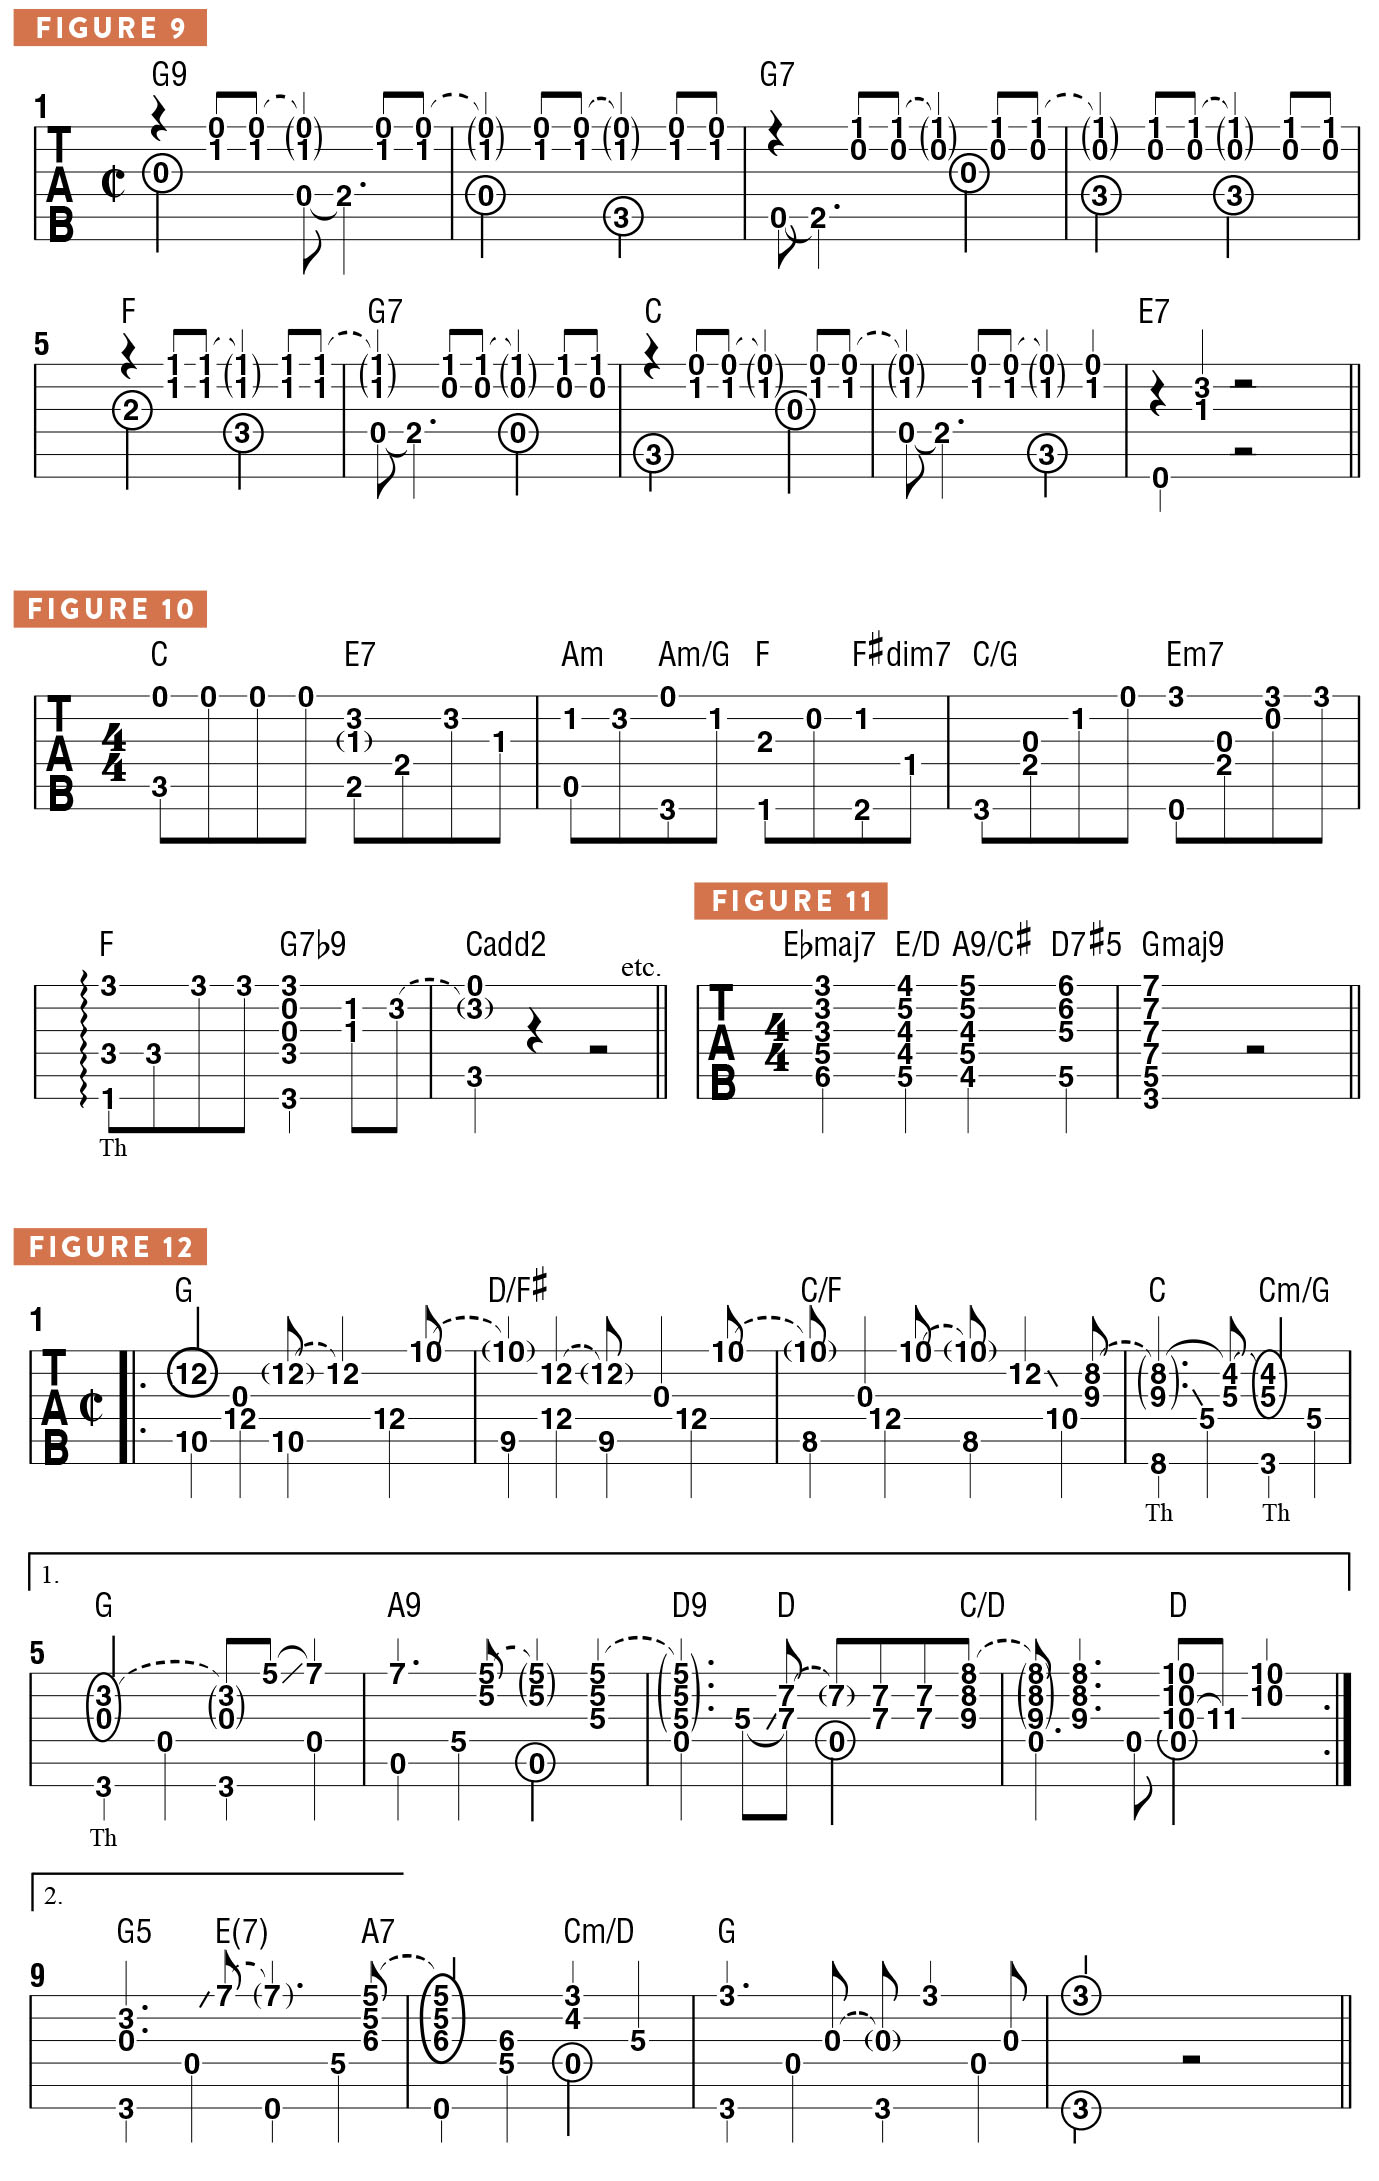
“Blackbird” was the principle inspiration for my song “Rachel’s Lullaby,” which I wrote for my daughter and recorded for my album Accomplice One. When she was a little girl, Rachel fell in love with “Blackbird,” and every time I picked up the guitar at home, she would ask me to play that song and would sing along with it, at two years old! When I wrote “Rachel’s Lullaby,” I took all the feeling I had for “Blackbird” and poured it into my own melody. Some of the chord voicings that you find in “Blackbird,” such as root-fifth-third (low to high), are also inherent in “Rachel’s Lullaby” (FIGURE 12).
Although “Rachel’s Lullaby” is nothing like “Blackbird,” musically speaking, the underlying feeling is similar, and both songs are in the key of G. In terms of pickhand execution, notice that the alternating thumb continually drives the rhythm of the song along, while the syncopated melody resides on the top strings. And the secret to the ringing quality of this pattern is the constant presence of the open G string, interspersed with chord voicings high on the fretboard.
Listening to Chet Atkins provided some of the best lessons I ever had, because you could always count on Chet to play the melody the right way, while also coming up with ideas to embellish and make his arrangements sound interesting.
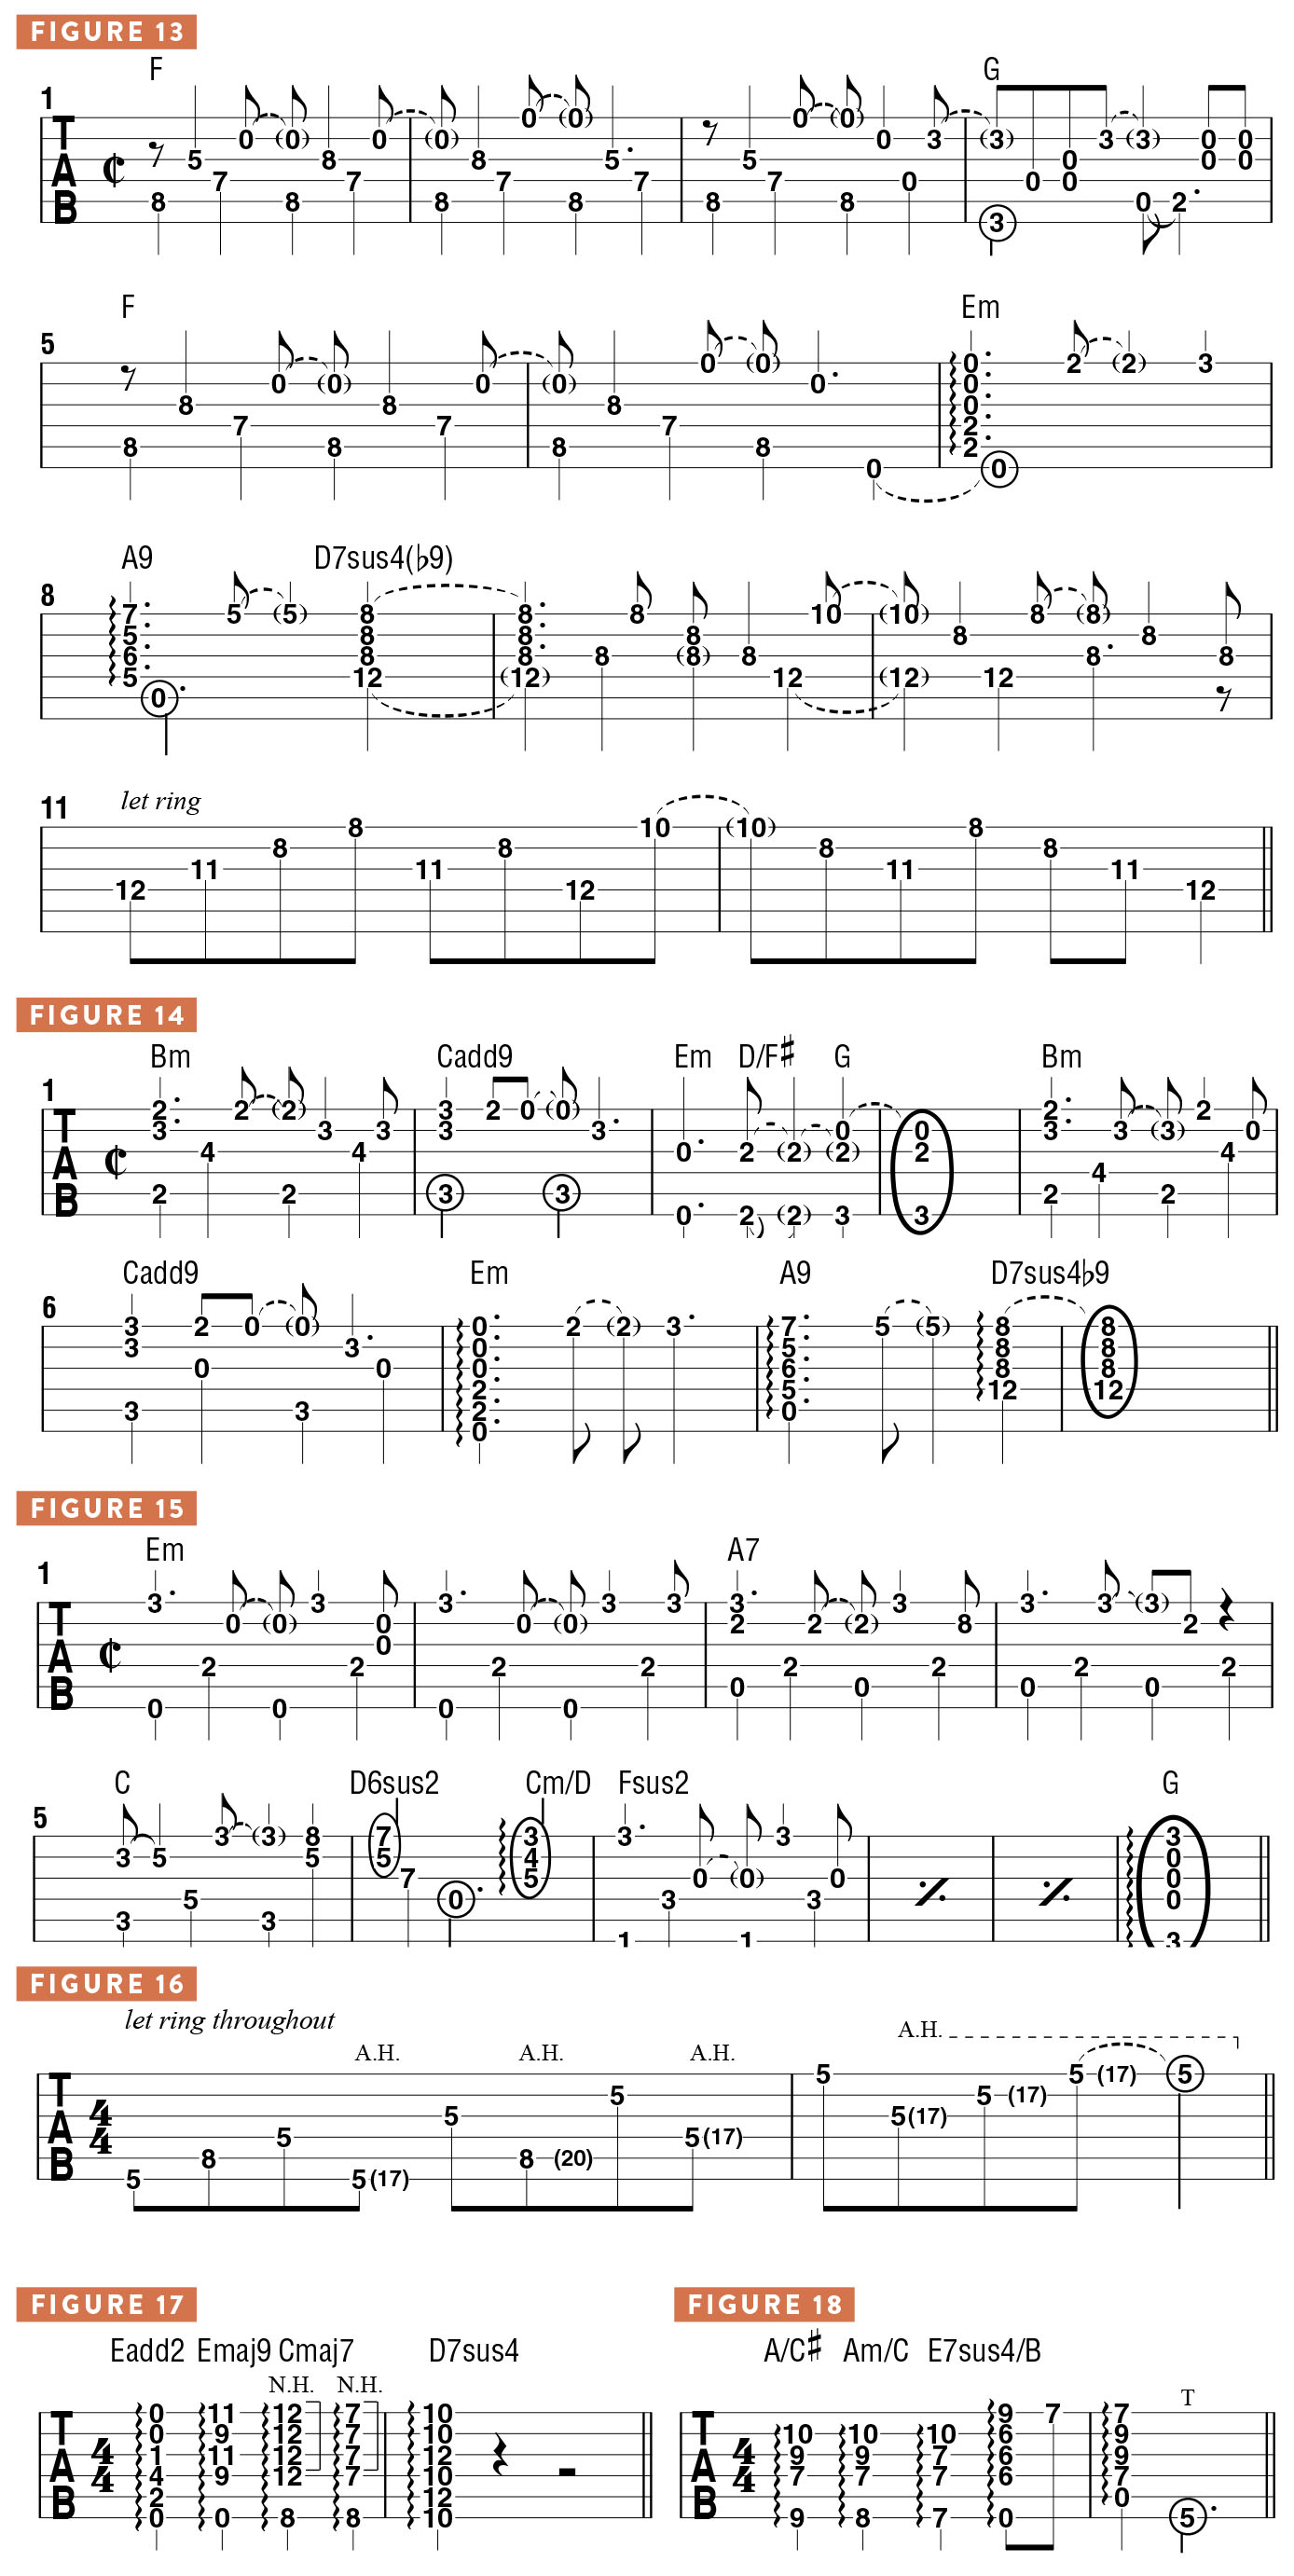
Once you have the verse down, move on to the first bridge section (FIGURE 13), which begins on an F(#4) chord, the #4 note provided by the open B string. While the alternating thumb pattern continues in a manner similar to the verse, I additionally bring in some strumming with my index finger, à la “Blackbird,” as well as raked chords (drag the pick, or a finger, across all the strings, from low to high) sounded with the thumb alone.
At the second bridge (FIGURE 14), bars 1–6 are played with the same fingerstyle approach, switching at bar 7 to raked chords, moving from Em to A7sus4 to D7sus4(b9). When I play the Em, I like to fret both the A and D strings with the tip of my index finger, which, for me, makes the performance a little bit easier.
For the ending of the tune (FIGURE 15), I switch to a more traditional Travis picking approach (a technique named after legendary fingerpicker Merle Travis), moving away from that steady rhythm in bars 5 and 6 to accentuate the high part of the melody. In this song, as with most of my compositions, I’m always looking at different ways of sounding one note against another, and having them ring together. That has always fascinated me.
You need to practice chord shapes like those used here, wherein the chords are held and the notes sustain, so that your fretting hand will get stronger and more dexterous. Practice until your hand starts to ache, stop and relax, and then resume. The same principle applies when playing the harmonic rows on the guitar, because a lot of fret-hand strength is required to hold those shapes firmly. Clarity and great sound take strength and control. In order to just hold this shape (FIGURE 16), you will need to work to build up the required strength in the fret-hand.
TUNING
One of the most important things that I think is often overlooked is tuning. I spend a lot of time tuning before I go onstage. I change my strings quite often, sometimes every night, if I feel the guitar needs it. If a set of strings sounds great, I’ll leave them, because they are all settled in. If you are really in tune, you will enjoy playing so much more, and you will also be able to depend on the entire guitar, especially way up the neck, giving you what you need from it.
To check the tuning of the guitar, I like to run through a series of unusual chords (FIGURE 17), chords combined with natural harmonics, and voicings high up on the fretboard. For example, if I move from A/C# to Am/C to E7sus4/B (FIGURE 18), the guitar has to be tuned just right for each of these chords to sound true and intonated properly.
“HOPE STREET”
“Hope Street” is a song that really tests the tuning of the guitar. There are many small chord voicings that move around the fretboard and are all played against open strings, creating “doubled” notes here and there, so the guitar really needs to be tuned precisely for each of those chords to sound really good (FIGURE 19). The G/B chord in the final bar of this example is a good barometer, because the low B note, fretted with the thumb, needs to sound right against the open D string and the high voicing on the top three strings.
Another good example is the lick I play at the end of the tune’s bridge (FIGURE 20), wherein a natural harmonic (N.H.) on the low E string rings against sustained pairs of higher strings.
MERLE TRAVIS AND CHET ATKINS
Merle Travis came before Chet, but if you want to delve into the origins of Merle’s style, listen to Ike Everly, the father of the Everly Brothers, as Merle got many of his ideas and playing approaches from Ike. Another guitarist who was a big influence on Merle’s style was Mose Rager. Travis “stole” as much as he could from these players, in the same way that I’ve stolen as much as I can from him! As musicians, we’re all petty thieves—that’s how the language of music gets handed down.
Merle, Ike and Mose all played in the style where the middle finger, ring finger and pinkie of the pick hand are all anchored to the guitar, with just the thumb and index finger striking the strings. Where the thumb alternates quickly across the lower strings, the index finger rakes across the higher strings in an upstroke motion to add the melody (FIGURE 21). It’s almost like a honky-tonk piano sound. Travis did it with great feeling, tone and ideas.
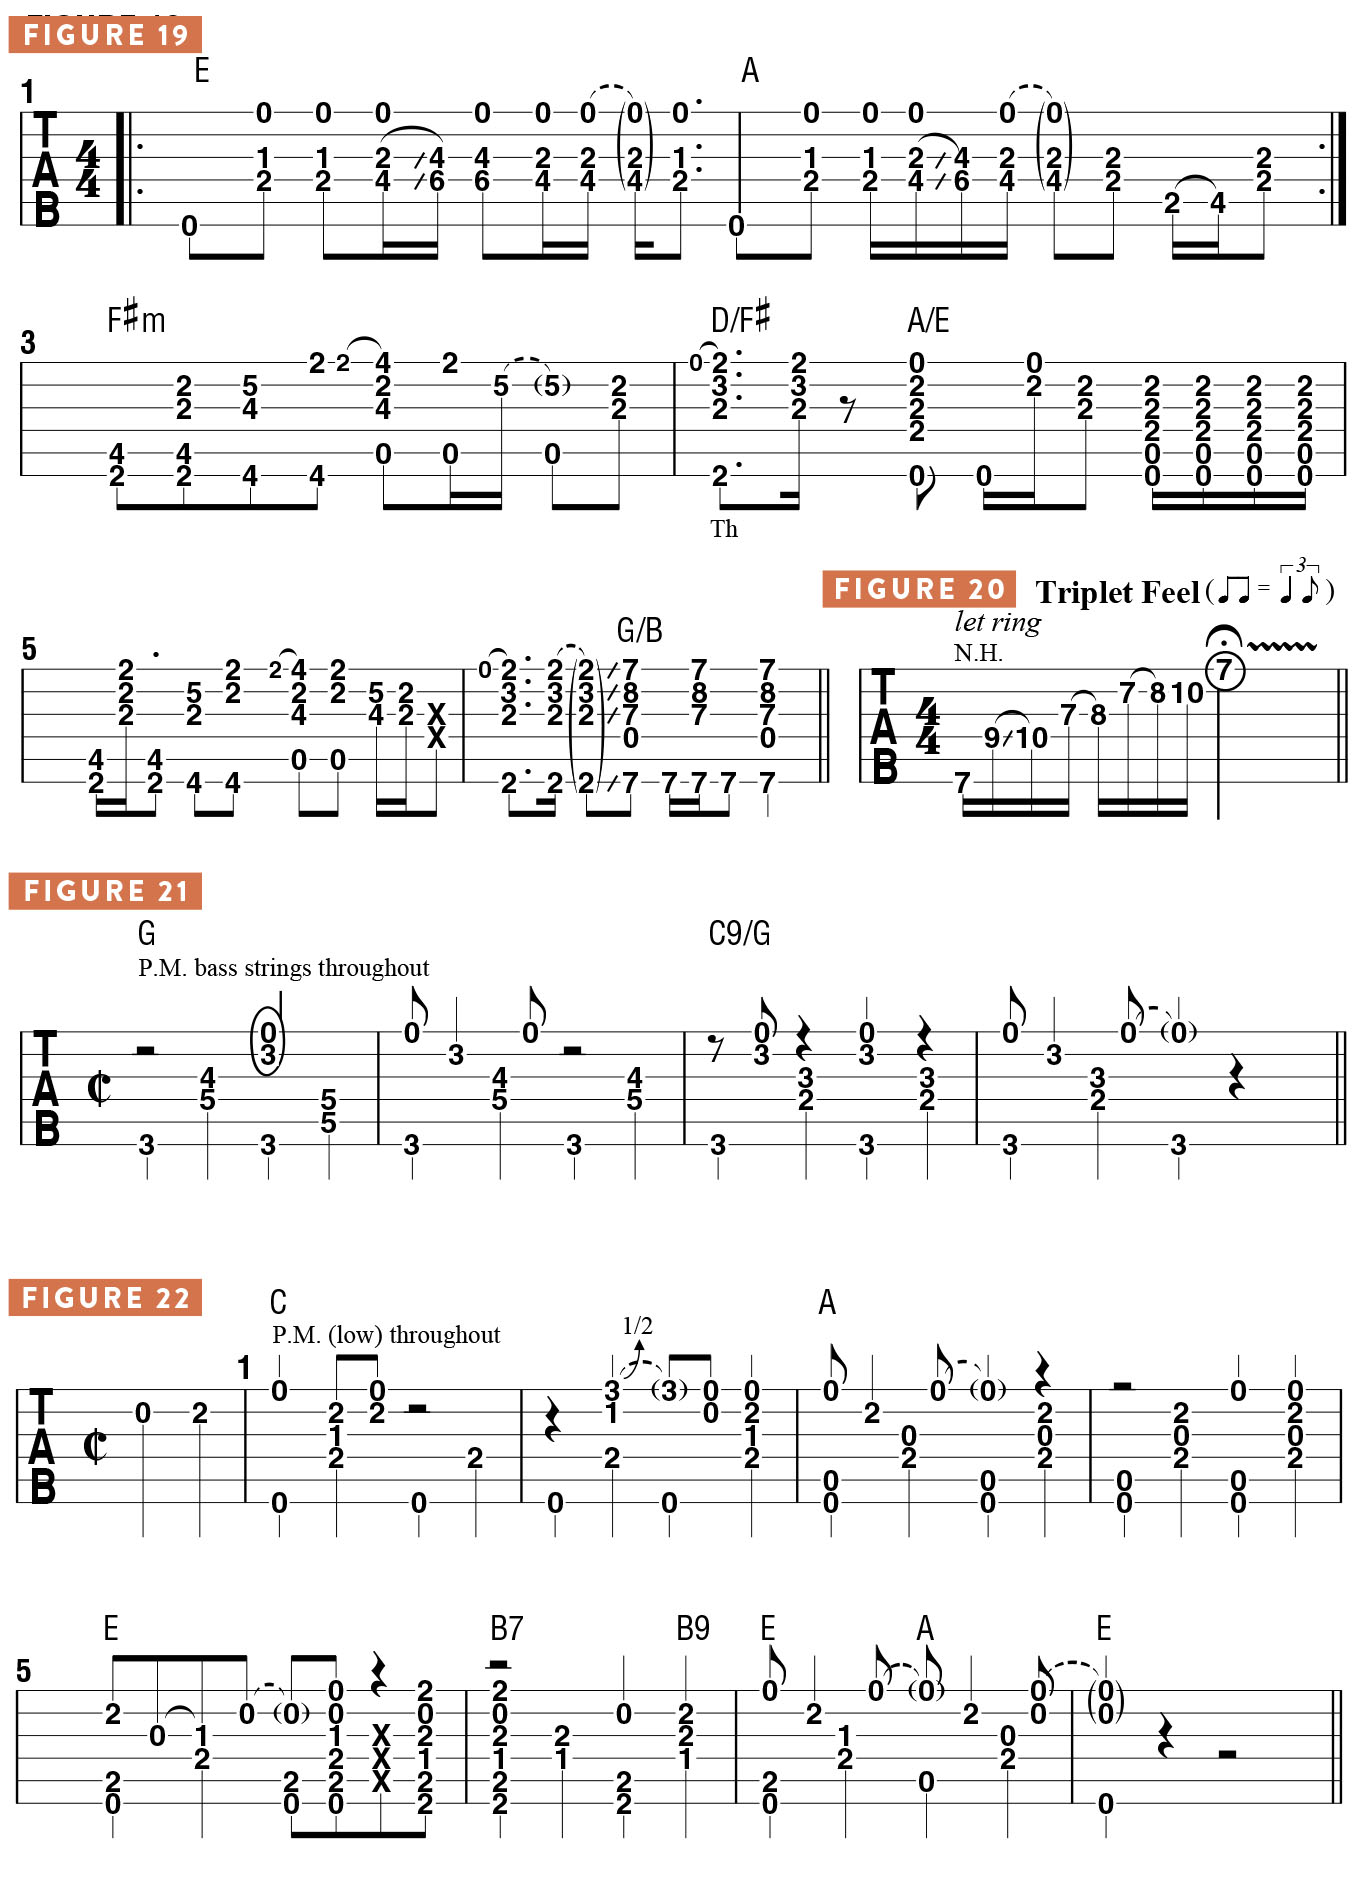
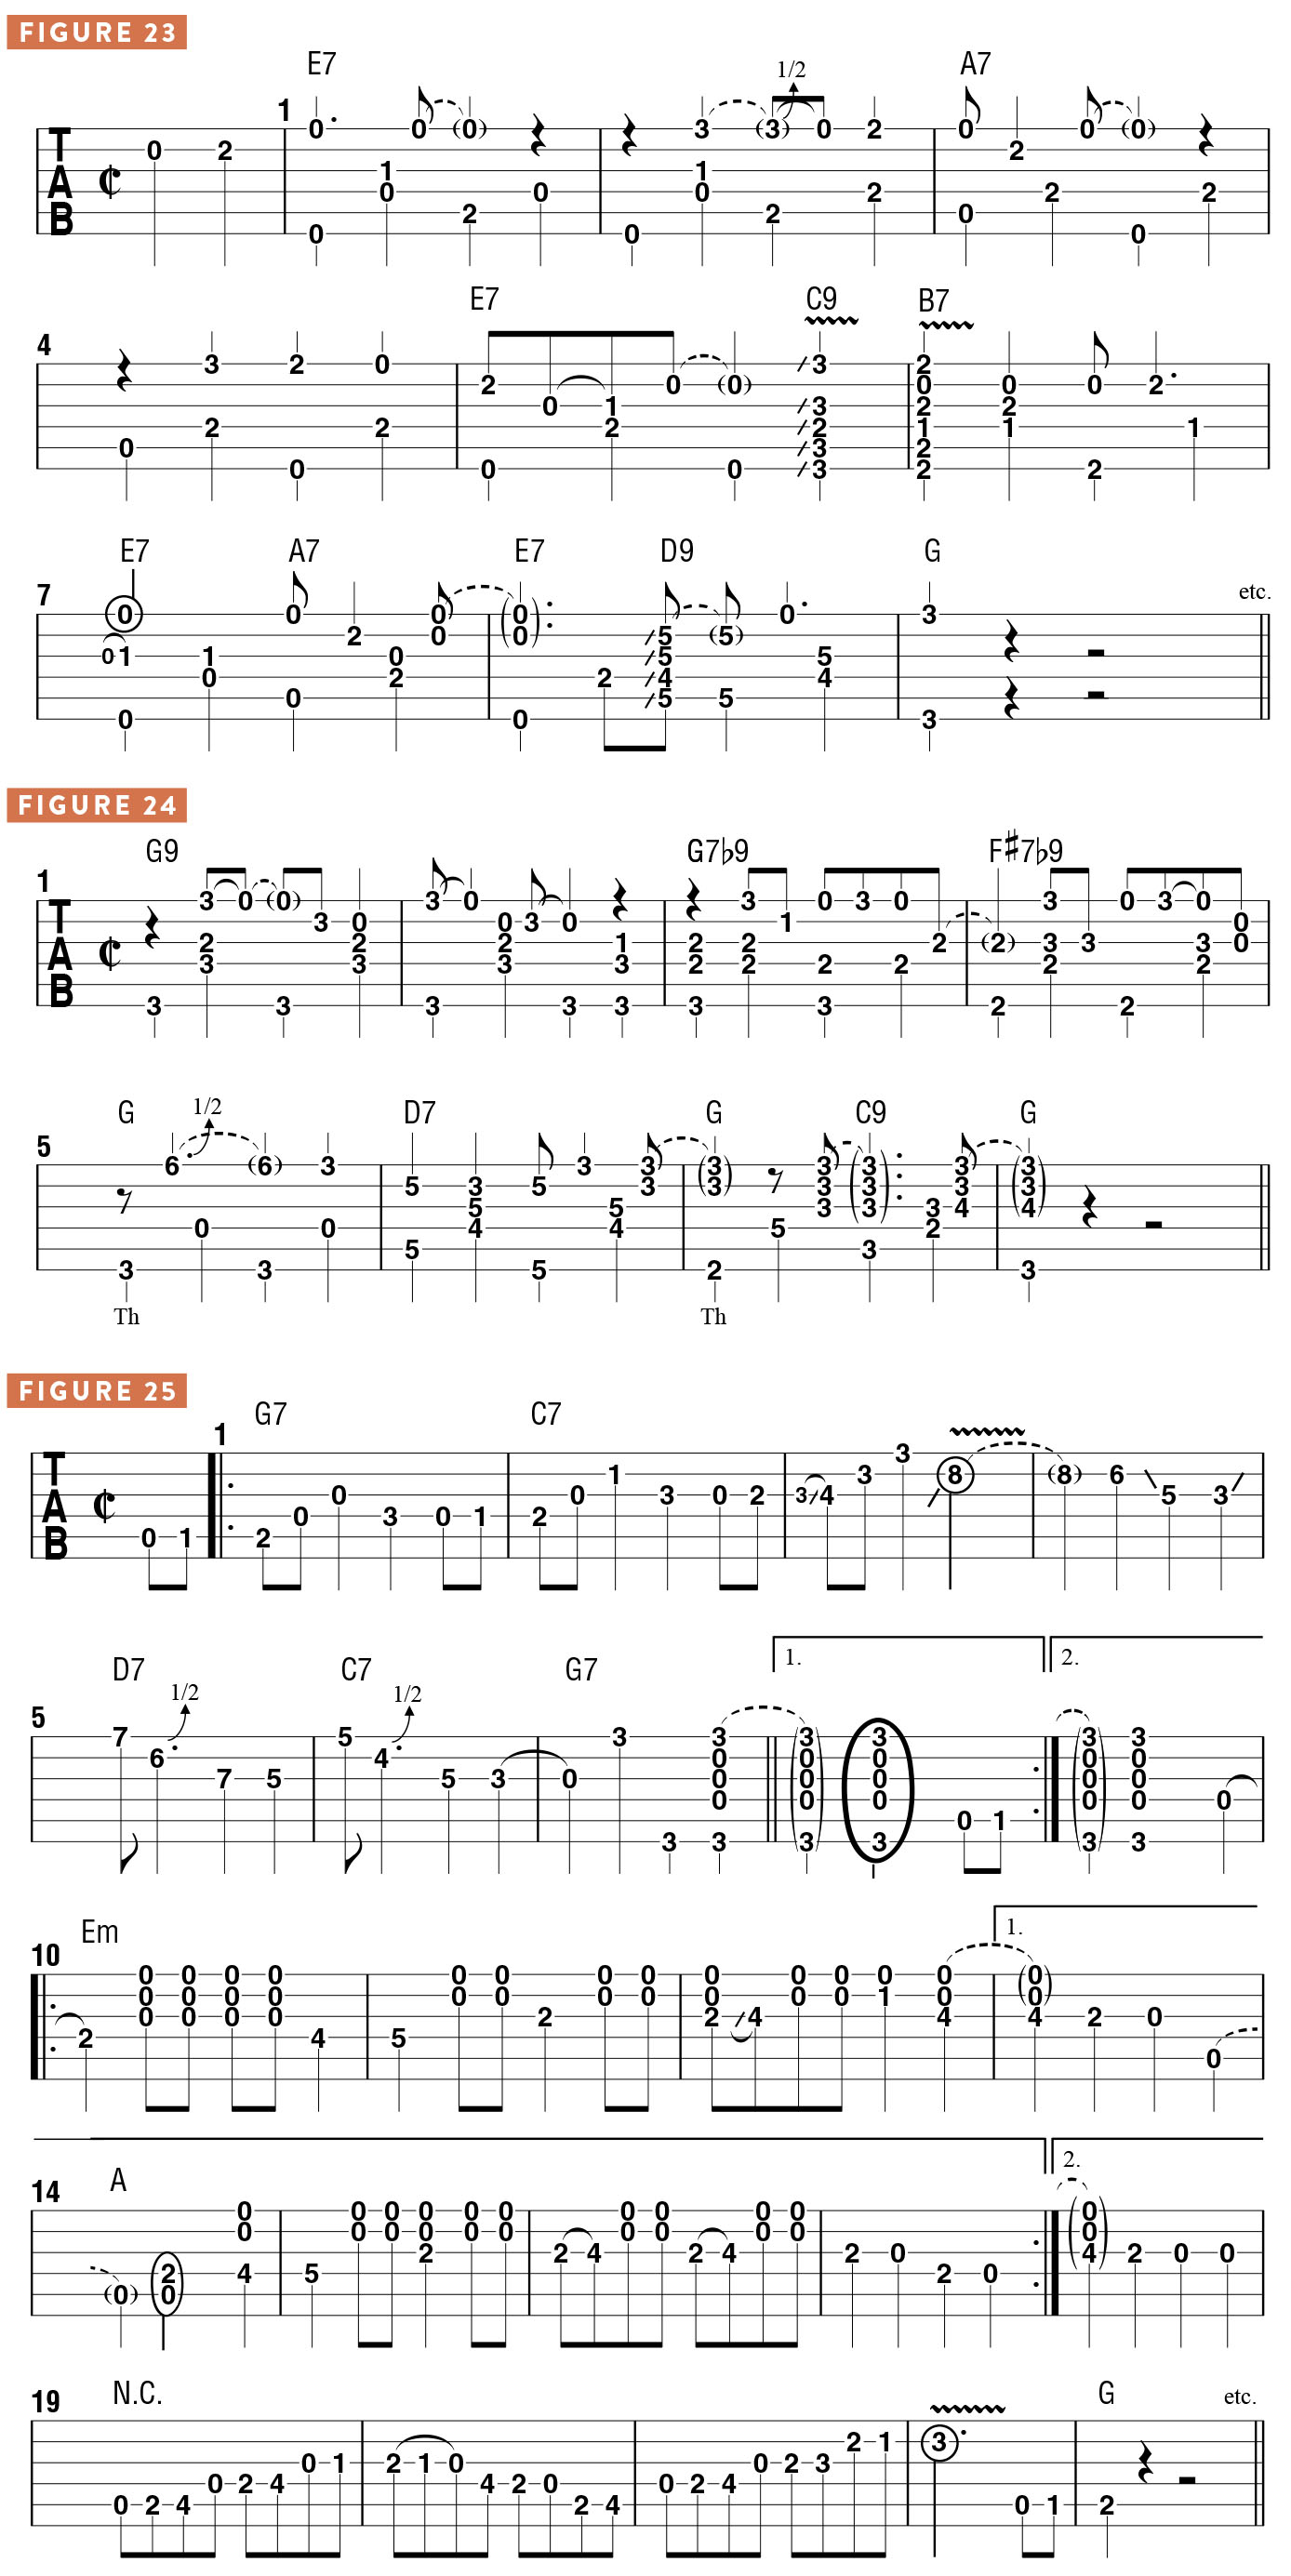
Chet Atkins took this approach in a different direction and made it much more athletic. A lot of his early recordings were so brilliant, none of us could believe our ears. For example, when Merle played “Nine Pound Hammer” and switched from that tune’s E chord to A, he still hit the low E string; he just kind of “plunked” away on it (FIGURE 22).
Chet’s approach was much more orderly and precise (FIGURE 23). Travis would play the next part like this (FIGURE 24). Let me recommend this to you: if you want to see someone play in Merle Travis’ style most authentically, you’ve got to check out Thom Bresh and Eddie Pennington. Those players can teach you more about Merle Travis’ playing than anybody on this planet.
The thing with Chet is that he started to play after hearing Merle Travis, developed his own style, and then heard Django Reinhardt and discovered Andrés Segovia and classical music. Chet actually studied with Segovia for a while, until Segovia found out that he played an electric guitar and refused to teach him after that! So Chet acquired all of that knowledge and experience in all of those different styles.
FLATPICKING: “WHEELIN’ AND DEALIN’ ”
Appearing on my Accomplice One album is an instrumental I wrote called “Wheelin’ and Dealin’,” which I purposely wrote in the style of “Eastbound and Down” by Jerry Reed, which was featured in the film Smokey and the Bandit. I perform “Wheelin’ and Dealin’ ” with a flat pick, and my “straight pick” style is pretty much made up of consistent alternate (down-up) picking (FIGURE 25), or whatever is needed at any moment. This song is fast, played in the typical bluegrass style with a lot of drive that’s provided by the pick hand.
HYBRID PICKING: “DRIVE TIME”
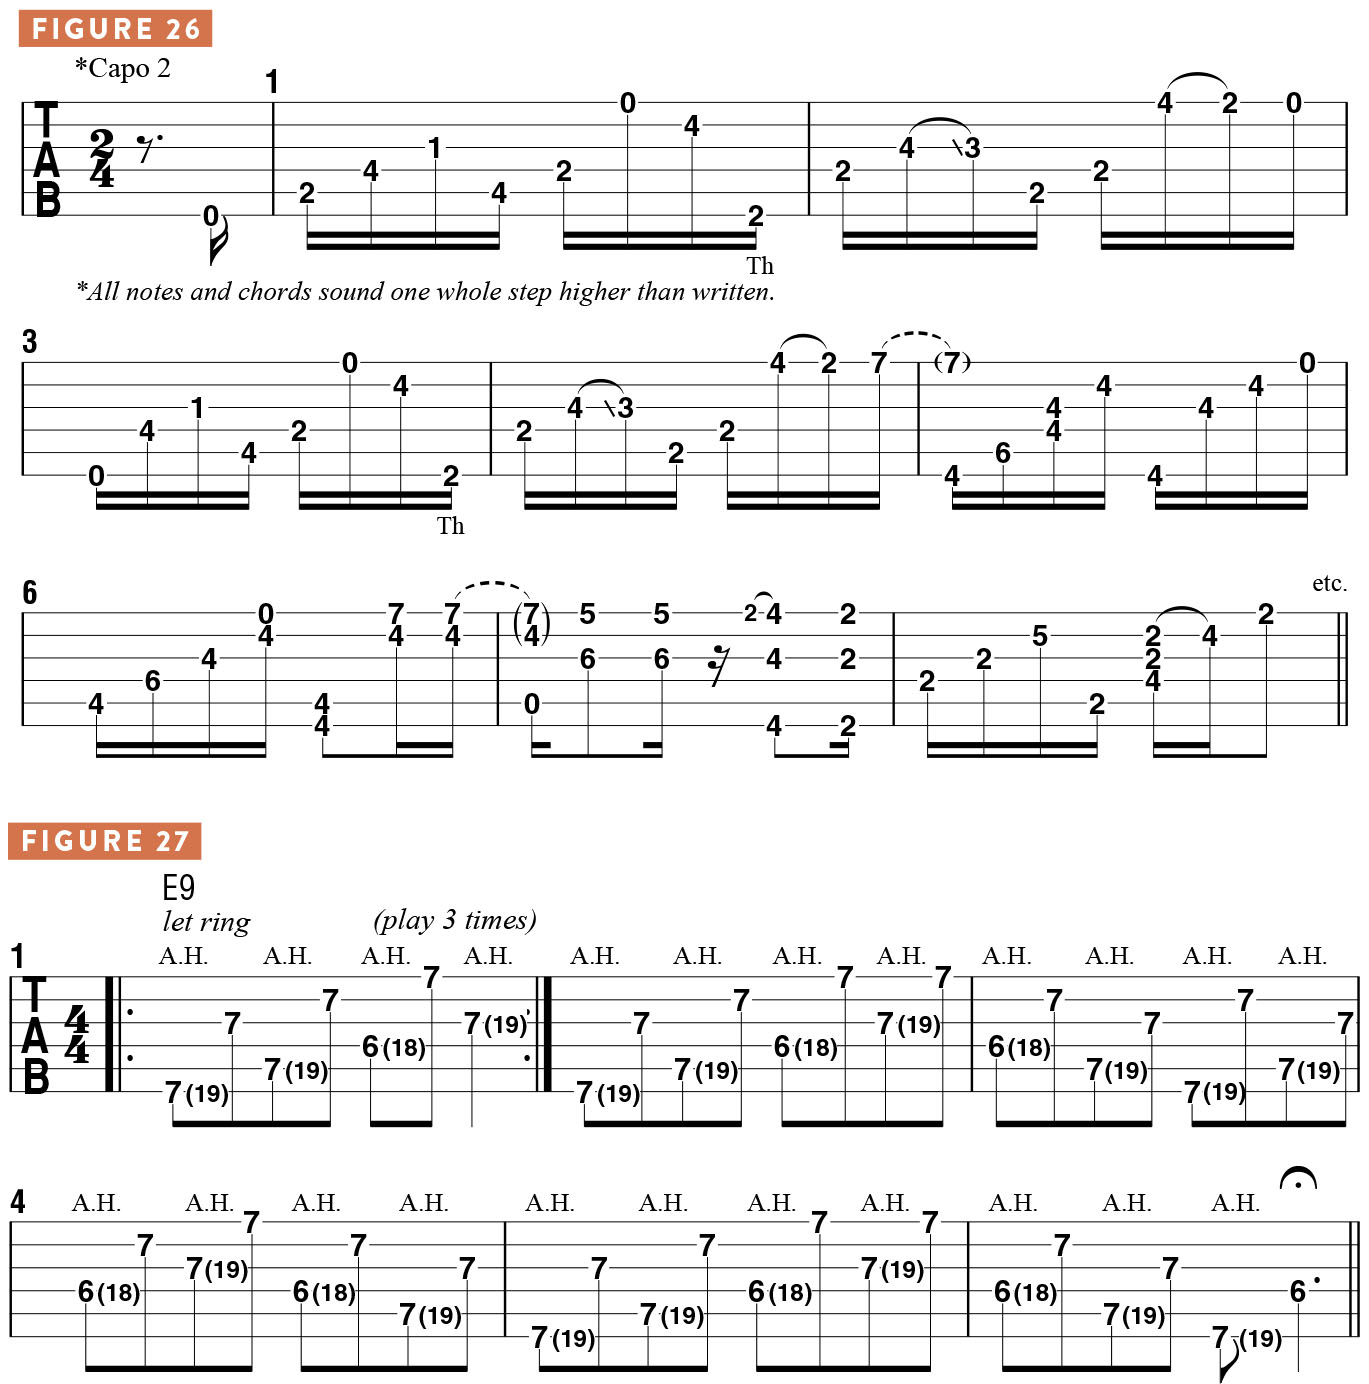
Now let’s try something a bit harder, a tune of mine called “Drive Time,” which I play with the capo at the second fret. The song is performed as if it were in the key of E but sounds in F#, due to the capo transposition. I play a lot of the melodic parts either with the pick or with my fingers, utilizing a technique known as hybrid picking, wherein flatpicking and fingerpicking are combined (FIGURE 26). The idea when using hybrid picking is to make the flatpicked and fingerpicked notes sound as similar as possible, so that the sound overall is blended and seamless.
HARP HARMONICS
A lot of people ask me about my use of harp harmonics, a technique so named because it emulates the sound of rolling arpeggios on a classical harp. The technique incorporates a combination of conventionally fretted and picked notes and artificial harmonics (A.H.) played alternately in a rapid manner, so that it is difficult to distinguish which of the notes are the harmonics. I learned about this technique and style from Chet Atkins and the brilliant Lenny Breau. Ted Greene did harp harmonics very well, too, and because of his vast chord knowledge, he played some really fantastic, creative harmonic arpeggios that sounded like no one else. I think Lenny took the technique to a level that no one has ever even come close to. Thank you, Lenny, for your legacy and for what you left us!
The idea is to get notes ringing like bells, with as much sustain as possible. If you do it with a flat pick, the pick must be held between the middle finger and thumb, so that the index finger can lightly touch the string exactly 12 frets higher than the fret-ted note, creating the sound of the artificial harmonic. If I use the thumb pick, though, I can get a cleaner sound, and my middle finger is now free to fingerpick, as well.
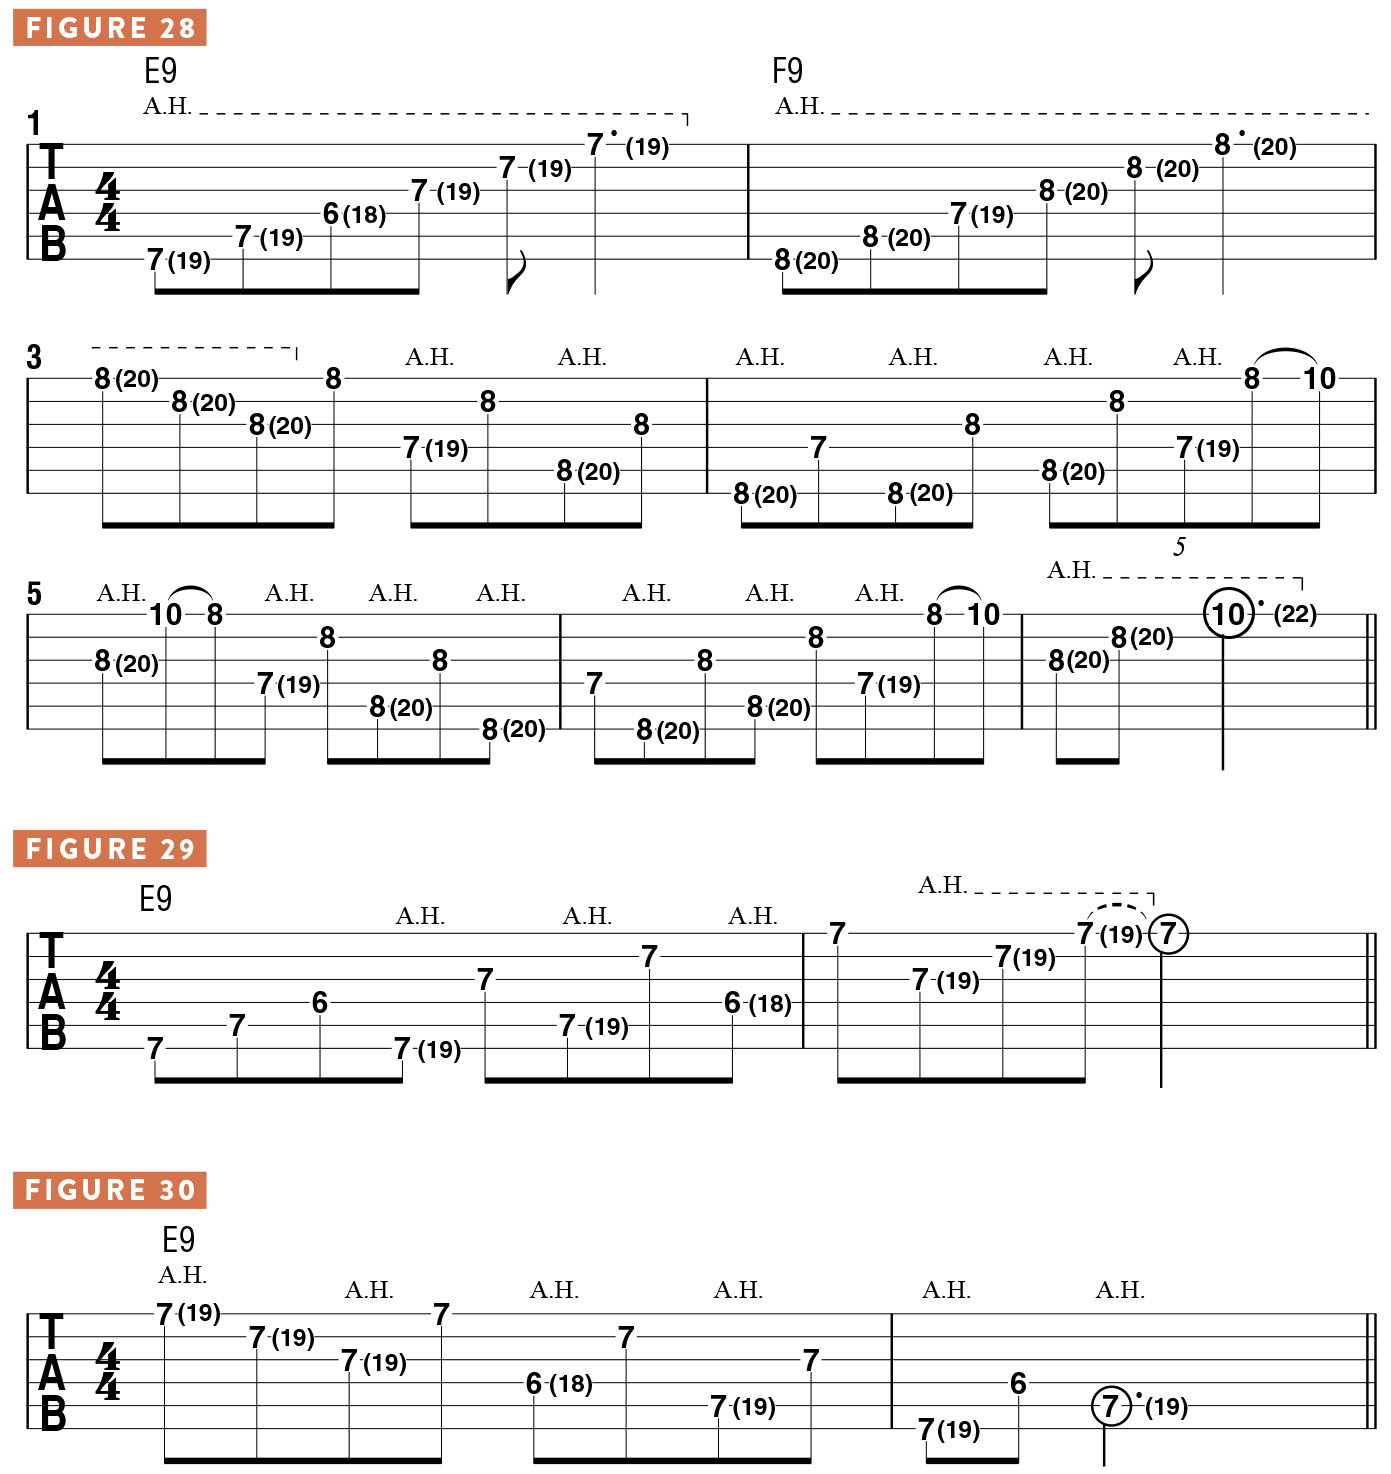
A good place to start is with an E9 chord (FIGURE 27): the pattern is harmonic, open note, harmonic, open note, etc., and by “open note,” I mean a normally picked fretted note. All the harmonics are picked with the thumb pick, with the index finger touching the string 12 frets higher than where the note is fretted, and the other notes are picked with the ring finger.
A good way to practice and master this technique is to play only harmonics at first (FIGURE 28), using E9 and F9, and then switch to the “harp” technique halfway through. A great twist is to introduce another pitch, via a hammer-on (bars 4–6). And you can create a longer row by starting with three normally picked notes on the bottom strings (FIGURE 29). If you’d like to start on the higher strings, begin with consecutive harmonics (FIGURE 30).
A song I perform at virtually all of my shows that incorporates many harp harmonics is “Somewhere Over the Rainbow,” which, musically, is a perfect vehicle for the technique.
PRACTICE REGIMEN
I’m often asked if I have a standard practice regimen or routine that I use. I’m very much not a routine kind of person. I like to practice what I need to practice. I play what I love, and that has served me well.

There are many different ways to practice, and the best way, to me, is what I call “sincere practicing.” That means to play the song as if you are onstage and people are watching you, and your life depends on it! I try not to waste time while I practice, just noodling along. I might play something that is difficult over and over, just so I can break down the difficulty level for myself.
I might play a fast tune like “Cannonball Rag” and go over it 100 times, purely to build up my finger strength and endurance. But one of the very best ways to practice is to jam with another player, someone who will push you and challenge you to come up with something new in the next five bars.
I also practice improvising: I’ll take a 12-bar blues and start playing, and I won’t stop even if I mess up and make a mistake. I imagine I’m onstage and fronting a band, so there’s no turning back, no stopping to fix your mistakes. Putting yourself in this mindset is, to me, the best way to practice.
