School of Shred: Paul Gilbert on the Art and Science of Playing Lead Guitar
When it comes to shred, few guitarists can rip like Paul Gilbert. In this insightful multi-part lesson, he breaks down the mechanics of his various playing techniques.

When it comes to shred, few guitarists can rip like Paul Gilbert. As the driving force behind shred-progenitors Racer X and the chart-topping late-Eighties outfit Mr. Big, Gilbert dazzled with his unhuman fretboard range that included wide stretches and intervallic leaps.
But he was a reluctant guitar hero.
When he went solo in 1996, Gilbert shied from the shred spotlight and pursued a pop vocal direction. It took more than 10 years, but in 2007, he returned to the land of big guitar chops with his solo debut, Get Out of My Yard, an album that represents the perfect meld of his amazing technique, harmonic gifts and off-the-wall sense of humor.
As anyone who has seen him on a G3 tour with Joe Satriani and John Petrucci can tell you, Gilbert’s talent for ripping guitar lines has only grown stronger.
An articulate and effective teacher, Gilbert presents an insightful multipart lesson in which he breaks down the mechanics of his various playing techniques and his conceptual approaches to the instrument.
Rhythmic Ideas
As Gilbert explains in this first section of the lesson, a great way to generate ideas for melodic and rhythmically grooving solo licks is to play a simple rhythmic vamp made up of a few notes and some “scratch” strums, then use it as a springboard for improvising melodic ideas. This is easier said than done, especially for shredders who are used to tearing up and down the fretboard with little consideration for rhythm and playing “in the pocket.”
All the latest guitar news, interviews, lessons, reviews, deals and more, direct to your inbox!
Gilbert suggests starting out with simple ideas that are rhythmically interesting but don’t have a lot of notes, such as the funky A minor pentatonic-based vamp shown in FIGURE 1. By thinking like a drummer and focusing on playing something that really grooves, you’ll pay more attention to playing with feeling and soul. When playing this vamp, pick aggressively and try to get the most out of each note, and be sure to tap your foot in steady quarter notes to really get into the groove.

Once you get used to this approach, you can start to introduce more notes, and that’s where the fun really begins. As Gilbert demonstrates, you can use a simple vamp as a launch pad for improvising more ambitious, note-inclusive licks and fills, like those shown in FIGURES 2 to 4. Gilbert advises that it’s very helpful to think of each of these phrases as being played as a drum solo, something that inspires him creatively and helps him remember ideas.
The fret-by-fret chromatic movement in FIGURE 2 shouldn’t be too difficult to master. When playing it, use whatever fingering you like; make sure to mute the lower strings to suppress unwanted noise and to count and perform the rhythms correctly.

FIGURE 3, while based on the harmonically straightforward A minor pentatonic scale, is a more challenging fill, as it involves some string skipping. As when learning any new piece of music, start out slowly and gradually increase the tempo while streamlining and economizing your movements.

The lick in FIGURE 4 doesn’t follow a set pattern but uses ideas similar to those in the three previous examples. The muted notes will help you maintain your groove throughout, so concentrate on making the pick hand comfortable before targeting all the notes.

“Reverse” String Bends
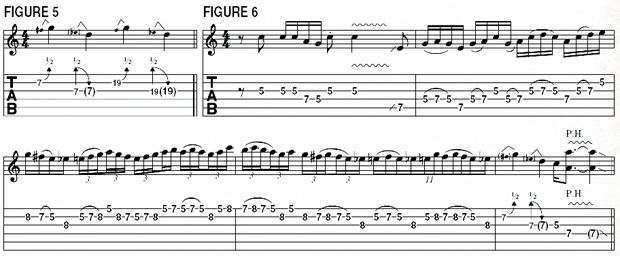
FIGURE 5 is an example of a slick, country pedal-steel-style bending technique Gilbert demonstrates whereby he picks a fretted note on the B string, bends the string with his ring finger (supported by the middle finger) and simultaneously bends the G string at the same fret with the tips of the same fingers. Upon completing the B-string bend, he picks the G string for the first time and releases the bend, creating a drop in pitch on that string (from Eb to D). This cool-sounding move is often called a “pre-bend and release” or a “reverse bend.”
Most of your practice should be centered on executing the half-step bends in tune. You can reference the target pitches of the bends by playing the unbent notes one fret higher. Once you get the techniques under your fingers, move the lick around the neck in different positions and keys. The technique also works quite well on the first and second strings.
In true Gilbert style, our maestro demonstrates the lick in a fast blues context at the end of a blazing run in A (see FIGURE 6).

Fast, Repeating Blues Licks
Gilbert plays many note patterns that are familiar to most rock guitarists, but there is always more than meets the eye when one attempts to play any of his licks. The resourceful guitarist often begins a fast run with an upstroke.
This may seem unusual, but it allows Gilbert to maintain an outside picking motion as he moves from the second string to the third, as he demonstrates with the repeating A minor blues scale lick shown in FIGURE 7. This kind of economical picking movement becomes even more important when string skipping, as the guitarist goes on to demonstrate in FIGURES 8 and 9.

In FIGURE 10, Gilbert performs a double pull-off on the third string, changing the rhythm from three- note groups to four-note groups. When playing all four of these examples, keep your fret-hand index finger barred at the fifth fret.

[[ 'Shred Alert' DVD: Let Paul Gilbert Teach You How to Shred ]]
Blazing Pentatonics
Many of Gilbert’s licks are based on patterns that he moves around the fretboard, as he demonstrates with the climbing A minor pentatonic legato run in FIGURE 11. The initial melodic pattern is eight notes long and is repeated with different notes across the remaining strings.
Although Gilbert has long fingers, he uses his fret-hand pinkie a lot. It’s a point worth noting, because you might think that he would rely on his extended reach and not use his pinkie much at all. Gilbert advises students with similarly endowed hands to develop the use if their pinkie because it will pay off in the long run.
The earlier you build its strength, the sooner it can become useful. Be sure to use the pinkie to finger all the eighth-fret notes in FIGURE 11.

When playing this example, it’s easy to start thinking in triplets, as the grouping of the first three notes suggests. Keep in mind that you’re playing 16th notes; tapping your foot, or at least nodding your head on each downbeat as Gilbert does in the video, will help you feel the 16th-note subdivision.
FIGURE 12 is a descending, pattern based A minor pentatonic lick that Gilbert demonstrates, this one incorporating more hammer-ons than pull-offs. Notice the wide interval jump between the fifth and sixth notes (C down to E). Gilbert begins this lick with a downstroke and alternate picks the notes that aren’t slurred, avoiding the use of two consecutive downstrokes or upstrokes, which in this case would slow him down. Try moving this lick to other areas of the neck and repeating it in different octaves, as Gilbert often does.

Natural Harmonics
In FIGURE 13, Gilbert demonstrates how a scale, in this case C major, may be played melodically in diatonic thirds. The pattern is “down one note, up two notes,” and it stays within the scale. Gilbert does something similar in FIGURE 14. Here, he uses a symmetrical fingering pattern across the strings, but the notes don’t comprise any particular scale.
Players like Eddie Van Halen and Dimebag Darrell have used symmetrical patterns like this in their lead playing. Be sure to concentrate on the fingering pattern used in this example and notice how it’s similar to the first example, in terms of contour.

Gilbert then takes the same fingering pattern from FIGURE 14 and plays natural harmonics (N.H.) instead of fretted notes, creating a very cool and unusual note sequence with lots of wide intervals. When executing each natural harmonic, be sure to lightly touch the string with the fret-hand finger directly over the fret rather than press the string down to the neck behind the fret. The harmonics at the fourth fret are a little more challenging to nail and must be performed accurately. Otherwise you’ll just produce a dull mute.

Piano-Style Licks
FIGURE 16 is a cool piano-style lick that Gilbert plays, and it’s a pointed example of his efficient picking technique. As in FIGURES 7 to 10, the guitarist begins with an upstroke to economize the movement from the high E string to the lower strings.


A lot of Gilbert’s super-fast alternate picking is based around this principle. When playing this example, keep the alternating notes on the high E and B strings separate so that they don’t bleed into each other. You can do this by releasing each fretting finger’s pressure against the string immediately after the note is picked. Also, avoid moving your fret hand excessively; it should move very little, in fact, so work on keeping the movement as efficient as possible.
Three-Octave Licks
Gilbert points out that a 24-fret guitar has a four-octave range (not including harmonics) and that the fretboard’s layout lends itself well to repeating note sequences in different octaves up and down the neck using the same fingering shape. A cool technique the guitarist likes to use is to take a short melodic idea and transpose it up and down and across the neck in octaves, as he demonstrates with the three-note A major arpeggio shape in FIGURE 17.
This technique helps develop your skill at shifting positions quickly and offers a great way of extending a short lick into a mammoth one. Notice that the initial three-note sequence is repeated on the next two higher strings using the same pattern, two frets higher and then on the top two strings, three frets higher.
This two-string concept is particularly useful for guitarists since it relies on each pair of adjacent strings, except the G and B, being tuned the same way, in fourths. FIGURE 18 is another example of this technique that Gilbert offers, this based on a more interesting six-note pattern in the A Mixolydian mode (A B C# D E F# G), which works well over an A7 chord.

To help switch from his fourth finger to his second finger between each six-note group, Gilbert uses a subtle finger slide, which is easier than trying to perfectly nail each position shift “from the air” and sounds very cool. You’ll find it helpful to first practice each six-note group separately before stringing them together. Also, keep your fret hand arched high, be- cause flattening your fingers will cause noise and slow you down.
Untranscribable Lick
“Here’s my secret lick that’s been impossible to transcribe,” says Gilbert. “I know the mental process involved and can teach your brain how to get it. There’s this kid in Japan who’s apparently an expert on my style. He plays all the stuff that I’ve done, which is kind of frightening for me! Every time I see him play, I’m like, ‘I’ve gotta learn something new!’ And so I came up with a seemingly untranscribable, lightning-fast legato lick that I’m hoping even he can’t play!”
Not letting Gilbert’s “untranscribable” tag deter us, we’ve tabbed out the lick he plays on the video in FIGURE 19. The best approach is to start with you fret hand only, which maps out the initial 11-note pattern upon which the lick is based. Gilbert uses this pattern all the time, so it’s worth getting to grips with it before adding the tapped notes.

The general principal behind the taps can be a little bit confusing at first, because Gilbert doesn’t quite do exactly what he thinks he does; even though he starts of by tapping the B note at the D string’s ninth fret on the video, when the lick is in full swing he begins taps the E note at the same fret on the G string instead. When he moves to other positions and strings, he then alternates the tapping between the two strings, but for our main lick, stick to tapping the ninth fret E on the G string.
This tap will serve as your “pulse” as you ramp the lick up to speed. Paul demonstrates this on the video, alternating between the original legato lick and the tapped lick. Listen for the rhythmic accents of each tap in the lick. This is the key to working with the odd set of notes and making the lick flow.
We can see why this lick has never been transcribed before, but it’s reassuring to see that even a player as precise and technically accomplished as Gilbert finds the lick so intuitive that it’s hard to explain.
One of the trickiest parts of playing FIGURE 19 is executing the fret-hand tap with the pinkie. This needs to be done quickly and firmly in order to generate sufficient volume for the note to be heard in balance with the other notes. Try practicing the first eight notes as a separate lick, aiming for even volume and tone between the notes. This will help with the transition between the third and fourth strings.
[[ 'Shred Alert' DVD: Let Paul Gilbert Teach You How to Shred ]]
Tapping Licks
Gilbert prefers to use his index finger to tap, favoring an upward flick to produce the initial pull-off. Experiment with your index or middle finger, using either an upward or downward flick. Your tapping hand will experience more up-and-down movement than usual, so try to avoid looking at your fretting hand at all, if possible.
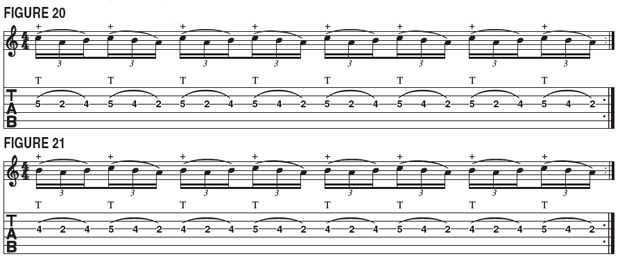
FIGURE 20 is a tapping lick that incorporates both an ascending and descending arpeggio shape. In FIGURE 21, the guitarist introduces his unique “Gilbertism” of tapping and hammering on at the same fret, in this case the fourth. The effect created in this example is a double effect on the B note. Gilbert uses this technique to great effect in many of his blazing solos. As he breaks it down in the video, you can see that it’s more a matter of coordination than hand speed.

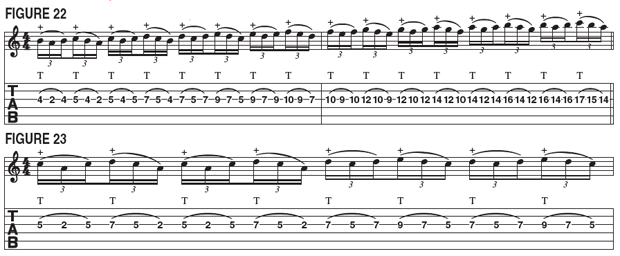
Notice in both figures that Gilbert uses the same pattern on each three-note shape. You should see the potential of using this idea on different strings and scales. In FIGURE 22, Gilbert takes this idea up the neck on the G string, staying within the A natural minor scale (A B C D E F G). The main difficulty here is getting the tapping finger out of the way of the fret hand’s third finger as both hands move up the string. Strangely, you may find this lick slightly easier to coordinate than the previous one, even though it looks more difficult!
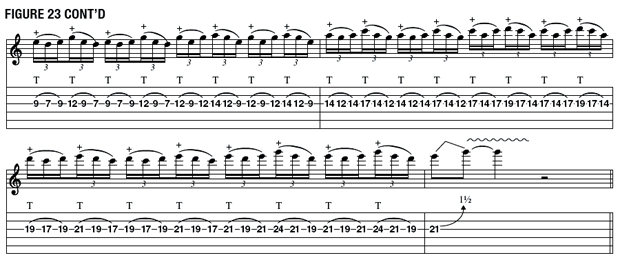
In FIGURE 23, Gilbert applies the same idea to the A minor pentatonic sale to make it sound more “rock.” Since the shapes are bigger, with the notes being spread further apart, there will be more movement between both hands, so start off by learning two or three shapes at a time and at a slower speed, then connect them and crank up the tempo. You’ll find it helpful to first get acquainted with the fret-hand shapes before adding the tapped notes. This will make it easier to work out the most comfortable fingering patterns for each. Try moving this idea onto other strings, and introduce new scales for variety.


To make your fret-hand shifts easy, use your index finger to slide to the note you have just vacated. You should be able to see this from the side without looking away from your tapping finger. Similarly, your fretting hand doesn’t move as soon as you change shape; it simply taps the same fret as the highest note in the previous shape.
[[ 'Shred Alert' DVD: Let Paul Gilbert Teach You How to Shred ]]
